Badges and incentivized reviews
Badges are icons and labels that call attention to certain contributors or reviews so that people viewing your site can easily identify content that may be important to them. Enable badges when you want to call attention to the following:
- People who are affiliated with your organization
- Top content contributors
- Experts about a product or service
- Reviews that were verified as written by someone who purchased the product or service
- Reviews written by someone who received the product or service for free in exchange for a review
Additionally, you can call attention to any review on your site by adding a featured badge.
Types of badges
Ratings & Reviews includes the following badge categories and types:
-
Affiliation
Indicates the contributor has an affiliation with the product or retail organization. There are two types of affiliation badges:
- Staff badge on native reviews—Indicates the person is employed by your company.
- Staff badge on syndicated reviews—Indicates the person is an employee of your company or has an affiliation with the product being reviewed.
-
Featured
Highlights reviews to consumers reading content on your site. These badges are assigned differently than the other badges in this list.
-
Merit
Shows the quantity and helpfulness of contributors’ content submissions. These badges are automatically calculated and applied daily.
- Top Contributor—Indicates the top contributor of useful content.
- Top 10 Contributor—Indicates one of the top 10 contributors of useful content.
- Top 25 Contributor—Indicates one of the top 25 contributors of useful content.
- Top 50 Contributor—Indicates one of the top 50 contributors of useful content.
- Top 100 Contributor—Indicates one of the top 100 contributors of useful content.
- Top 250 Contributor—Indicates one of the top 250 contributors of useful content.
- Top 500 Contributor—Indicates one of the top 500 contributors of useful content.
- Top 1000 Contributor—Indicates one of the top 1000 contributors of useful content.
-
Token-based
Provides a way to automatically assign a badge to a contributor or review based on data that is injected into the submission form. By default, two token-based badges are provided for you, which establish the authenticity of the contributor’s review and increase consumer trust in the content of the review:
- Verified Purchaser—Indicates that the contributor actually purchased the product and/or service from your site.
- Incentivized Review—Indicates that the contributor received a free product or service to review. Bazaarvoice requires this badge any time a consumer writes a review in exchange for something of value. Possible incentives include entry into a sweepstakes, coupons or discounts, loyalty reward points, and free products. Refer to Identify incentivized reviews for information about syndicated incentivized reviews.
-
Response-based
Provides a way to automatically assign a badge to a contributor or review based on the answer to a submission form question. A response-based badge indicates that the person responded in a specific way to a custom people or product question on a submission form.
-
Rank
Indicates a specific level of expertise or experience the contributor has with your products or services. There is one type of rank badge, Expert, which indicates that the person has a high level of expertise or experience with your products or services.
-
Syndicated review
Indicates that the review was syndicated from another source within the Bazaarvoice network. For example, a consumer might write a review of a product on the website for that product’s manufacturer. That review could then be shared with retailers that sell the product. This badge is applied automatically by Bazaarvoice and cannot be disabled.
Badge display order
The following section lists the order in which badges are displayed when a piece of content has multiple badges. A maximum of three badges can be shown on a wide display. Only one badge is shown on a narrow display.
Ratings & Reviews badge order:
- Incentivized review (token-based badge)
- Verified purchaser (token-based badge)
- Featured
- Staff (affiliation badge)
- Top contributor
- Expert (rank badge)
- Response-based
Enable badges
Complete the following steps to enable badges for your implementation:
- Contact your Bazaarvoice representative or Bazaarvoice Support to enable affiliation badges, top contributor badges, rank badges, and token-based badges.
- Sign in to Bazaarvoice Portal
 .
. - Select Configuration from the Portal menu
 located in the upper-left corner.
 - Select an instance.
- Select Go to Configuration. The Site Manager appears, listing the available deployment zones and implementations.
Note:You can also add new deployment zones and implementations on this screen.
- Under Implementations, use the filter to find the name of the implementation you require.
- Select Edit next to the implementation you want to configure.
- From the menu on the left side of the page, select Badge Editor under User Experience. A list of available badges opens in the main window.
- Turn on the toggle switch on the right side of the badge name to enable a badge for your implementation.
- Select the home icon in the upper-left corner to return to the Site Manager.
- Under Implementations, use the filter to find the implementation you have configured.
- Deploy the changes to the implementation.
Configure badges
Complete the following steps to configure an enabled badge:
- Sign in to Portal .
- Select Configuration from the Portal menu located in the upper-left corner.
- Select an instance.
- Select Go to Configuration. The Site Manager appears, listing the available deployment zones and implementations.
Note:You can also add new deployment zones and implementations on this screen.
- Under Implementations, use the filter to find the name of the implementation you require.
- Select Edit next to the implementation you want to configure.
- From the menu on the left side of the page, select Badge Editor under User Experience. A list of available badges opens in the main window.
Note:If a badge is not available, contact your Bazaarvoice representative Bazaarvoice Support . You must enable affiliation, top contributor, rank, and token-based badges.
- Select Edit on the right side of the badge name to open the Edit Badge Details dialog box.
- If available, use the Currently Editing drop-down list to select the locale in which you want to display the text in the Description text area.
- If available, type text in the Label field, which we will use if the custom badge image is missing. We will also use this field as the description if the description is missing and you have uploaded a custom badge.
Note:You can’t customize the badge label and badge icon. If you specify a label, we use the default badge icon. If you upload a custom icon, we use the default badge label.
- In the Description text area, enter a brief explanation about why the badge applies to the associated contributor. This text displays when the person viewing your site hovers over the badge.
- To display a custom image with the badge, select Upload Image. If you have already configured an image for the badge, select Edit > Upload New. To delete an image, select Edit > Remove image.
Note:You can’t customize the badge label and badge icon. If you specify a label, we use the default badge icon. If you upload a custom icon, we use the default badge label.
Valid image types are PNG, GIF, or JPG. Badge images must be a minimum of 50px in height (maximum of 100px) and have a minimum width-to-height ratio of 1:1 (maximum 6:1). The badge will display on the submission form at 25px high for retina display. We attach the below images by default to the following badge types:

Top contributor 
Staff (affiliation badge) 
Featured 
Incentivized review 
Expert (rank badge) - Select Save Changes to save your edits.
- Deploy the changes to the implementation.
Add a token-based or response-based badge
By default, two token-based badges are provided—incentivized review and verified purchaser—but no response-based badges are provided. The type of badge you create depends on your needs:
- Add a token-based badge if you want to assign a badge to a contributor or review based on data that is injected into the submission form. If the submission form question is hidden, you must create a token-based badge that passes the information through a simple submission URL (ssURL) or data injection. For example, to assign a Staff affiliation badge with a simple submission URL, you can create an ssURL that automatically adds the default Staff affiliation badge to reviews left by staff members who use that link. To create an ssURL that you can distribute to staff members, refer to the list of parameters in Support Community.
- Add a response-based badge if you want to assign a badge to a contributor or review based on the answer to a submission form question.
Note: You cannot use a hidden submission question to apply a response-based badge to the submitted content. Instead, use a token-based badge.
For example, you may want to badge all reviews that are submitted on your website to indicate that the reviews are native and not syndicated. To achieve this, create a token-based badge, which is documented in detail below. Here is an overview of the steps:
- Create a product question on your submission form that is hidden and allows one value, such as “true.”
- If using hosted authentication, create an ssURL to be sent to consumers that links to the submission form. The value of the hidden question is injected into the submission form URL.
If using site authentication, create a
userTokenthat injects the value of the hidden question into the submission form. - Create a token-based badge that is associated with the hidden question.
- Send the ssURL to consumers in a review request (formerly post-interaction email or PIE). When a consumer selects the link and fills in the form to submit a review, the injected data is captured and the review is tagged with the custom token-based badge. Watch this short video to see the steps needed to create a response-based or token-based badge:
To create a token-based or response-based badge, complete these steps:
- Sign in to Portal .
- Select Configuration from the Portal menu located in the upper-left corner.
- Select an instance.
- Select Go to Configuration. The Site Manager appears, listing the available deployment zones and implementations.
Note: You can also add new deployment zones and implementations on this screen.
- Under Implementations, use the filter to find the name of the implementation you require.
- Select Edit next to the implementation where you want to add a badge.
- From the menu on the left side of the page, select Submission Form Editor under User Experience.
- Add or edit a submission form question whose answer or contributor you want to badge.
When adding or editing the badge, be aware of the following:
- We only support People and Products question categories and Drop-down Select question types.
- If you create a token-based badge, you can select Hide on submission when configuring the question.
- Be sure to take a note of the question ID, which you will require in step 12.
- From the menu on the left side of the page, select Badge Editor under User Experience.
- In the Response-based Badges or the Token-based Badges section, select Add a new badge.
- Provide the following details:
- From the Question drop-down list, select the submission form question that you want to associate with the new badge.
- From the Answer drop-down list, select the answer whose contributor or review you want to badge.
- Type text in the Label field. We will use this text if the custom badge image is missing, or we will use it as the description if the description is missing and you have uploaded a custom badge.
Note: You can customize the badge label or the badge icon. If you specify a label, we use the default badge icon. If you upload a custom icon, we use the default badge label.
- In the Description text area, enter a brief explanation of why the badge is applied to the user or content. This text displays as a tooltip when the person viewing your site hovers over the badge.
- Select Upload Image to add a custom image for the badge. Valid image types are PNG, GIF, or JPG. Badge images must be a minimum of 50px in height (maximum of 100px) and have a minimum width-to-height ratio of 1:1 (maximum 6:1). The badge will display on the submission form at 25px high for retina display.
- Select Save Changes to save your edits.
-
If you’re using hosted authentication, construct a ssURL. This ssURL will inject data into the submission form and trigger badging. Refer to How to create an ssURL
in Support Community for more information.If you’re using site authentication, construct a UAS token that includes a custom key that specifies the question and answer IDs. Include this token in the
userTokenproperty. Refer to UAS steps in Site authentication for details. Here is an example of an unhashed and unencoded UAS token that includes the “NativeReview” question ID and “true” answer value:date=20161225&userid=shopper123&NativeReview=true - Deploy the changes to the implementation.
Assign a badge to a contributor or review
The method of assigning badges varies depending on the type of badge. The following sections provide information about assigning the various badges and explain how to assign a badge to more than one contributor or review at a time.
Affiliation and rank badges
Manually assign badges to specific contributors by modifying the contributor’s role.
- From Workbench, select Settings > Modify Contributor Roles under the Contributor Settings section.
- Search for the contributor you want to assign a badge by either:
- entering the beginning of their user ID or display name (nickname)
- searching for them by their current contributor role status
- From the table, select the contributor to whom you want to assign a badge. A list opens showing the user ID, display name, and badge statuses.
- Select whether the contributor is a staff member, expert, or eligible for one of the top contributor badges.
- Select Save to update the table that lists all of the contributors and their roles
Featured badge
Complete the following steps to assign a featured badge to a review:
- From Workbench, select Content > Ratings & Reviews under the Content Dashboards section.
- Select the calendar icon to the right of the Date filter. Select a predefined range from the drop-down menu or enter a custom range of dates. You can further refine the search using the Product, Content, and Moderation filter categories, all located beneath the Date filter. Hover over the category and select a filter from the drop-down menu. Each filter includes additional options to narrow the search parameters.
- Select Show Reviews.
- Hover over the review you want to feature and select Show Details.
- In the pop-up dialog box, set Featured to Yes.
- Select Save.
The review is displayed with the featured badge, as shown in the following image.

Response-based and token-based badges
For custom response-based and token-based badges, the badges are automatically assigned to contributors or reviews based on the answer that is chosen when the badge is created.
Verified purchaser badges are assigned in two ways:
- When a contributor accesses the review submission form by selecting the link in a review request and submits that review.
- When you inject badge credentials into a user authentication string (UAS).
Incentivized review badges are assigned to reviews in two ways:
- When badge credentials are injected into the “Received free product” question on the review submission form.
- When badge credentials are injected into a user authentication string (UAS). This is particularly useful if you are driving review volume through incentivized review campaigns. By using an ssURL , you can ensure your review source is transparent to consumers.
You do not need to perform additional steps to assign verified purchaser or incentivized review badges.
Top contributor badges
Top contributor badges are automatically assigned to contributors based on qualifications that Bazaarvoice has defined for that specific badge. The winners of these badges are calculated nightly. You do not need to perform additional steps to assign top contributor badges.
Assign badges to multiple users
Complete the following steps to assign staff (affiliation), expert (rank), or merit badges for more than one contributor at a time:
- From Workbench, select Settings > Assign Contributor Roles in the Contributor Settings section.
- In the User IDs text box, enter the user IDs of contributors to whom you want to assign badges.
- From the drop-down lists below the text box, choose the badge(s) to assign to the users:
- Select Staff from the Assign User IDs to the following staff status drop-down list to assign the staff badge to the users.
- Select Expert from the Assign User IDs to the following expert status drop-down list to assign the expert badge to the users.
- Select Eligible from the Merit Badge Eligibility drop-down list to enable the system to assign the merit (top contributor) badges to the users.
- Select Preview. A page is displayed that shows your changes.
- Select Assign. The badge eligibility is applied to the contributors. If a user ID you entered in step 2 is not in the Bazaarvoice database, that user ID is added to the database.
Identify incentivized reviews
If a consumer receives an incentive and then submits a review, that review is called an incentivized review. An incentive might include a free or discounted product or service, an entry into a sweepstakes, and loyalty reward points.
You must inform consumers when reviews are incentivized. Online shoppers expect this level of transparency, and disclosing incentivized reviews helps build trust between consumers and your company. Bazaarvoice is committed to content authenticity. We believe consumers have a right to trust the reviews they read. We also believe businesses have a responsibility to ensure that reviews they present about their products and services are legitimate. Refer to the Bazaarvoice Authenticity Policy for more information about content authenticity guidelines.
How does it work?
Identify incentivized reviews on your website with badges. A badge is an icon that is displayed next to the review if incentivized review badges are enabled on your site. The following example shows an incentivized review badge:
Incentivized review badges are assigned to reviews in two ways:
- When badge credentials are injected into the “Received free product” question on the review submission form.
- When badge credentials are injected into a user authentication string (UAS). This is particularly useful if you are driving review volume through incentivized review campaigns. By using an ssURL, you can ensure your review source is transparent to consumers.
For syndicated reviews, the reviews do not include the incentivized review badge. Instead, Bazaarvoice appends the following text to each syndicated review:
[This review was collected as part of a promotion.]
Configure incentivized review badges
Complete these steps to configure an implementation to assign incentivized review badges:
- Sign in to Portal .
- Select Configuration from the Portal menu located in the upper-left corner.
- Select an instance.
- Select Go to Configuration. The Site Manager appears, listing the available deployment zones and implementations.
Note: You can also add new deployment zones and implementations on this screen.
- Under Implementations, use the filter to find the name of the implementation you require.
- Select Edit next to the implementation to which you want to assign incentivized review badges. If you are using a single deployment zone, select Edit next to the implementation file on the Site Manager page. If you have multiple deployment zones, determine which implementation to edit by examining the URL referenced on your website:
- Locate the container page on your site.
- View the page source and locate this element:
<script type="text/javascript" src="https://display.ugc.bazaarvoice.com/bvstaging/static/<client_name>/<site_ID>/<locale>/bvapi.js"></script>The URL maps to the implementation you need to modify. Replace <client_name>, <site_ID>, and _
_ with your values, and remove bvstaging/ if the URL points to a production environment. - Return to the Site Manager and select Edit next to the implementation for the identified deployment zone (site ID).
- Enable the incentivized review badge, which is a type of token-based badge:
- From the menu on the left side of the page, select Badge Editor under User Experience.
- In the Token-based Badges section, turn on the toggle switch on the right side of the Incentivized Review row to enable the badges.
Note: You can select Edit next to the toggle switch to edit the badge details.
- Enable Bazaarvoice to match incentivized review badges to reviews submitted by contributors who received free products or services:
- From the menu on the left side of the page, select Submission Form Editor under User Experience.
- Select
 located in the upper-left corner of the page to find the product category or subcategory of the submission form you want to modify. Your product feed generates the list of categories.
Note: The editor automatically displays the All Products submission form. If you add, edit, or delete questions in this particular form, the editor applies your changes to all linked forms.
- On the right side of the Product section, select + New Question to open the Add a New Product Question dialog box.
- Select Add This Question on the right side of the Received free product row to edit the product question. Received free product is the default question that the submission form editor generates with the IncentivizedReview question ID.
Note: If the Received free product question is not available in the list of default questions, the question is already defined for the implementation. You can’t add a custom question for incentivized content because the Received free product question already uses the appropriate question ID.
It is also important to remember that you should add the Received free product question as a product question and not as a people question.
- If you are using a sitewide campaign to collect incentivized reviews, such as a sweepstakes, we recommend that you indicate this in the question’s text. Select Edit on the right side of the question you added in step c. and modify the text in the Display Label field to indicate that the reviewer is opting into a campaign. For example, you could type this text: “I would like to be entered into the sweepstakes.”
- If you are only collecting incentivized reviews through an email campaign, you might want to hide the question on the submission form. You can do this by selecting Hide on submission under Global Question Settings.
- Select Save Changes to save your edits.
- If you are using an ssURL to request reviews through an email campaign, make sure the ssURL includes the relevant parameters. Refer to the incentivized reviews example in Support Community for more information.
- Deploy the changes to the implementation.
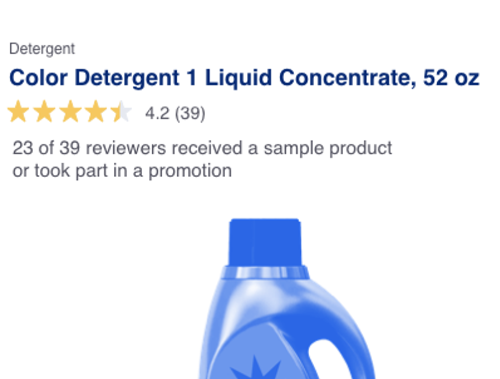
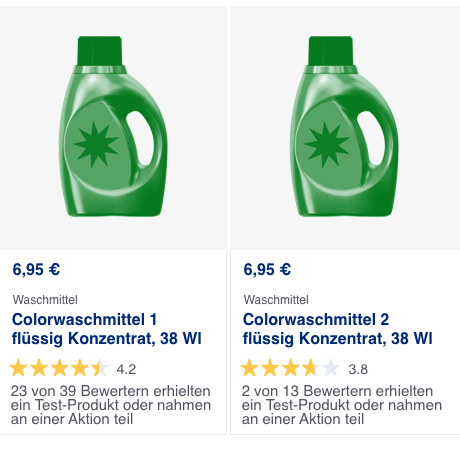
Display incentivized content summaries
Display how many of a product’s reviews were incentivized by enabling incentivized content summaries. When enabled, the summary text displays under the five-star average product rating in the following display modules:
- Ratings summary
- Reviews
- Inline ratings Here are two examples showing the incentivized content summary text:
Follow these steps to enable incentivized content summaries:
- Sign in to Portal .
- Select Configuration from the Portal menu located in the upper-left corner.
- Select an instance.
- Select Go to Configuration. The Site Manager appears, listing the available deployment zones and implementations.
Note: You can also add new deployment zones and implementations on this screen.
- Under Implementations, use the filter to find the name of the implementation you require.
- Select Edit next to the implementation you want to configure.
- From the menu on the left side of the page, select Display Options under User Experience.
- Select the Ratings & Reviews tab.
- Go to Incentivized Content Summaries. Under Incentivized Reviews, select Enabled.
- Deploy the changes to the implementation.
Reviews badged as incentivized prior to enabling incentivized content summaries are automatically included in the summaries’ review counts. If you enable the feature but don’t have incentivized content, the summary text will not appear on your website.
The standard summary text is:
- English—n of n reviewers received a sample product or took part in a promotion.
- Deutch—n von n Bewertern erhielten ein Test-Produkt oder nahmen an einer Aktion teil.
- Français—n sur n consommateurs ont reçu un échantillon de produit ou ont participé à une promotion. The text is available in all supported languages. It complies with Bazaarvoice authenticity guidelines and has been tested with consumers; it cannot be altered.