Create and launch a campaign
With members and (optionally) vendors in place, you are ready to set up a campaign.
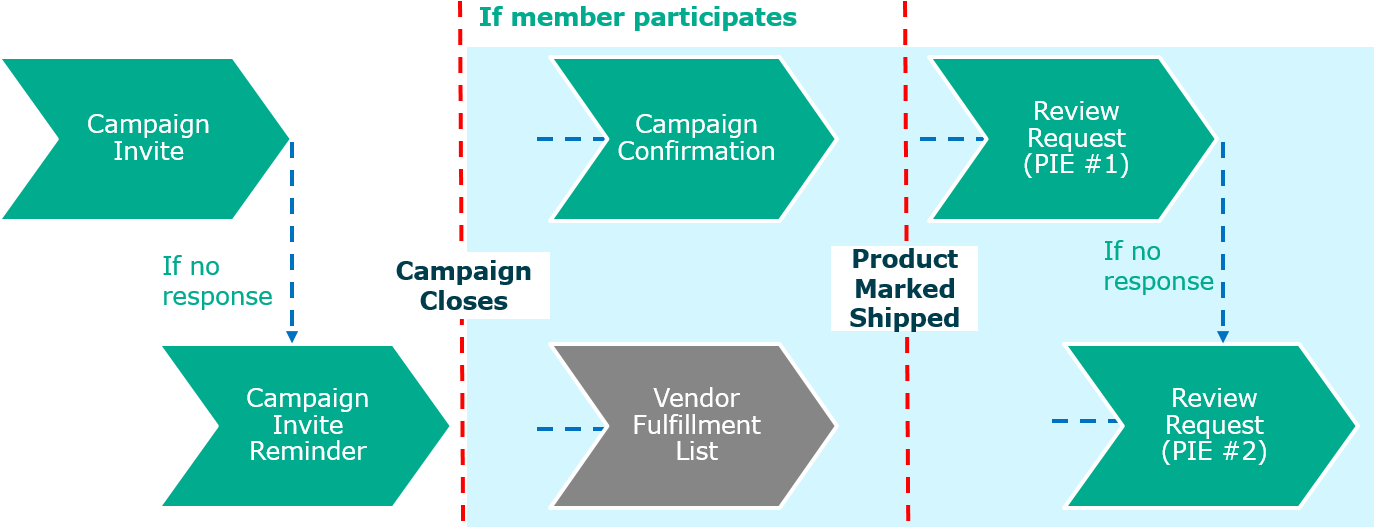
Here is an overview of when email messages are sent over the course of a campaign:
Before beginning
-
Be aware that the following email templates are used during a campaign:
- Campaign invite email (this template is modified in the procedure below)
- Campaign confirmation email
- Campaign invite reminder email
- PIE #1
- PIE #2
- Vendor fulfillment list
Configure the templates before or immediately after launching a campaign.
- For existing products, the product name and image included in email messages are taken from product definitions in the Bazaarvoice Ratings & Reviews product feed. You may want to make sure that the name and image are consumer-friendly.
- For new, unreleased products, it is recommended that you add the product to the product feed (in Ratings & Reviews). However, you can add an unreleased product before creating the campaign or during campaign creation, if you are uncertain whether the product will become widely available after the sampling campaign.
Creating a campaign
- Log in to the Sampling portal using your admin credentials.
- Click Campaigns at the top of the portal
- Click + Add New Campaign on the View Campaigns page.
- On the Step 1: Name Campaign page, provide an outward-facing name for the campaign in the Public Name field. This name is visible to your members and vendors, and it appears on reports.
- In the Internal Name field, change the default internal name of the campaign, if you want. You can use this name to filter and build reports from the Bazaarvoice Ratings & Reviews workbench. Bazaarvoice uses this name for internal campaign tracking, and to differentiate among campaigns with duplicate external names.
- Click Next.
- On the Step 2: Schedule Campaign page, in the Start Date and End Date fields, select start and end dates for the campaign. This establishes the period during which invited members can select the free products you offer.
When determining campaign length and cadence, consider these recommendations:
- Allow at least one week for members to select free products.
- Run a single campaign in any given period. Although you can run multiple campaigns simultaneously for the same members, it is not recommended.
- Launch campaigns at a regular cadence, as allowed by your business. Once monthly, at the same time each month, is good practice.
- Specify when reminders will be sent to members:
- Send Campaign Invite Reminder – Specifies when to send a reminder to members to register with the campaign. The content of this reminder message is provided in the "Campaign invite reminder email" template.
- Send Review Reminder 1 – Specifies when the first review reminder is sent after the product ships. To opt out of a reminder, enter a value of 0. The content of this reminder is provided in the "PIE #1" template.
- Send Review Reminder 2 – Specifies when the second review reminder is sent. The content of this reminder is provided in the "PIE #2" template.
- Click Next.
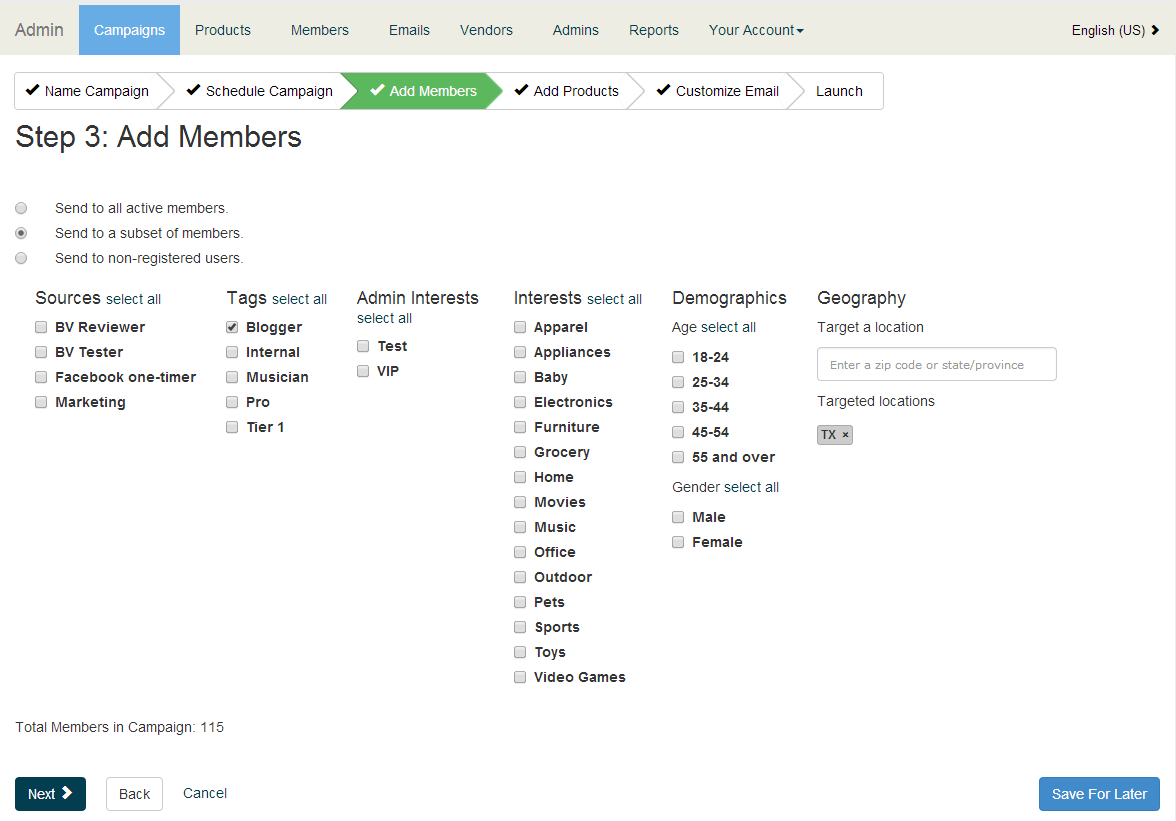
- On the Step 3: Add Members page, select one of these options to invite members to your campaign:
- Send to all active members – Select this option to send the campaign invitation to all registered members with active status. Use this method if you are offering a widely appealing product or you have limited sampling membership.
- Send to a subset of members – Select this option to send the campaign invitation to a subset of members, based on demographic data and metadata. Use this method to leverage your membership through filtering based on business and brand-specific targeting criteria.
If you choose to send to a subset of members, these tabs are displayed:
- Interest Categories – Includes internal information that you provide and that members cannot view or change (Sources, Tags, and Admin Interests) and information that your members provided when they register for the campaign (Interests, Demographics, and Gender).
- Language and Locales – Includes languages and locales that were gathered from members' profiles, which were specified when members registered with the portal. Locales are available only if you are sampling products in multiple countries.
- Custom Profile Questions – Enables you to target members for campaign participation based on how they responded to questions when they registered with your sampling program.
Each of the data types selected is a mathematical AND. Each of the data fields within a data type is a mathematical OR.
In the following illustration, 103 members are (interested in Grocery OR Health & Beauty) AND (tagged as Bacon OR Blogger OR Professional) AND (is in targeted location Texas). Members who do not match these parameters will not receive the campaign invitation. The Total Members in Campaign number is updated as you change the parameters.
- Send to non-registered users – Select this option to generate a unique URL that will allow only a certain number of new, non-member invitees to participate. For example, you can create a campaign and paste the URL to Facebook to give a certain number of responders a chance to receive free products in exchange for registering their profiles. You can select users based on internal information that you provide and that members cannot view or change (Tags, Sources, and Admin Interests) and information that users provide when they register for the campaign (Interests).
This method is not recommended because no member targeting is done here, unless targeting was done outside of the portal.
- Import existing members – Upload a CSV file of members, as described in Invite advocates to become members. Use this method to target members at a more detailed level than supported by the portal, such as if you make sure not send to members that were included in the prior campaign. This method usually involves additional manual effort.
- Click Next.
- On the Step 4: Add Products page, select the Enable Category Navigation option to enable members to sort product offers by category when they are select products to sample during a campaign. Otherwise, members cannot sort products on their portals.
- In the Maximum number of products per customer field, type the number of products that each member can choose during a campaign.
- In the Products per page field, specify the maximum number of products that are displayed on the Offers tab of the members' portals. Bazaarvoice recommends that you specify 8 (or less).
- Choose the products to offer:
- To add existing products, which are specified in your Bazaarvoice product feed, click + Add Existing Products to search for a product by value such as name or product ID. Existing products may also be those that are vendor-nominated or unreleased products created in the past.
- To add a new, unreleased product that is not in your product feed, click + Add Unreleased Product and then provide these values:
- Product Name–Official name of the product. This information is required.
- SKU/Product ID–Stock keeping unit (SKU) or product ID. This information is required. If necessary, provide a temporary ID and then you can migrate all reviews collected against this temporary ID to the released product ID later.
- Category–Type of product. This information is required.
- Description–Detailed description of the product.
- Image–Image or URL to an image that will be displayed to the member
- Fair Market Value (FMV)–Fair market value (FMV) of the product, which is the general market price of the product on your website.
- Inventory Quantity–The number of samples that will be available during the campaign. This information is required.
- Vendor – Vendor that was added to the portal and will fulfill shipping requests for the product. This information is required.
- Brand – Brand or manufacturer of the product. This information is required.
- Click Import Products – Upload a CSV file of products.
- To add existing products, which are specified in your Bazaarvoice product feed, click + Add Existing Products to search for a product by value such as name or product ID. Existing products may also be those that are vendor-nominated or unreleased products created in the past.
- If you have set up vendors, select the appropriate vendor for each product if the vendor was not set for the product.
- Update the fair market value (FMV) of each product, if necessary. FMV is the general market price of the product on your website. Use this to track the total value of products you give away.
- Specify the quantity of each product that will be available during the campaign.
- Click Next.
- On the Step 5: Customize Email page, configure the following:
- Subject – Include a clear and compelling call-to-action so that recipients understand what you are asking them to do. Use 9-14 words, if possible, and be cognizant of spam filter triggers, such as special characters, all capital letters, and so on. This field allows up to 50 characters.
- Header (title) – Provide a clear and concise title to the email message. You can specify up to 50 characters.
- Body – Include a single call-to-action to limiting distracts of other marketing messages. Provide clear and concise messaging so that members can quickly identify the action you want them take. You can specify up to 200 words.
- Signature (if available) – Specify a signature that is consistent with your brand and messaging. You can include up to 50 words. Example: Thanks for participating. Your input is important to us! Your Brand Team
- Banner image – Upload or reference a JPEG file that is 600x200px. You must have the license to use any images, graphics, and logos you provide (do not use copyrighted images without permission).
- To send a test email message, enter one or more email addresses in the Send test email to: field, and then clicking Send. To specify multiple addresses, separate each address with a comma.
- Modify the email template as necessary based on the test email.
- When finished, click Next.
- On the Step 6: Launch page, review your selections.
- To modify a component of the campaign, click
 and make your changes.
 - When you're satisfied with your selections, click Launch Campaign.
Selected, registered members will receive the campaign invitation at the scheduled start date and time, thus kicking off the product request period. Members also will receive a review request (post-interaction email) at a future scheduled date.