Single sign-on (SSO) setup with Azure AD
To set up SSO using Azure AD as your identity provider (IdP), follow the below steps.
Add an SSO app to your IdP
- Sign in to Azure AD.
- Give your SSO app a descriptive name, for example, Bazaarvoice SSO. When you’re prompted to add SSO app details, add sample credentials for now.
Note: You will be required to add the permanent SAML values in Step 4 of the setup wizard, visible in the following image. Bazaarvoice will provide these values during setup.

-
During setup, Bazaarvoice provides the sign-in user attributes. Map these to your Azure AD attributes.
Azure AD Mappings

Group IdP access
If required, your IdP administrator can set up group access to your Azure AD portal. The administrator can then add all users who need access to the Bazaarvoice Portal to this user group. Members of this group can access the Bazaarvoice platform in their personal dock and will be able to sign in to Bazaarvoice solutions through SSO once it has been enabled.
Create a new SSO configuration
To get started:
- Sign in to the Bazaarvoice Portal
 .
. - From the upper-right corner, select the settings icon
 .
. - Select Manage Users.
Note: Only Account Administrators can access Users & Permissions. If you’re not assigned the Account Administrator role, sign in to Portal, go to your Profile page and select View Administrators to see who can assign you this role.
- Select the Single sign-on tab.
-
Select Create SSO Configuration in the upper-right corner. The five-step SSO setup wizard will guide you through the following tasks:
- Configuration setup
- Base permissions
- Identity provider settings
- SAML protocol settings
- Email domains
Five-step wizard
To complete the five-step wizard, follow the instructions in this video or in the written steps that follow. You can select Save and exit at any time if you need to exit the wizard and return later.
Step 1: Add configuration details
Add your SSO configuration details:
- Specify a unique configuration name.
-
Select Azure AD.

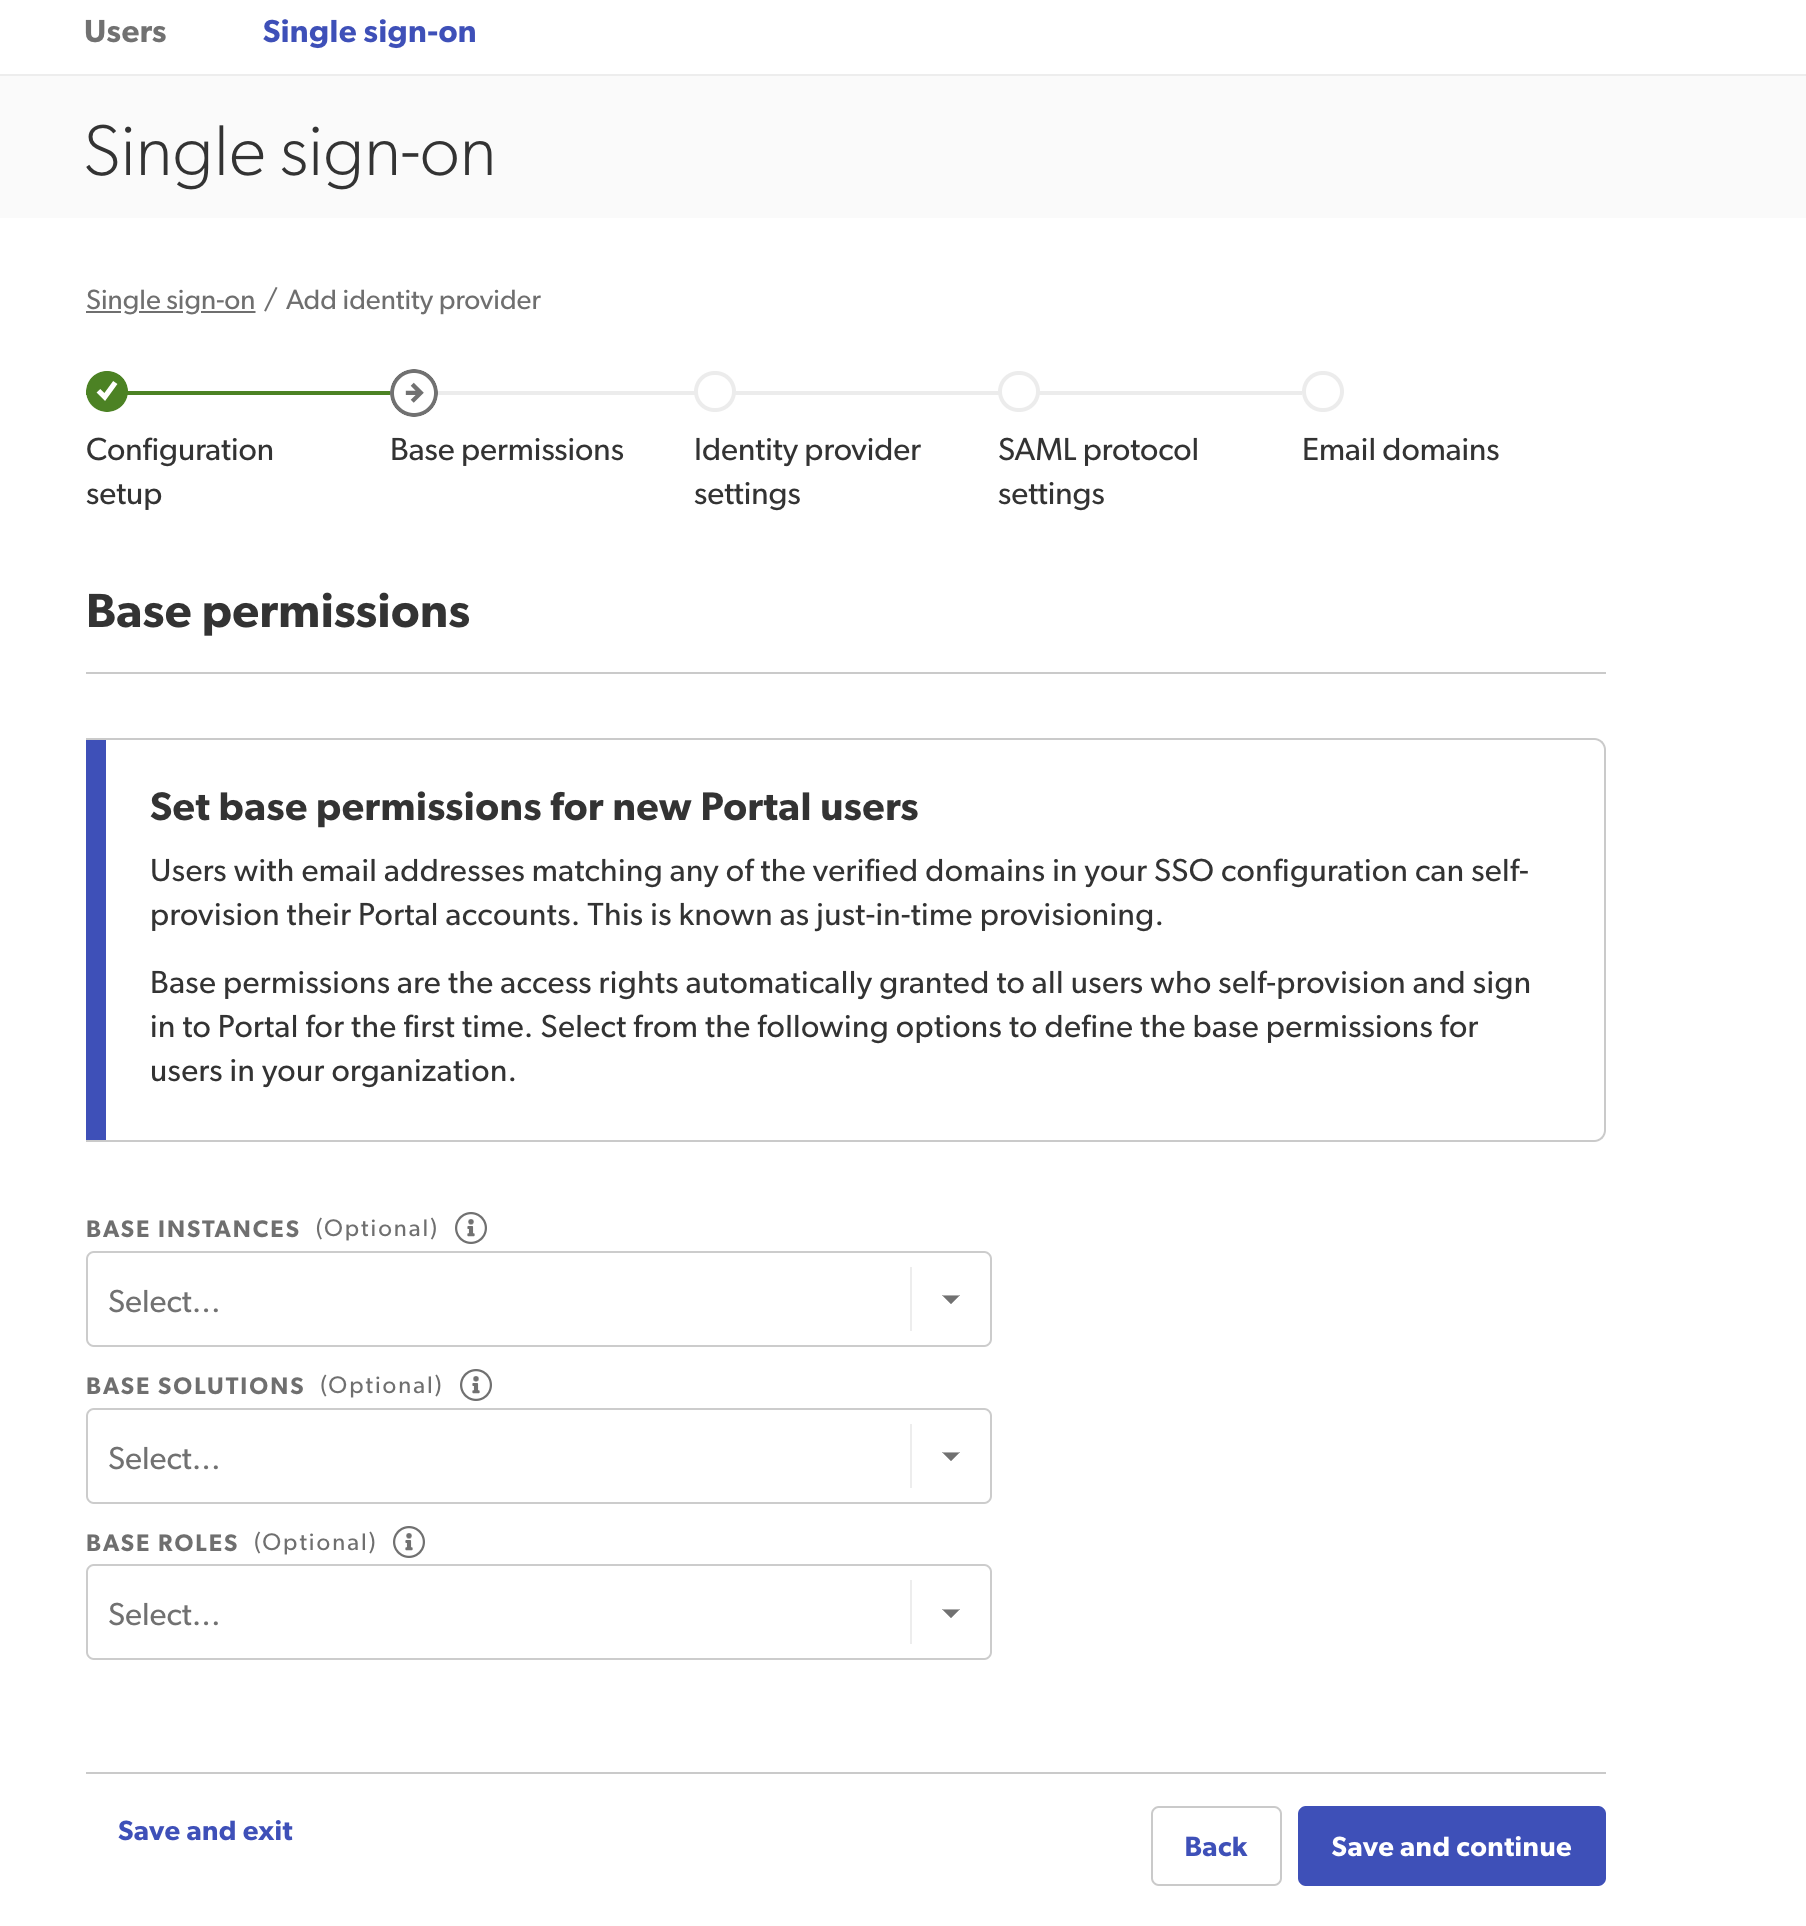
Step 2: Assign base permissions
Assign base permission details for any of your Bazaarvoice products. This step will apply base level permissions for all newly created users within your domain. However, you can only assign permissions to instances, solutions, roles, or settings to which you already have access.
The first time a new user signs in using SSO, a new account is created automatically using these base settings. You’ll no longer have to create new users (with your domain name) manually. You can edit these accounts if necessary.
- Set base permissions in the following sections:
- Base instances—Select which instances users can access.
- Base solutions—Select which Bazaarvoice solutions users can access.
- Base portal roles—Assign base roles to users. Roles will only appear after you have assigned solutions.
- Social commerce-Assign Social Commerce settings.
- Select Save and continue.
Step 3: Copy identity provider settings
- Copy the Issuer URI from your Azure AD account and paste it into the Identity provider issuer URI field. For example, https://your-idp.endurancecycles.com.
- Copy the SP-initiated SSO URL (not the IdP-initiated SSO URL) from your Azure AD account and paste it into the Identity provider issuer URI field. For example, https://your-idp.endurancecycles.com/your-idp-path/.
- Upload a valid, up-to-date x.509 certificate issued by Azure AD in Identity provider settings.
Note: This x.509 certificate is a text file that authenticates the identity of your users and your IdP. It must be a valid file type such as .pem, .cer, .crt, .cert, .der, .p7b, .p7c, .p12.

- Select Save and continue.
Step 4: Copy SAML protocol settings
- Copy your SAML protocol settings by selecting Copy to the right of each set of protocol values.
- Paste them into the configuration section of your Azure AD account.
Tip: For further support from Azure AD, refer to their help documentation.
- Replace the sample ACS and URI values you entered earlier with these SAML protocol values:
- ACS (Assertion Consumer Service) URI
- Audience URL
- Default Relay State
- Confirm you have completed this step by selecting the checkbox that reads I have added the above information to my IdP’s configuration section.
-
Select Save and continue.

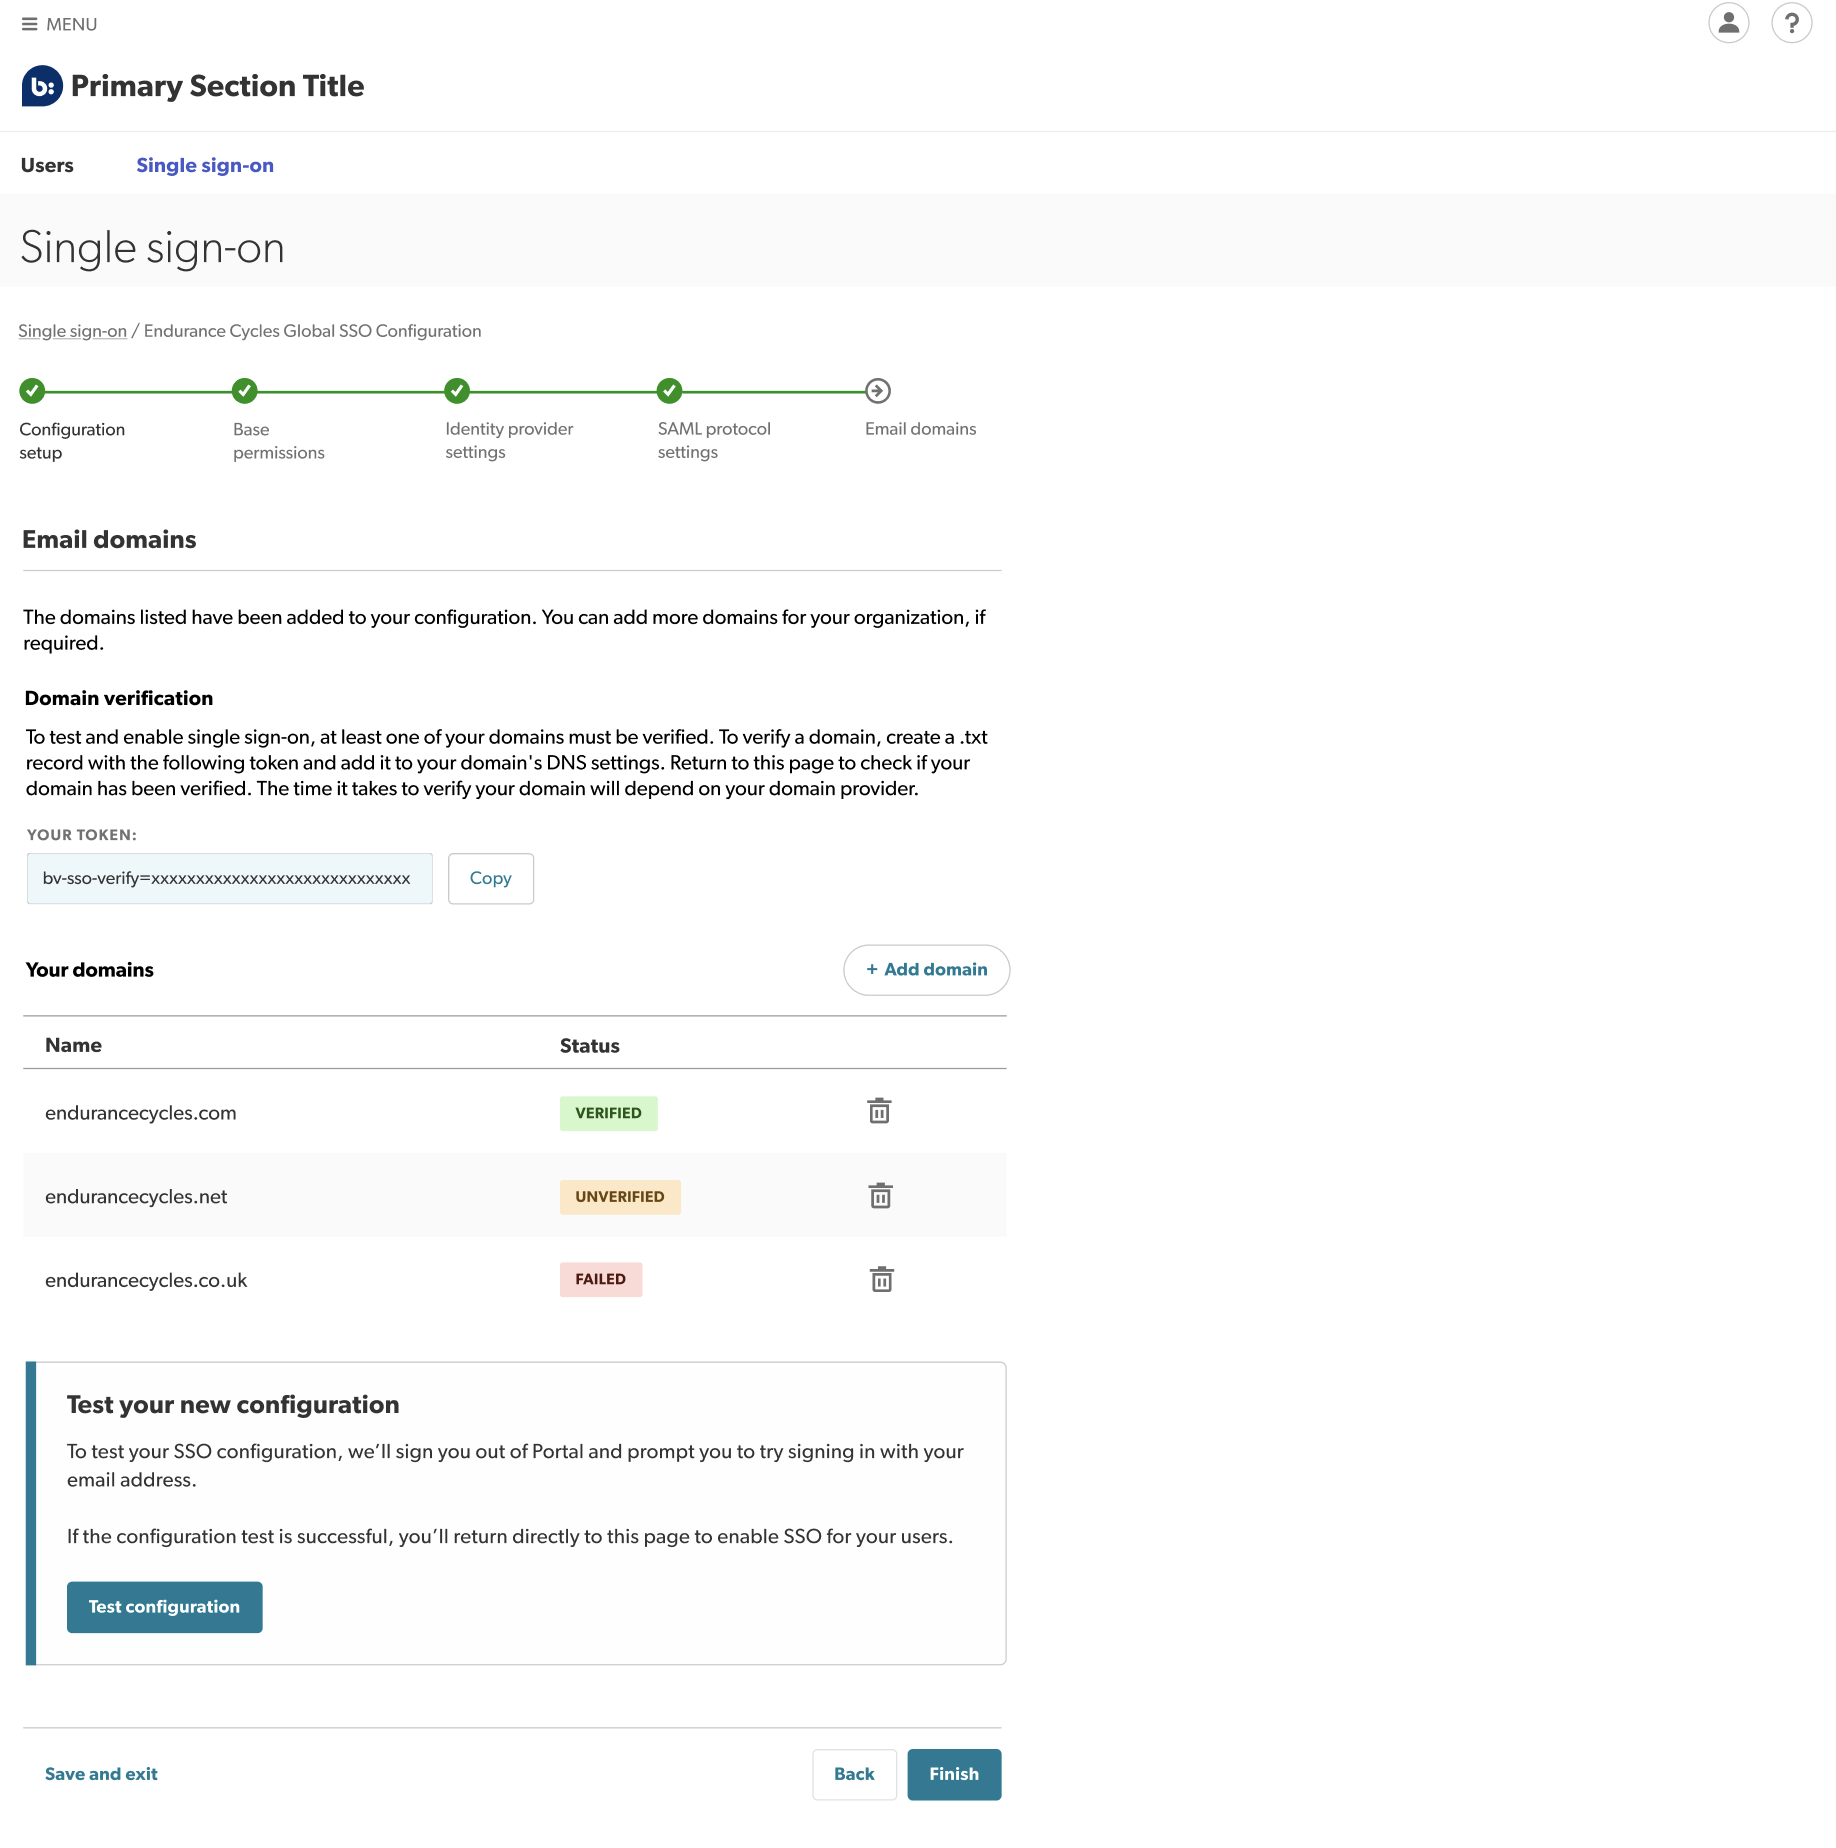
Step 5: Add and verify email domains
You can now add and verify your email domains, for example, endurancecycles.com. This verification process provides extra security by ensuring that only users with your verified domain(s) can use your SSO configuration.
- Add your domains by selecting Add domain.
- Verify your domains.
- To test or enable your configuration, at least one of your domains must be verified.
- A verification token will be automatically populated, allowing you to create a .txt record following the domain list table.
- Copy this token and add it to your domain’s DNS settings.
Note: Depending on your domain provider, it could take hours or several days to verify your domain. Refresh or return to this page later to check if your domain has been verified. - Test your configuration.
- Once you have at least one verified domain, you are ready to test and enable your configuration.
- Select Test configuration. You will then be signed out of the Bazaarvoice portal and redirected to the sign-in page.
- Sign in to the Bazaarvoice portal using your corporate email address.
Note: If testing is successful, you will return directly to the setup wizard. If there is a problem, you can sign in using your username and password as normal. - Enable your configuration. To enable your configuration for everyone in your organization, select Finish.
Caution: Once your configuration is enabled, you will no longer be able to test it.