Federated single sign-on
What is single sign-on (SSO)?
Single sign-on is an authentication feature which allows users to sign in with a single username and password to multiple Bazaarvoice platforms or applications.
Why switch to single sign-on?
- Enhanced security—SSO provides two-factor authentication through your corporate identity provider (IdP)
- Reduced administration costs—It saves time as setup only needs to be completed once to access multiple Bazaarvoice platforms
- Improved user experience—A single username and password is used to connect to all areas of your Bazaarvoice package
When new users sign in to the Bazaarvoice Portal using SSO, user accounts are created automatically using your corporate identity provider base settings. Learn more about this in Step 2 of the setup guide.
What happens once you’ve set up SSO?
- You’ll no longer need to manually set up user accounts in Portal. New user accounts are automatically created for users from your organization who sign in to Portal for the first time using SSO.
- User profiles will be populated with information from your corporate IdP account.
- Your Bazaarvoice account will be linked to your corporate IdP so that you can update a user’s credentials (name or password) through your corporate IdP account. You will only need to manage one set of credentials.
SSO setup
Select your IdP from the following list to read setup steps specific to it.
If you use a different IdP, follow these generic steps:
Add an SSO app to your identity provider
- Sign in to your corporate IdP account.
- Give your SSO app a descriptive name, for example, Bazaarvoice SSO. When you’re prompted to add SSO app details, add sample credentials for now.
Note: You will be required to add the permanent SAML values in Step 4 of the setup wizard, visible in the following image. Bazaarvoice will provide these values during setup.

- Map the sign-in user attributes provided by Bazaarvoice to your corporate IdP attributes. These attributes will vary depending on your IdP.
If you are unable to create the app without the details generated in Step 4, complete the following steps:
- In Step 3 of the wizard, you will be asked to enter values generated by your IdP. If you have been unable to set up the app, add sample details at this stage.
- Continue to Step 4 of the setup wizard and copy the generated details to your IdP, which should allow you to complete setup of your IdP app.
- Once you have successfully setup your IdP applciation, return to Step 3 and replace the sample details with the correct details generated by your IdP.
Group IdP access
If required, your IdP administrator can set up group access to your IdP. The administrator can then add all users who need access to the Bazaarvoice Portal to this user group. Members of this group can access the Bazaarvoice platform in their personal dock and will be able to sign in to Bazaarvoice solutions through SSO once it has been enabled.
Create a new SSO configuration
To get started:
- Sign in to the Bazaarvoice Portal
 .
. - From the upper-right corner, select the settings icon
 .
. - Select Manage Users.
Note: Only Account Administrators can access Users & Permissions. If you’re not assigned the Account Administrator role, sign in to Portal, go to your Profile page and select View Administrators to see who can assign you this role.
- Select the Single sign-on tab.
- Select Create SSO Configuration in the upper-right corner. The five-step SSO setup wizard will guide you through the following tasks:
- Configuration setup
- Base permissions
- Identity provider settings
- SAML protocol settings
- Email domains
Five-step wizard
To complete the five-step wizard, follow the instructions in this video or in the written steps that follow. You can select Save and exit at any time if you need to exit the wizard and return later.
Step 1: Add configuration details
Add your SSO configuration details:
- Specify a unique configuration name.
-
If your IdP is not Azure AD, Okta, or Ping, select Other. Your identity provider must be supported by SAML 2.0.

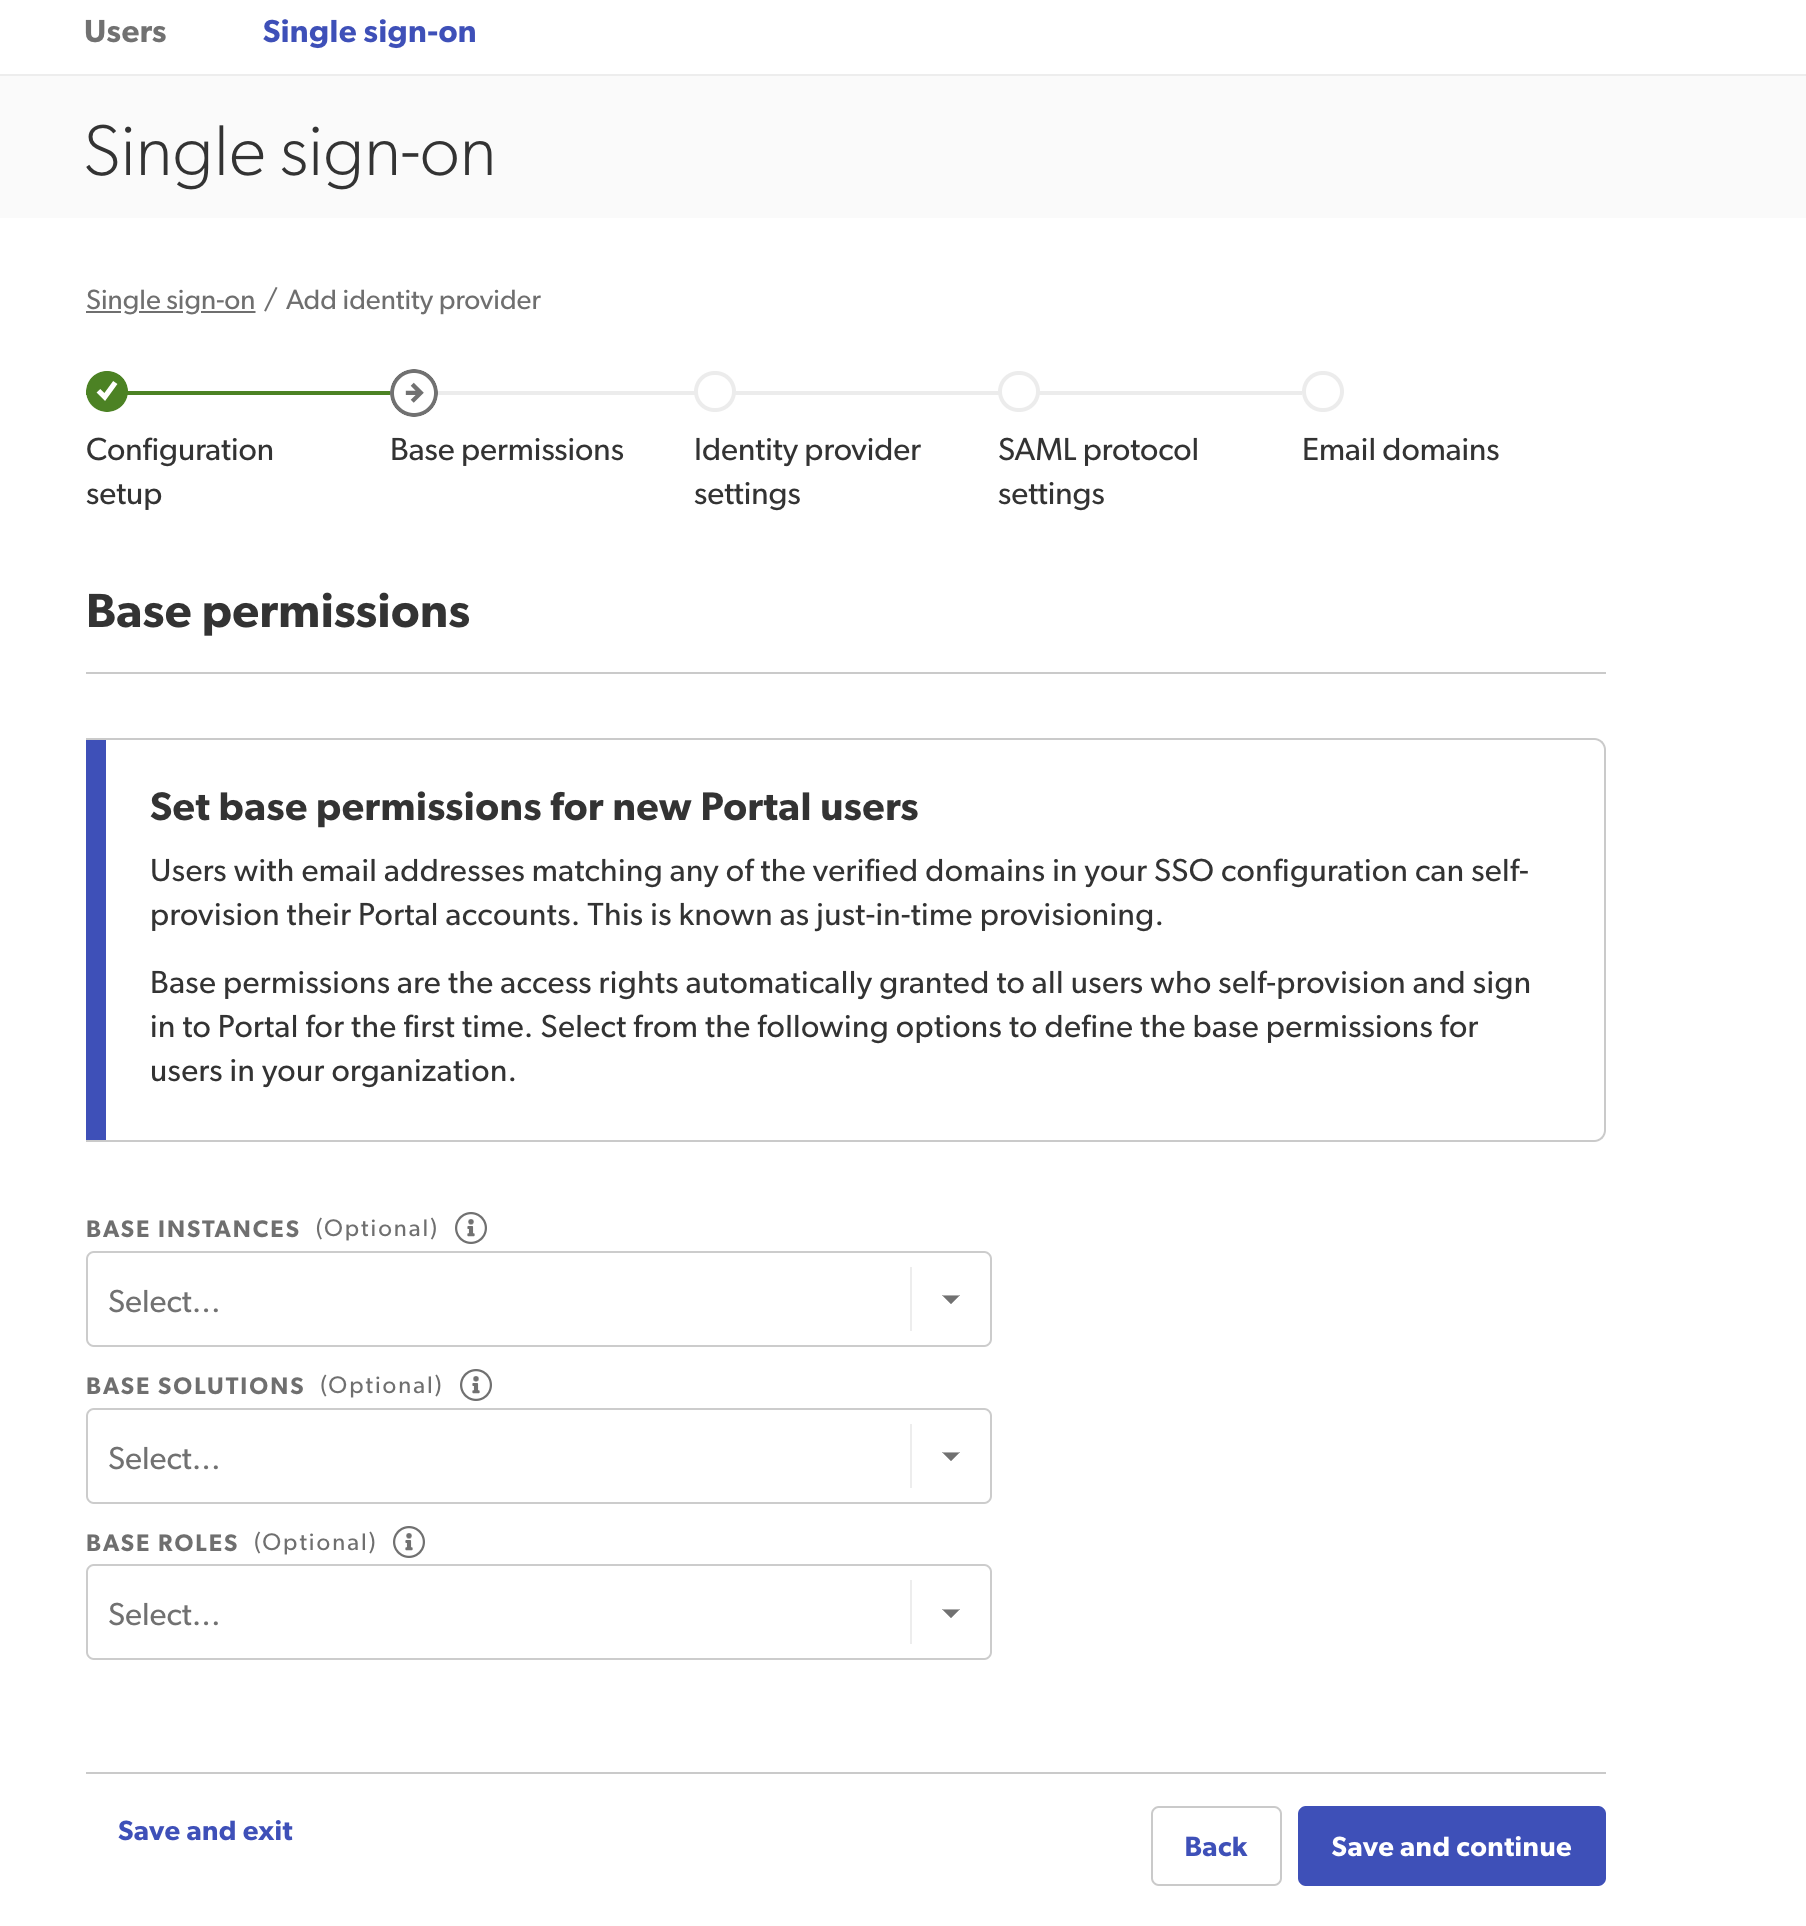
Step 2: Assign base permissions
Assign base permission details for any of your Bazaarvoice products. This step will apply base level permissions for all newly created users within your domain. However, you can only assign permissions to instances, solutions, roles, or settings to which you already have access.
The first time a new user signs in using SSO, a new account is created automatically using these base settings. You’ll no longer have to create new users (with your domain name) manually. You can edit these accounts if necessary.
- Set base permissions in the following sections:
- Base instances—Select which instances users can access.
- Base solutions—Select which Bazaarvoice solutions users can access.
- Base portal roles—Assign base roles to users. Roles will only appear after you have assigned solutions.
- Social commerce-Assign Social Commerce settings.
- Select Save and continue.
Step 3: Copy identity provider settings
- Copy the Issuer URI from your IdP account and paste it into the Identity provider issuer URI field. For example, https://your-idp.endurancecycles.com.
- Copy the SP-initiated SSO URL (not the IdP-initiated SSO URL) from your IdP account and paste it into the Identity provider issuer URI field. For example, https://your-idp.endurancecycles.com/your-idp-path/.
- Upload a valid, up-to-date x.509 certificate issued by your corporate IdP in Identity provider settings.
Note: This x.509 certificate is a text file that authenticates the identity of your users and your IdP. It must be a valid file type such as .pem, .cer, .crt, .cert, .der, .p7b, .p7c, .p12.

- Select Save and continue.
Step 4: Copy SAML protocol settings
It is very important to follow the instructions in this step carefully. If SAML values are not copied correctly, new users will not be created automatically.
- Copy your SAML protocol settings by selecting Copy to the right of each set of protocol values.
- Paste them into the configuration section of your corporate IdP.
Tip: For further support from your identity provider, refer to their help documentation.
- Replace the sample Assertion Consumer Service (ACS) and URI values you entered earlier with these SAML protocol values:
- ACS (Assertion Consumer Service) URI
- Audience URL
- Default Relay State
- Confirm you have completed this step by selecting the checkbox that reads I have added the above information to my IdP’s configuration section.
-
Select Save and continue.

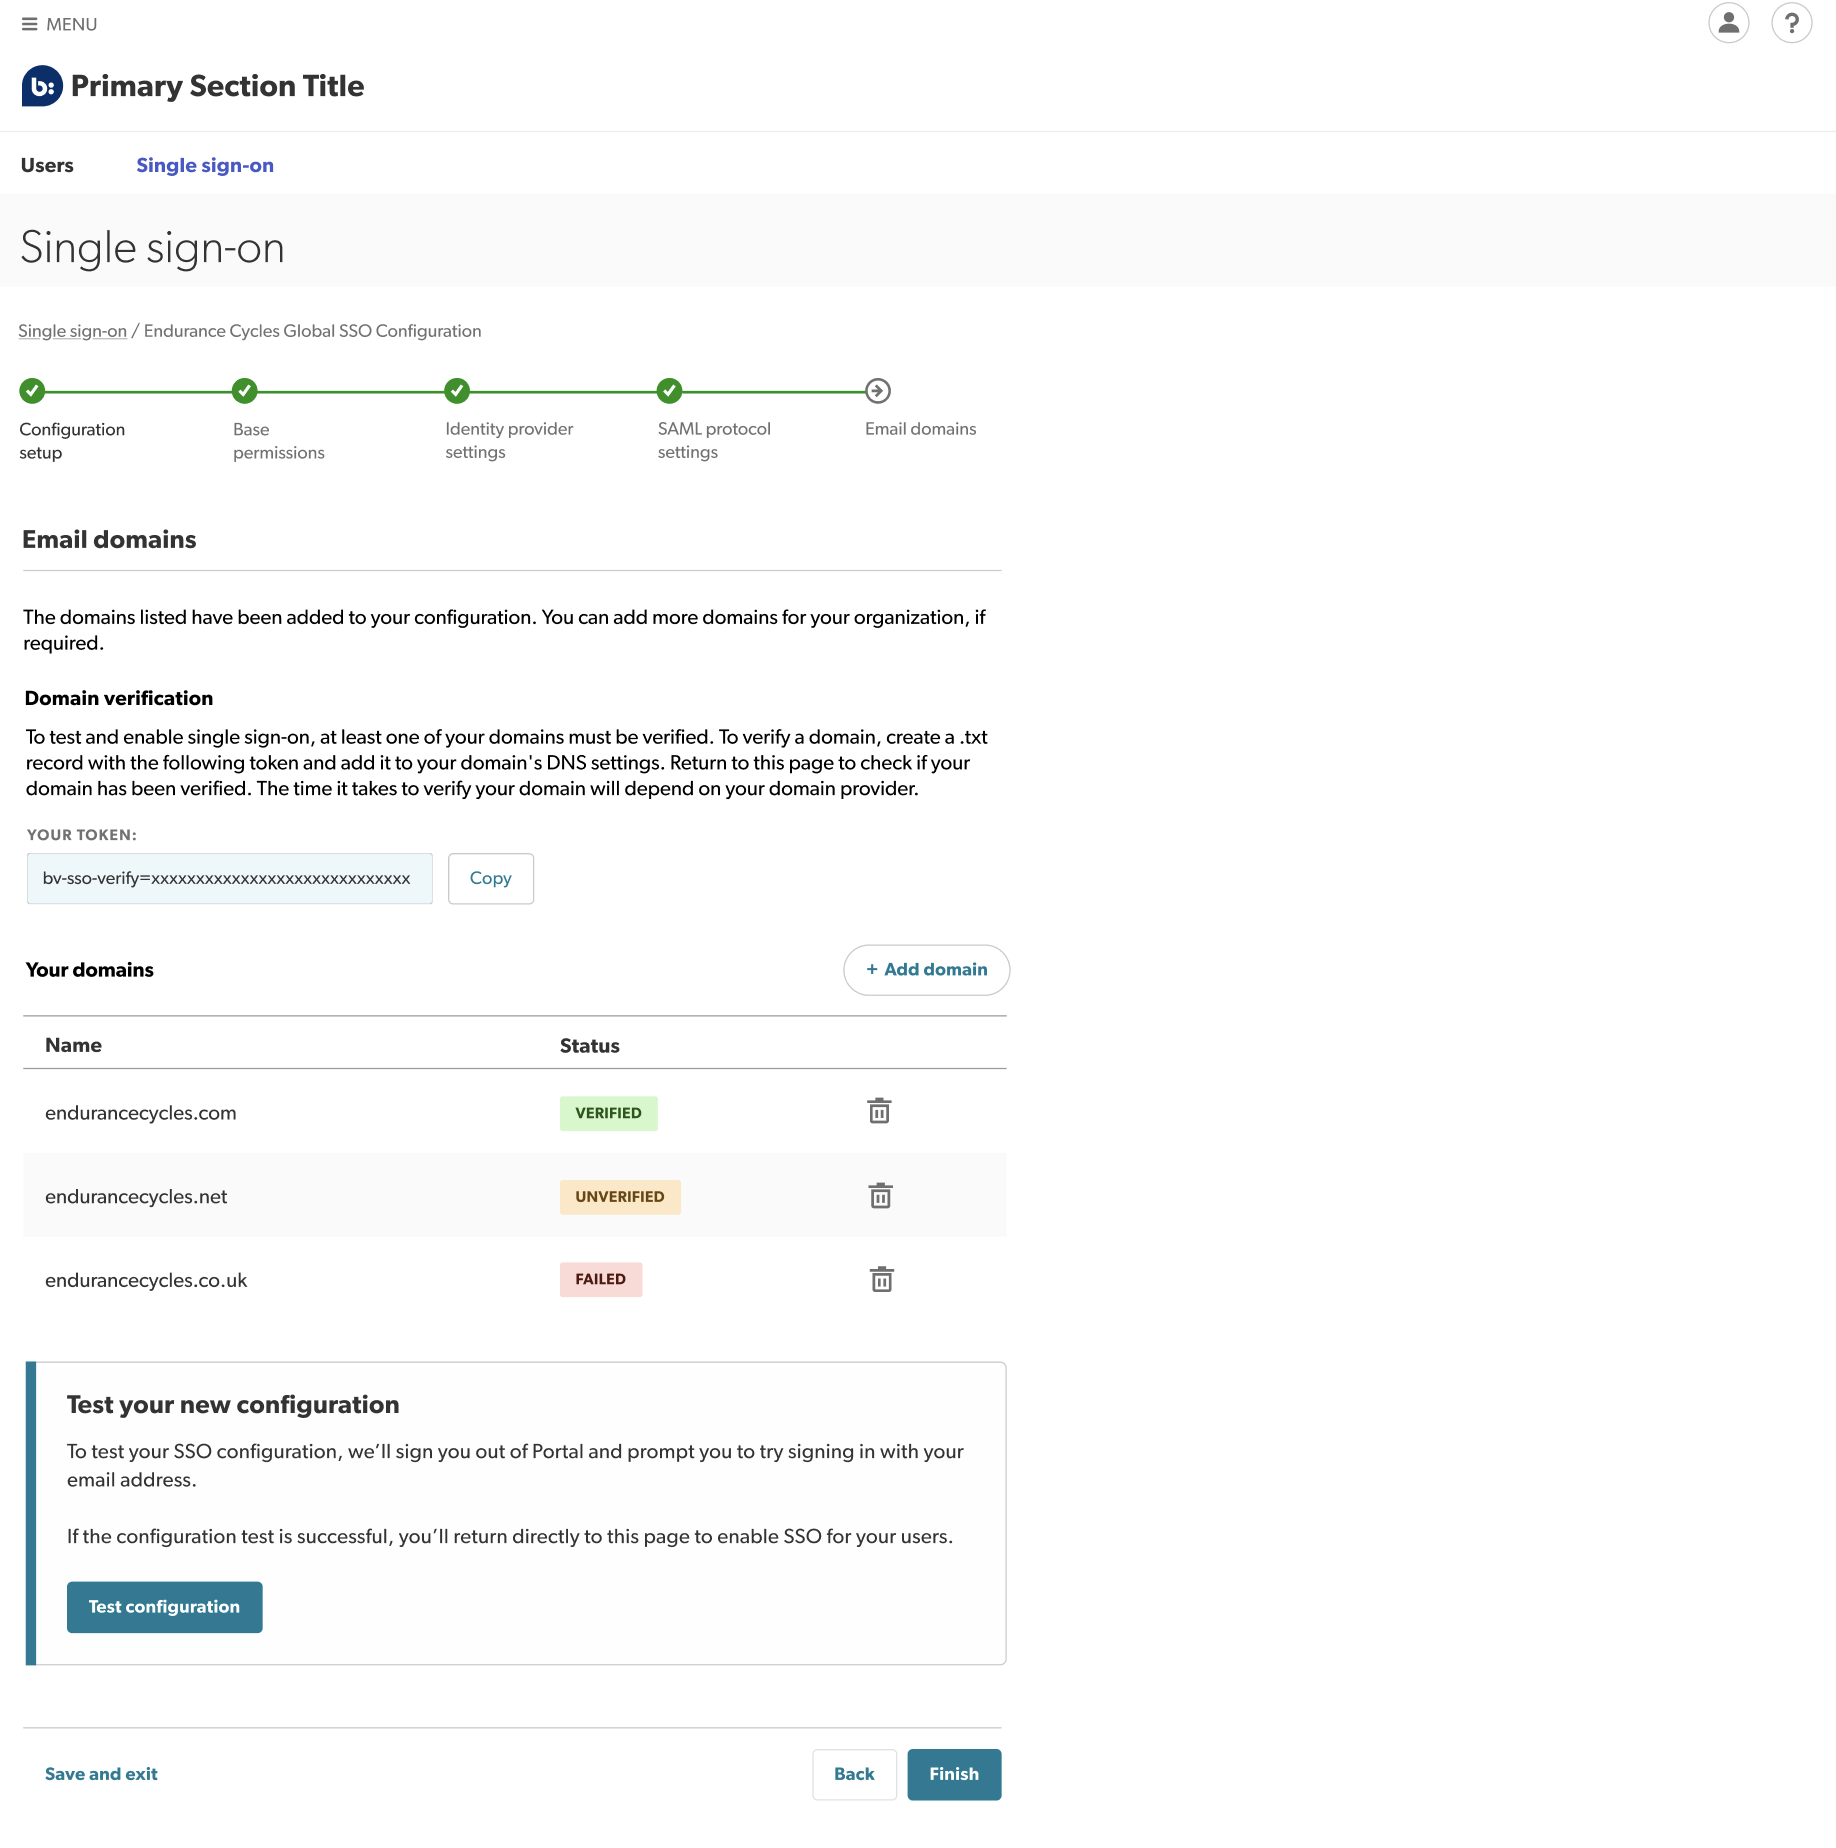
Step 5: Add and verify email domains
You can now add and verify your email domains, for example, endurancecycles.com. This verification process provides extra security by ensuring that only users with your verified domain(s) can use your SSO configuration.
- Add your domains by selecting Add domain.
- Verify your domains.
- To test or enable your configuration, at least one of your domains must be verified.
- A verification token will be automatically populated, allowing you to create a .txt record following the domain list table.
- Copy this token and add it to your domain’s DNS settings.
Note: Depending on your domain provider, it could take hours or several days to verify your domain. Refresh or return to this page later to check if your domain has been verified. - Test your configuration.
- Once you have at least one verified domain, you are ready to test and enable your configuration.
- Select Test configuration. You will then be signed out of the Bazaarvoice portal and redirected to the sign-in page.
- Sign in to the Bazaarvoice portal using your corporate email address.
Note: If testing is successful, you will return directly to the setup wizard. If there is a problem, you can sign in using your username and password as normal.Note: If your session times out after successful testing, you cannot sign back in until you have enabled the configuration. This is because the testing process sets up your account for SSO sign-in, but SSO is still not enabled for your organization.Workaround: To revert to password-based sign-in and regain access, use the Trouble signing in? link to reset your password.
- Enable your configuration. To enable your configuration for everyone in your organization, select Finish.
Caution: Once your configuration is enabled, you no longer have access to the test functionality.
Edit SSO configuration
To update your configuration:
- If you have successfully enabled SSO for your configuration, sign in to Portal using FSSO . If you haven’t yet completed setup and enabled SSO for your configuration, sign in with your username and password .
- From the upper-right corner, select the settings icon .
- Select Manage Users > Single sign-on. A table listing your SSO configurations appears. The State column will show one of four labels:
- Draft – You have created this configuration but not completed the five-step wizard yet.
- Testing – You have initiated the test flow for this configuration and it is currently being tested.
- Enabled – You have successfully completed setup and can now use this configuration to sign in with SSO.
- Disabled – This configuration can no longer be used to sign in with SSO.

- From the list view, select the SSO configuration you want to edit. The configuration details page appears.

- Make the required changes in any of the following sections:
- Configuration setup—Edit your configuration name.
- Base permissions—Edit the lowest level of access rights assigned only to new users for all products.
- SAML protocol settings—Copy the SAML protocol settings provided and add them to your IdP’s account configuration.
- Domain verification—Add or disable domains.
Tip: If you want to change your identity provider, we advise setting up a new configuration using the new IdP. - Select Update configuration to save your changes.
Disable SSO configuration
To disable your IdP configuration:
- Sign in to the Bazaarvoice Portal .
- From the upper-right corner, select the settings icon .
- Select Manage Users > Single sign-on. A table listing your SSO configurations appears.
- From the list view, select the SSO configuration you want to disable. The configuration details page appears.
Note: When a configuration is disabled, all existing users in that domain will need to create a new password by using the Forgot password link.
- To deactivate SSO for everyone whose email matches your corporate email domains in this SSO configuration, select Delete.
Manage users and permissions
Account Administrators can manage the company’s users and access permissions (to Bazaarvoice solutions) through Portal.
In Manage Users, Account Administrators can do the following:
- View user accounts—Federated users who have been disabled in their corporate IdP account may still appear in the list view, but won’t be able to sign in.
- View a user’s status—Users are assigned one of the following statuses: Active, Locked out, Provisioned, Recovery, Staged, or Suspended.
- Update a user’s account—You can modify Bazaarvoice solutions, instances, and assigned roles by editing the Permissions fields.
- Disable users—If you disable users, they will no longer have access to Bazaarvoice solutions and will be assigned the Suspended status.
You cannot create a new account using an email address that belongs to an active single sign-on (SSO) federated domain. New user accounts are created automatically the first time a user signs in to Bazaarvoice through their corporate IdP.
Common Questions
If you see this error message, contact your CSM.
This could be due to one of the following reasons:
- If you are a new BV Portal user, it is possible that attribute mapping was not completed correctly during setup. This would stop JIT provisioning from functioning properly.
- If you are an existing user, it is possible that your SAML details do not match the details in your IdP. This may be because incorrect details were added during Step 3 or Step 4 of SSO setup.
Your user account needs to be set up manually. Your account administrator should check that all IdP credentials have been entered correctly during setup to prevent this happening for other users.
If you can't see this tab, contact your CSM.
No. Once enabled, you’ll no longer be able to sign in to Portal using your existing Bazaarvoice password. Instead, enter your email on the SSO sign-in page. You will then be redirected to sign in via your IdP, before being brought back to the Bazaarvoice Portal.
When new users sign in to Portal using SSO, user accounts are created automatically using profile information from their IdP’s default settings. If you assigned base permissions during setup, these will be applied to all new users within your domain.
Users should reach out to their CSM before changing their email address. When the user signs in using their new email address, a new user account will be created (using Just–in-Time provisioning). The user's previous permissions will be merged to the new account.
Yes. Federated users can be deleted manually from Portal. However, this is not recommended. Once a user is deleted, all audit history will be lost. Additionally, users who are deleted will be recreated the first time they sign in through their IdP. To completely remove a user, you must delete their IdP credentials.
SSO allows you to access Bazaarvoice solutions using your company's credentials. This means your Bazaarvoice account is now linked to your corporate IdP. As a result, there are some parts of your profile which cannot be edited in Portal, such as your name or password. Instead, you can update these parts of your profile in your corporate IdP account and your Bazaarvoice Portal account will be updated automatically.
From the upper-right corner, select the settings icon ![]() . Select Manage Users. Select your name to view your account details, access rights, and assigned roles. Note that you can only view this page as an Account Administrator.
. Select Manage Users. Select your name to view your account details, access rights, and assigned roles. Note that you can only view this page as an Account Administrator.
If you’re not assigned the Account Administrator role, sign in to Portal, go to your Profile page and select View Administrators to discover who can assign you this role.
To change your domain(s), access the configuration details page by following the steps in the Edit SSO configuration section. Navigate to the Email domains section where a list of your domains will appear. To change a domain, select the trash can icon beside the domain you want to change and then select the Add domain link to add the updated domain.
There are multiple reasons why you may be receiving this message:
- SAML details (ACS URL, Identity URL) details are incorrect, causing a conflict between BV and IdP details. Ensure the Identity URL, ACS URL and Audience URL match their equivalents in your IdP.
- The certificate uploaded in Step 3 of the wizard is invalid.
To verify your domain(s), go to the Email domains section of your configuration setup. Bazaarvoice will provide you with a token which will allow you to create a .txt record . This should then be added to your domain’s DNS settings. The length of time it takes to complete verification will depend on your domain provider.
If you’re unable to verify any of your domains, please contact Bazaarvoice Support , your CSM, or your TSM.
No. However, if you delete one of your domains and need to re-add it at a later stage, you will need to generate the .txt record again.
There are multiple reasons why this may be happening:
- If the user is new to Bazaarvoice and there is a mismatch in their SAML attributes between Bazaarvoice and your IdP, this causes JIT provisioning to fail. To fix this issue, make sure the attributes match up or ask Bazaarvoice to federate the user.
- If the user is an existing user, there may have been a change in IdP configurations. In this case, contact your CSM.