Implement with Google Tag Manager
Using Bazaarvoice with the Google Tag Manager, you can capture user actions, transactions, and behaviors on a product detail page and confirmation page. Before beginning, complete the following steps:
- Create an account
 , if you do not have one.
 - Add the Bazaarvoice Analytics Inspector extension to Chrome, which helps diagnose implementation problems.
- Familiarize yourself with the Google Tag Manager Setup and Installation page , if necessary.
To implement Google Tag Manager, perform one of the following:
-
If BV Pixel is implemented in your instance of Ratings & Reviews, create the following tags:
- BV loader tag—Loads the Bazaarvoice JavaScript library and tracks activities on your website. This must be added to all pages where you intend to collect events.
- Conversion tag—Tracks non-eCommerce user activities that do not directly generate revenue but are still valuable.
- Transaction tag—Captures purchase data when a customer buys a product or service.
All other events are automatically captured by BV Pixel.
-
If your implementation uses an API, you must set up these tags to capture all analytics events:
- BV loader tag—Loads the Bazaarvoice JavaScript library and tracks activities on your website. This must be added to all pages where you intend to collect events.
- PageView tag—Indicates that a user loaded the page.
- InView tag—Indicates that user-generated content (UGC) was visible on the page.
- ViewedUGC tag—Indicates that UGC was visible in the display window for a period of time.
- FeatureUsed tag—Indicates user interaction with the UGC container and controls.
Publish the tags when you are done.
Add the BV loader tag
The BV loader loads the Bazaarvoice JavaScript library and tracks activities on your website. You add it to all pages where you intend to collect events. Then, you create a tag for the BV loader using Google Tag Manager and test the tag to ensure that it works properly.
Add the BV loader to pages
If you have not already done so, add the BV loader to all pages where you intend to collect events.
Create the tag
In your Google Tag Manager workspace, create a new tag with the following properties:
- Name: BV Loader
- Tag Configuration:
-
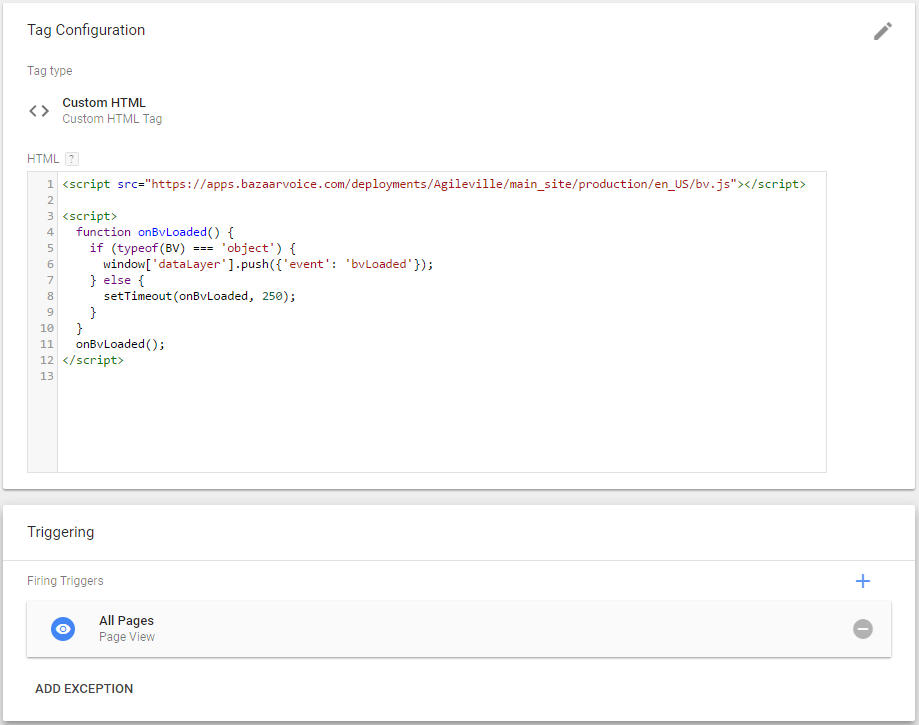
Tag type: Custom HTML and then specify the following code, which adds the BV loader and includes a function that tells Google Tag Manager when BV loader has loaded to prevent race conditions with other tags:
<!-- load BV -->
<script type="text/javascript" src="https://apps.bazaarvoice.com/deployments/<client_name>/<site_ID>/<environment>/<locale>/bv.js"></script>
<script>
  function onBvLoaded() {
    if (typeof(BV) === 'object') {
      window['dataLayer'].push({'event': 'bvLoaded'});
    } else {
      setTimeout(onBvLoaded, 250);
    }
  }
  onBvLoaded();
</script>
Refer to Add the BV loader for a description of the URL values.
-
Advanced Settings: Set Tag firing options to Once per page.
-
- Triggering: Select the Page View trigger and then set it to fire on All Pages.
Note: If Page View is not displayed at the top of the page, use the search button to find it.
The new tag should look like this example:
Test the tag
installed.Complete these steps to test the tag:
- In the top, right-hand corner of the workspace, click the drop-down menu and select PREVIEW. This enables preview mode so that you can test the tag.

- Load your web page in Chrome.
-
Verify that the tag was fired for the page. In the Google Tag Manager preview pane, BV Loader should be listed under Tags Fired On This Page.
If the tag was not fired, verify that the trigger is set up correctly. For example, if you have misspelled something in the filters, the trigger will not fire as expected.
-
Click
 in the browser menu to display the Analytics Inspector and verify that details similar to these are displayed:
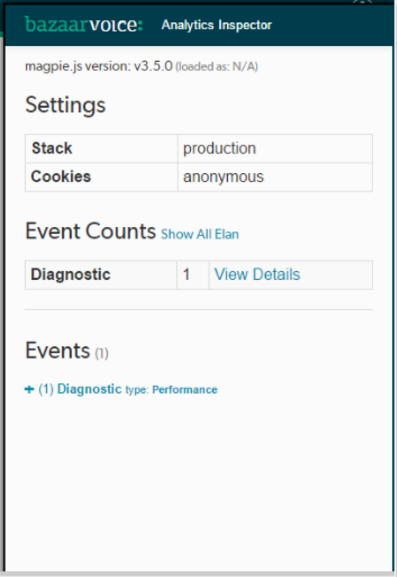
Add the PageView tag
The PageView event indicates that a user has loaded the page. Add this tag using the Tag Manager to capture page view data.
Create the tag
In your Google Tag Manager workspace, create a new tag with the following properties:
- Name: BV PageView
-
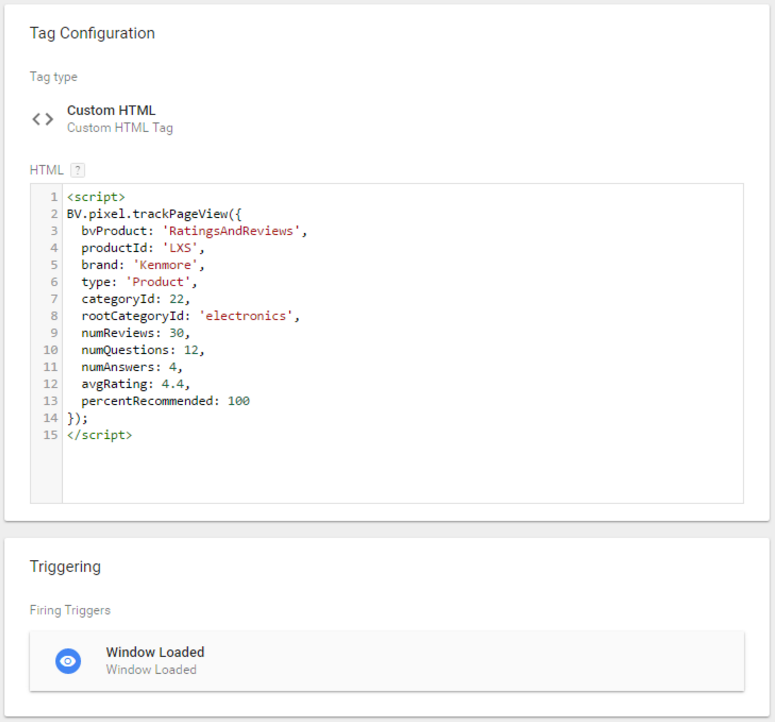
Tag Configuration: Select the Custom HTML tag type and then add code that will capture data from your site. For each parameter in the
trackPageViewfunction, be sure to specify values for your website. If your site is more dynamic and includes JavaScript variables on the page, you can use them to set the values. ThetrackPageViewfunction only needs a regular JavaScript object. Ask your website developers how you can dynamically populate this page view object with variables that exist on the page.Here is an example:
<script> BV.pixel.trackPageView({ bvProduct: 'RatingsAndReviews', productId: 'LXS', brand: 'Kenmore', type: 'Product', categoryId: 22, rootCategoryId: 'electronics', numReviews: 30, numQuestions: 12, numAnswers: 4, avgRating: 4.4, percentRecommended: 100 }); </script> - Triggering: Add a new Window Loaded trigger and specify Window Loaded as the name of the trigger.
Note: When a page is loaded in the browser, Google Tag Manager fires the PageView event, the DOM Ready event, and the Window Loaded event (in that order). PageView occurs when the browser begins to parse the page, DOM Ready occurs when the browser has finished constructing the DOM, and Window Loaded occurs when the page has fully loaded, including images and scripts. The PageView tag uses the Window Loaded trigger because Google Tag Manager loads the BV loader asynchronously, but that event must complete before calling the
trackPageViewfunction in the PageView tag. If you set the trigger to Page View, the BV loader may not fully load and will not track a page view.
The new tag should look like this example:
Test the tag
Complete these steps to test the tag:
- In the top, right-hand corner of the workspace, click the drop-down menu and select PREVIEW. This enables preview mode so that you can test the tag.
- Load your web page in Chrome.
-
Verify that the tag was fired for the page. In the Google Tag Manager preview pane, BV Loader should be listed under Tags Fired On This Page.
If the tag was not fired, verify that the trigger is set up correctly. For example, if you have misspelled something in the filters, the trigger will not fire as expected.
-
Click
in the browser menu to display the Analytics Inspector and verify that details similar to these are displayed: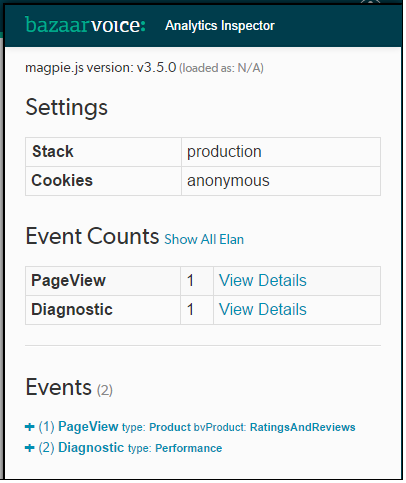
Add the InView tag
The InView event indicates that UGC is visible on the page. The event fires after 250 pixels of the reviews container is visible in the browser. Ask your website developers what parts of the page will be tracked. Each page element you want to track needs a unique ID. Then, add this tag using the Tag Manager to capture in-view data.
Create the tag
In your Google Tag Manager workspace, create a new tag with the following properties:
- Name: BV InView
- Tag Configuration:
-
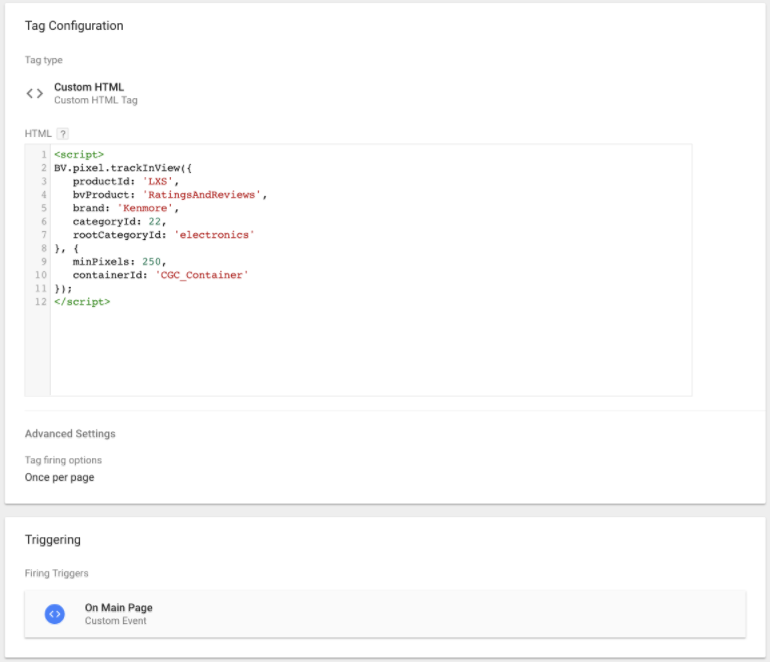
Tag type: Custom HTML and then add code that will capture data from your site. For each parameter in the
trackInViewfunction, be sure to specify values for your website. Here is an example:<script> BV.pixel.trackInView({ productId: 'LXS', bvProduct: 'RatingsAndReviews', brand: 'Kenmore', categoryId: 22, rootCategoryId: 'electronics' }, { minPixels: 250, containerId: 'bvUGC' //div ID of reviews container }); </script> -
Advanced Settings: Set Tag firing options to Once per page.
-
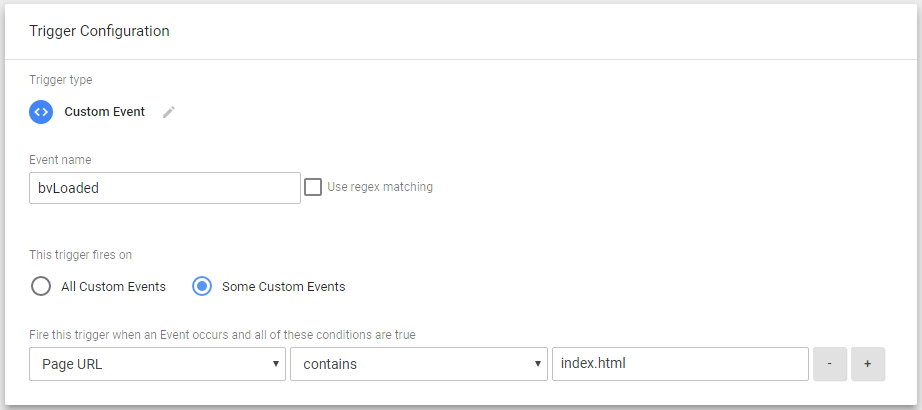
- Triggering: Select the Custom Event type, specify bvLoaded as the trigger name (the function defined in the BV loader tag), and then select the Some Custom Events option.
Note: With these instructions, the trigger allows the tag to be fired on one page. You could use All Pages but that might result in many InView tags and it might slow down the page load time. Bazaarvoice recommends that you create one trigger for the specific page or group of pages that will contain the container ID for which you are creating tags.
Here is an example of the trigger configuration:
The new tag should look like this example:
Test the tag
Complete the following steps to test the tag:
- In the top, right-hand corner of the workspace, click the drop-down menu and select PREVIEW. This enables preview mode so that you can test the tag.
- Load your web page in Chrome.
-
Verify that the tag was fired for the page. In the Google Tag Manager preview pane, BV Loader should be listed under Tags Fired On This Page.
If the tag was not fired, verify that the trigger is set up correctly. For example, if you have misspelled something in the filters, the trigger will not fire as expected.
-
Click
in the browser menu to display the Analytics Inspector and verify that details similar to these are displayed: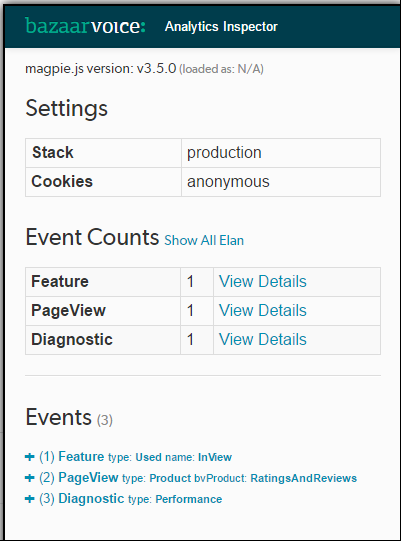
Add the ViewedUGC tag
The ViewedUGC event indicates if UGC is visible in the display window. The event fires five seconds after the InView tag, which means that the reviews container is in view for more than five seconds. Ask your website developers what parts of the page will be tracked. Each page element you want to track needs a unique ID. Then, add this tag using the Tag Manager to capture viewed UGC data.
Create the tag
In your Google Tag Manager workspace, create a new tag with the following:
- Name: BV ViewedUGC
-
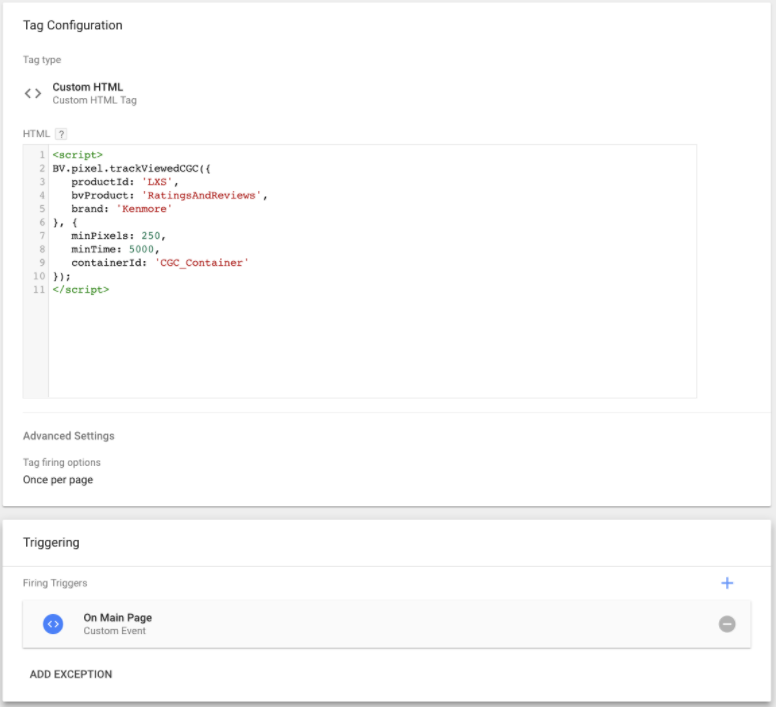
Tag Configuration: Choose Custom HTML and then add code that will capture data from your site. For each parameter in the
trackViewedUGCfunction, be sure to specify values for your website. Here is an example:<script> BV.pixel.trackViewedUGC({ productId: 'LXS', bvProduct: 'RatingsAndReviews', brand: 'Kenmore', categoryId: 22, rootCategoryId: 'electronics' }, { minPixels: 250, minTime: 2500, containerId: 'bvUGC' //div ID of reviews container </script> - Triggering: Select the bvLoaded trigger, which was created in Add the InView tag.
Note: With these instructions, the trigger allows the tag to be fired on one page. You could use All Pages but that might result in many ViewedUGC tags and it might slow down the page load time. Bazaarvoice recommends that you create one trigger for the specific page or group of pages that will contain the container ID for which you are creating tags.
Here is an example of the trigger configuration:
The new tag should look like this example:
Test the tag
Complete these steps to test the tag:
- In the top, right-hand corner of the workspace, click the drop-down menu and select PREVIEW. This enables preview mode so that you can test the tag.
- Load your web page in Chrome.
-
Verify that the tag was fired for the page. In the Google Tag Manager preview pane, BV Loader should be listed under Tags Fired On This Page.
If the tag was not fired, verify that the trigger is set up correctly. For example, if you have misspelled something in the filters, the trigger will not fire as expected.
-
Click
in the browser menu to display the Analytics Inspector and verify that details similar to these are displayed: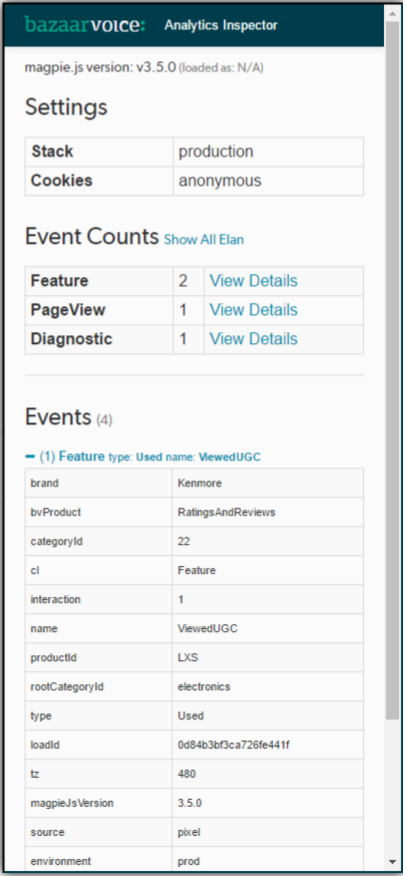
Add the FeatureUsed tag
The FeatureUsed event records user interaction with the UGC container and controls. For example, you can track when a user clicks on a button or watches a video. Ask your website developers what parts of the page will be tracked. Each thing you want to track needs a unique ID. Add this tag using the Tag Manager.
Implement analytics
Be sure to implement the required analytics as listed on this page .
Create a variable
Complete these steps to create a user-defined variable in your Google Tag Manager workspace. Variables enable Google Tag Manager to share data between tags.
-
Create the variable with the following properties:
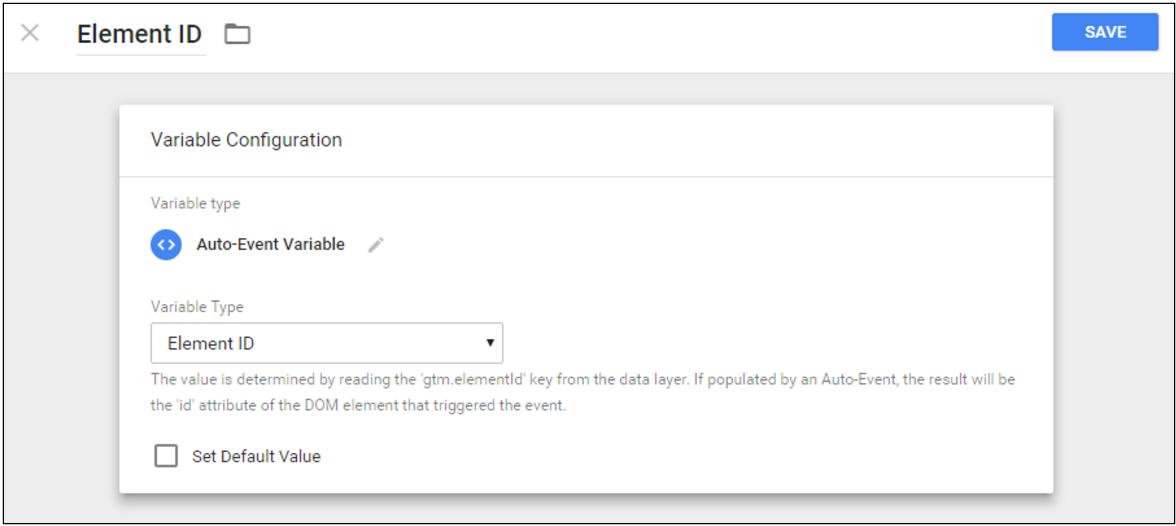
- Name: Element ID
- Type: Auto-Event Variable under Page Elements
- Variable Type: Element ID
The variable configuration should look like this:
-
Determine the ID that is used by the element you want to track. Typically, HTML elements contain an ID attribute, though if not, you may need a developer to modify the website to add one for you. Open a new browser window or tab and locate the button or element you want to track. Right-click on the element and select Inspect. Locate the ID in the HTML code.
Here is an example:
In this example, the ID is
helpfulness-btn-yes:<button type="button" class="btn btn-vote js-btn-vote-yes" bveventtype="votingHelpfulness" data-value="yes" id="helpfulness-btn-yes">...</button> -
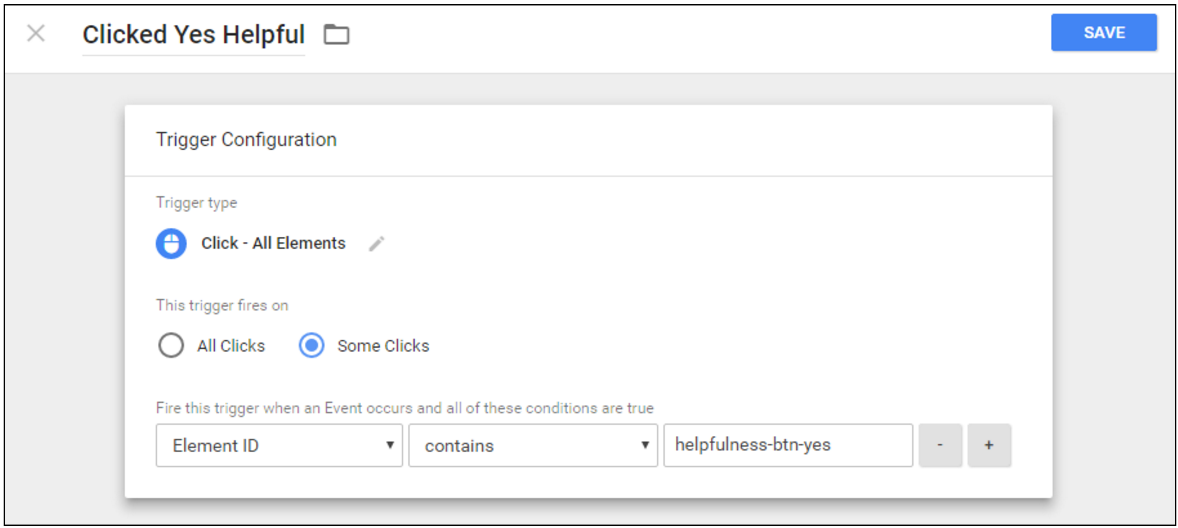
In your Google Tag Manager workspace, create a new trigger that will be used by the FeatureUsed tag to record when a user clicks on the element on your website. For example, it can record when a user clicks the “Yes” button next to “Was this review helpful?”. Specify these trigger properties:
- Name: Specify a name that describes the action, such as Clicked Yes Helpful
- Type: All Elements under Click
- Trigger Configuration:
- This trigger fires on: Some Clicks.
-
Fire this trigger when an Event occurs and all of these conditions are true: Select Element ID (the variable defined above), select contains, and then specify the element ID. Your configuration should look like this:
Create a tag
Create a new tag with the following properties:
- Name: Specify a name that describes the action, such as Found Review Helpful.
-
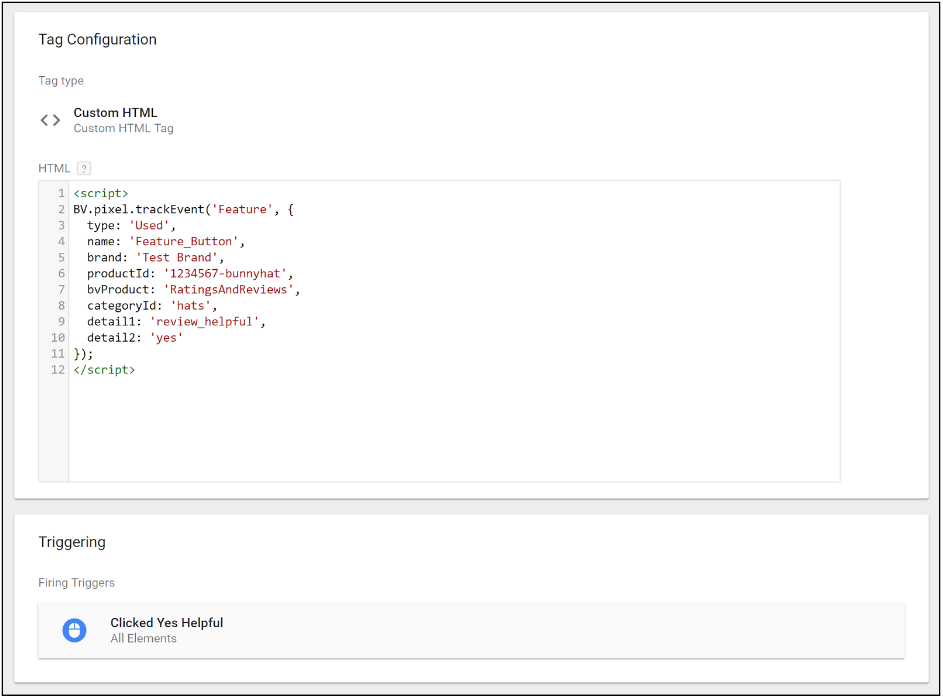
Tag Configuration: Choose Custom HTML and then add code that will capture data from your site. For each parameter in the
trackEventfunction, be sure to specify values for your website. Here is an example:<script> BV.pixel.trackEvent('Feature', { type: 'Used', name: 'Feature_Button', brand: 'Test Brand', productId: '1234567-bunnyhat', bvProduct: 'RatingsAndReviews', categoryId: 'hats', detail1: 'review_helpful', detail2: 'yes' }); </script> - Triggering: Select the trigger created in above.
The new tag should look like this example:
Test the tag
Complete the following steps to test the tag:
- In the top, right-hand corner of the workspace, click the drop-down menu and select PREVIEW. This enables preview mode so that you can test the tag.
- Load your web page in Chrome.
-
Verify that the tag was fired for the page. In the Google Tag Manager preview pane, BV Loader should be listed under Tags Fired On This Page.
If the tag was not fired, verify that the trigger is set up correctly. For example, if you have misspelled something in the filters, the trigger will not fire as expected.
-
Click
in the browser menu to display the Analytics Inspector and verify that details similar to these are displayed: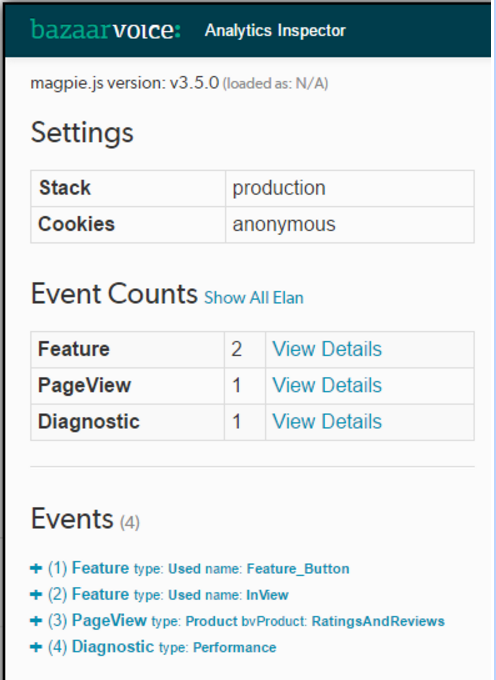
Add the Conversion tag
A conversion event tracks non-eCommerce user activities that do not directly generate revenue but are still valuable, such as when a user clicks Store Locator or Where to Buy. Add this tag using the Tag Manager.
Note: This tag is required on non-eCommerce sites, such as brand websites, and it is optional on eCommerce sites. Add it to any page where an event can occur.
Create a variable
Complete these steps to create a user-defined variable in your Google Tag Manager workspace. Variables enable Google Tag Manager to share data between tags.
-
Create the variable with the following properties:
- Name: element ID
- Type: Auto-Event Variable under Page Elements
- Variable Type: Element ID
The variable configuration should look like this:
-
Determine the ID that is used for the element you want to track. Typically, HTML elements contain an ID attribute, though if not, you may need a developer to modify the website to add one for you. Open a new browser window or tab and locate the button or element you want to track. Right-click on the element and select Inspect. Locate the ID in the HTML code.
In this example, the ID is
findStore:<button data-target="#overlay" data-behavior="modal" data-tcin="15060404" id="findStore" class="btn btn-sm">...</button> -
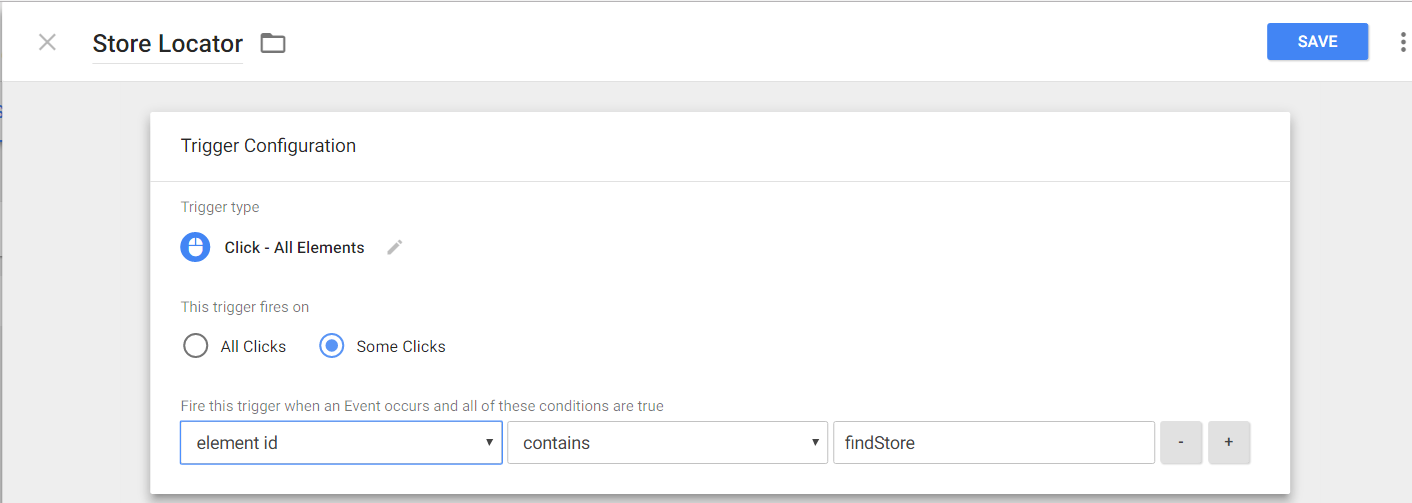
In your Google Tag Manager workspace, create a new trigger that will be used by the tag to record the event. For example, you can record when a user clicks the Store Locator button. Specify these trigger properties:
- Name: Specify a name that describes the action, such as Store Locator.
- Type: All Elements under Click.
- Trigger Configuration:
- This trigger fires on: Some Clicks.
-
Fire this trigger when an Event occurs and all of these conditions are true: Select element ID (the variable defined above), select contains, and then specify the element ID. Your configuration should look like this:
Create a tag
Create a new tag with the following properties:
- Name: Specify a name that describes the action, such as Store Locator.
-
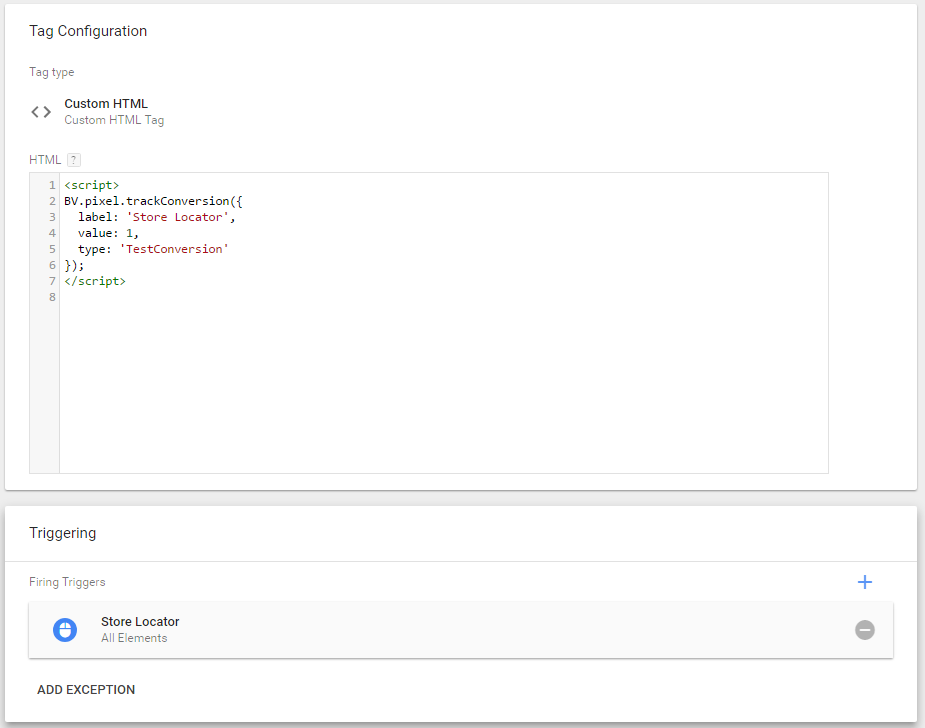
Tag Configuration: Choose Custom HTML and then add code that will capture data from your site. For each parameter in the
trackConversionfunction, be sure to specify values for your website. Here is an example:<script> BV.pixel.trackConversion({ label: 'Store Locator', value: 1, type: 'TestConversion' }); </script> - Triggering: Select the trigger created above.
The new tag should look like this example:
Test the tag
Complete these steps to test the tag:
- In the top, right-hand corner of the workspace, click the drop-down menu and select PREVIEW. This enables preview mode so that you can test the tag.
- Load your web page in Chrome.
-
Verify that the tag was fired for the page. In the Google Tag Manager preview pane, BV Loader should be listed under Tags Fired On This Page.
If the tag was not fired, verify that the trigger is set up correctly. For example, if you have misspelled something in the filters, the trigger will not fire as expected.
-
Click
in the browser menu to display the Analytics Inspector and verify that details similar to these are displayed: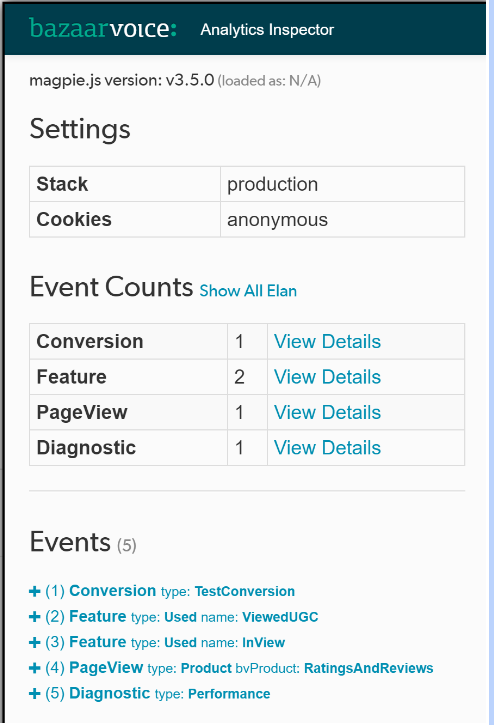
Add the Transaction tag
A transaction event captures purchase data when a customer buys a product. A purchase comprises an order and the items purchased in the order. Add this tag using the Tag Manager.
Note: The transaction tag is required on eCommerce sites.
Add order data to the page
Add code to a page that contains order data, such as a payment confirmation page or thank-you page. This code copies transaction data into the Google Tag Manager data layer, which sends data objects to Google Tag Manager so that tags, triggers, and variables can use them.
When adding order data, be mindful of the following restrictions:
- If you specify a parameter without a value, set the value to
"0"or"". Make sure that values do not default to"null". -
If you pass item parameters from the data layer, be sure to designate the object as an array, not a string. If the object is passed as a string, parameter names and values are included in quotation marks and then escaped, as shown in this example, and Bazaarvoice cannot parse the array elements:
"items": "[ {\"name\":\"Product_Name\",\"price\":2899.99,\"sku\":2935,\"quantity\":2}]"Instead, format the parameters as shown in the example below.
For a list of required and optional parameters, refer to Add the transaction event.
Here is an example of the code to execute on the page:
var transactionData = {
  // host: "bazaarvoice.com",
  currency: '',
  orderId: '4601555774216',
  total: '9.27',
  city: 'Springfield',
  state: 'DOH',
  country: '',
  zip: '55555',
  userId: '',
  email: 'homer@simpson.com',
  nickname: '',
  tax: '0.72',
  shipping: '4.97',
  items: [
  {
    price: '3.58'
    quantity: '1',
    sku: '1234567-2',
    category: 'beer',
    name: 'Can of Generic Beer',
    imageUrl: 'http://tag-manager.bazaarvoice.cimages/beer.jpg',
  }
  ]
};
// Ensure that dataLayer exists as an array if Google Tag Manager
// is still asynchronously loading.
window['dataLayer'] = window['dataLayer'] || [];

// Send the transaction data into the Google Tag Manager.
window['dataLayer'].push({
  'transactionData': transactionData
});

// Tell Google Tag Manager to send Bazaarvoice Conversion Tracking
window['dataLayer'].push({
  'event': 'bv_conversion_transaction'
});
Create a variable
Complete these steps to create a user-defined variable in your Google Tag Manager workspace. Variables enable Google Tag Manager to share data between tags.
-
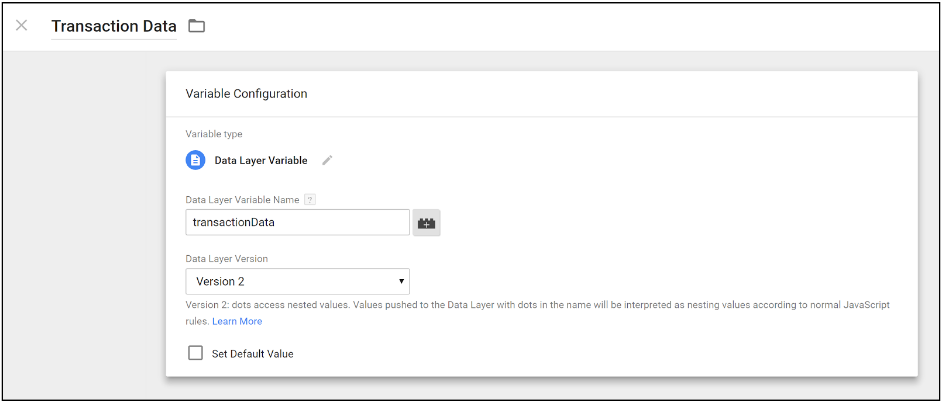
Create a variable with the following properties so that you can share transaction data with the data layer:
- Name: Transaction Data
- Type: Data Layer Variable under Page Variables
- Variable Type: transactionData, which is configured in the code that was added to the page in the step 1
The variable configuration should look like this:
-
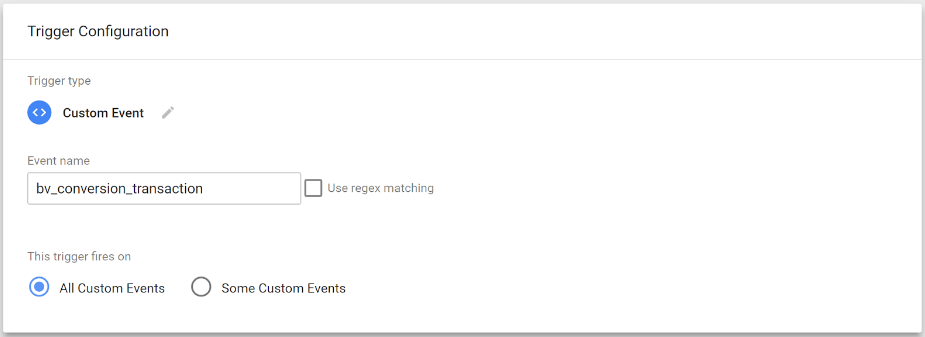
In your Google Tag Manager workspace, create a new trigger that will be used by the page to notify Google Tag Manager when a conversion transaction has occurred and that the transaction data is ready. Specify these trigger properties:
- Name: BV Transaction
- Type: Custom Event under Other
- Trigger Configuration: Specify bv_conversion_transaction as the Event name, which matches the code specified in step 1
Create a tag
Create a new tag with the following properties:
- Name: Specify BV Transaction.
-
Tag Configuration: Choose Custom HTML and then add code that will capture data from your site. For each parameter in the
trackTransactionfunction, be sure to specify values for your website. Here is an example:<script> function waitForBV() { if (typeof(BV) === 'object') { BV.pixel.trackTransaction({{Transaction Data}}); } else { setTimeout(waitForBV, 250); } } waitForBV(); </script>Note: Google Tag Manager loads the BV loader asynchronously, which can cause a race condition. This is because the data layer may contain an event that instructs Tag Manager to fire the conversion transaction before the BV loader has fully loaded. Tag Manager’s Tag Sequencing feature does not know when Bazaarvoice is available in JavaScript. Therefore, the function will check every 250ms to see if the BV loader has been loaded before tracking transactions.
Also, notice that the Transaction Data variable is added in double curly brackets. Though this is not standard JavaScript, it is interpreted by Tag Manager as a reference to the custom variable you set up in step 2. When this code is executed, Tag Manager replaces the variable with an object.
Finally, leading and trailing whitespaces matter inside the Tag Manager variable. Do not include spaces around the variable name, such as {{ Transaction Data }}. - Triggering: Select the trigger created in above.
The new tag should look like this example:
![]()
Test the tag
Complete these steps to test the tag:
- In the top, right-hand corner of the workspace, click the drop-down menu and select PREVIEW. This enables preview mode so that you can test the tag.
- Load your web page in Chrome.
-
Verify that the tag was fired for the page. In the Google Tag Manager preview pane, BV Loader should be listed under Tags Fired On This Page.
If the tag was not fired, verify that the trigger is set up correctly. For example, if you have misspelled something in the filters, the trigger will not fire as expected.
-
Click
in the browser menu to display the Analytics Inspector and verify that details similar to these are displayed: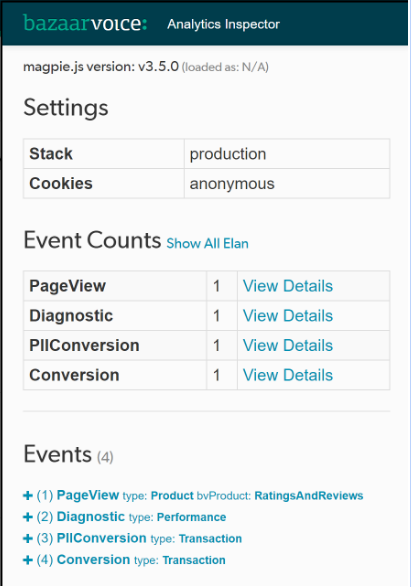
Publish the tags
When you are ready to make your changes live on your website, you must publish the Google Tag Manager container.
- In the top, right-hand corner of the workspace, click PUBLISH.
- Add a name and description for this version of the container and then click PUBLISH.