Ratings & Reviews content management
Use the Ratings & Reviews content management tool and its powerful filtering options to:
- Quick search or filter reviews
- Respond to consumer reviews
- Approve reviews
- Reject
- Export to CSV
Get started
Watch this short video to learn about working with the Ratings & Reviews solution.
To start using Ratings & Reviews:
- Sign in to the Bazaarvoice Portal
 .
. - From the navigation bar, select Ratings & Reviews > Reviews.
- Search, filter, or sort your review content from the list view that appears.
Required solutions and roles
To use Ratings & Reviews, you must be assigned the following:
| Solution: | One of these roles: |
|---|---|
| Ratings & Reviews |
|
Learn more about Portal users and permissions.
The list view
The following illustration highlights the key elements in the list view:
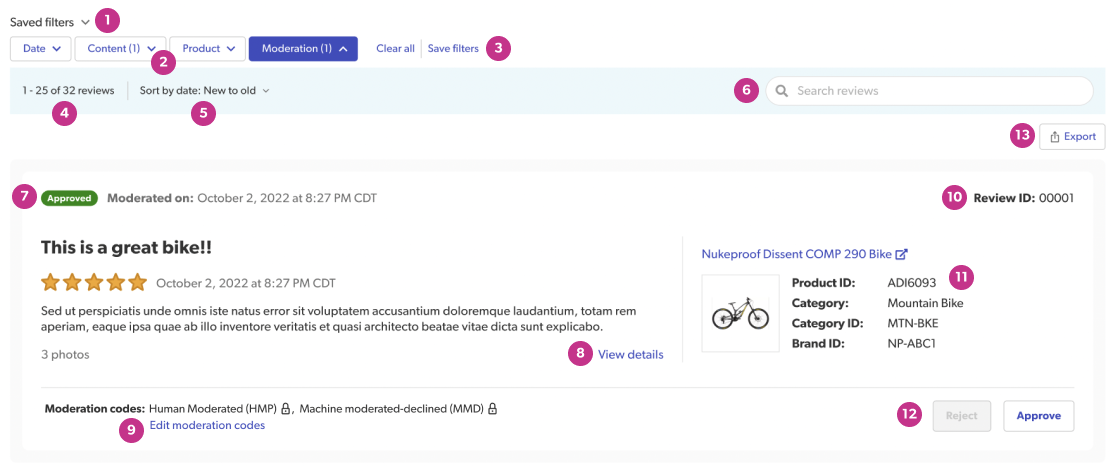
| Label | UI element | Label | UI element |
|---|---|---|---|
| Saved filters drop-down | Moderation status label | ||
| Sort methods | View details | ||
| Save filters | Moderation codes | ||
| Review count | Review ID | ||
| Sort methods | Product information | ||
| Search field | Reject or Approve | ||
| Export button |
Quick search
Find what you’re looking for faster. Use the search bar to find reviews by entering the review ID, review title, review text, product ID, product name, campaign ID, or contributor location.

- Best match: Enter your keywords in the search bar and press the Enter key. For example, EnduranceFlyer07.
- Exact match: For more precise results, put your search keywords in double quotation marks. For example, enter the product name “EnduranceFlyer07” for exact results.
- Multiple keyword search: Enter multiple keywords into the search bar separated by commas. No need to put them in double quotation marks. For example, if you’re searching for reviews for two specific products, enter their respective product IDs: 42398905,3098731831.
Sort reviews
In the list view, from the drop-down list, select one of the following:
- Sort by rating: Low to high or High to low
- Sort by date: Old to new or New to old

Filter reviews
Filter content to find and manage your reviews more easily. To find your content, select a filter category. For example, you can filter by date, moderation status, or product content.
To apply filters:
- In the list view, select the filter category you’re interested in.
- Select your filter criteria, and enter any information required.
- Select Apply and close.
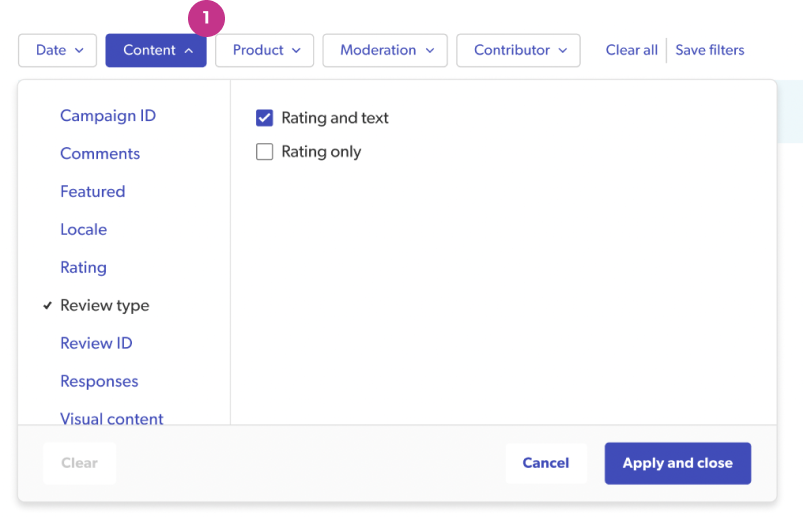
![]() —Filter category (Content), with (Review type) filter value and criteria selected
—Filter category (Content), with (Review type) filter value and criteria selected
The following table shows the filter categories and values you can apply:
| Filter category | Filter values and additional criteria |
|---|---|
| Date | Select one:
|
| Content | Campaign ID: Select a web or email campaign source, or enter a custom campaign ID. |
| Featured: Select Featured reviews | |
| Locale
If your instance includes more than one locale, your locales will be listed. Select one or more. For example:
|
|
| Rating
Select one or more:
|
|
| Review type
Select one or more:
|
|
| Responses
Select one or more:
|
|
| Review IDs: Enter at least one review ID. | |
| Visual content
Select one or more:
|
|
| Products | Brand: Enter brand names or IDs as required. |
| Category: Enter category names or IDs as required. | |
| Product attributes: Select a custom product attribute, such as Model Number. Enter the required filter citeria. For example, "S21 Ultra 200", "LG WM4500HBA", or "Dexl XPS 13 9310". You can add as many filter values as needed to refine your search. | |
| Product ID: Enter product IDs as required. | |
| Product name: Enter product names as required. | |
| Product status
Select one or more:
|
|
| Moderation | Moderation status
Select one or more:
|
Moderation codes: Select one or more codes from the list. You can also select No moderation codes. |
| Contributor | Review contributor: Enter contributor names or IDs. Note: A contributor’s ID and email address are considered personally identifiable information (PII). To view and use the Contributor filter, your must be granted access to PII by your Account Administrator. |
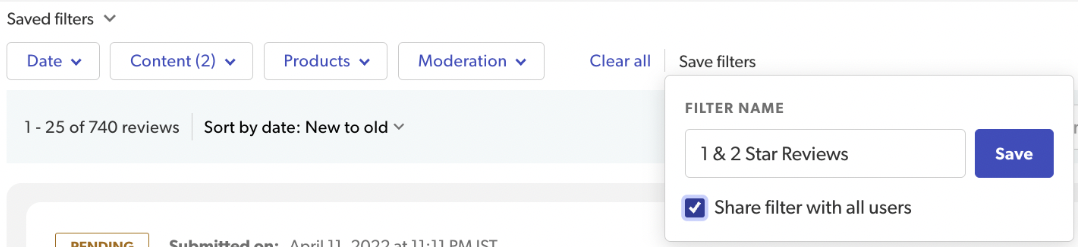
Set up a personal filter
- Select the filter values and criteria you need.
- Select Apply and close in each filter category you define.
- Select Save filters. A pop-up window appears.
- Enter a unique name for your personal filter and select Save.
- Select Share filter with all users to make your personal filter available to everyone in your instance.
Note: If you select a time period from the Date filter, it will show data for that specific time period from the date you created the filter. For example, if you select Last 30 days on January 30, 2024, your personal filter will show data from January 1, 2024 to January 30, 2024.
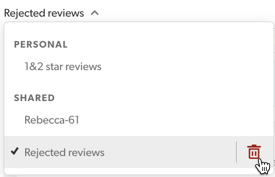
Delete a filter
- In the saved filters drop-down list, find the filter you want to delete.
- Hover over the name of the filter you want to delete so that it’s highlighted.
- Select the trash can icon to delete the highlighted name.
Manage reviews
Open the detail view to:
- Read reviews
- Inspect visual content
- Explore comments and helpfulness votes contributed by consumers
- Find product and reviewer information
- Moderate content
- Respond to reviews and add notes
To open up the detail view:
- Select the title of any review.
Or - Select View details.
The following illustration of the list view highlights the two ways of opening the detail view:
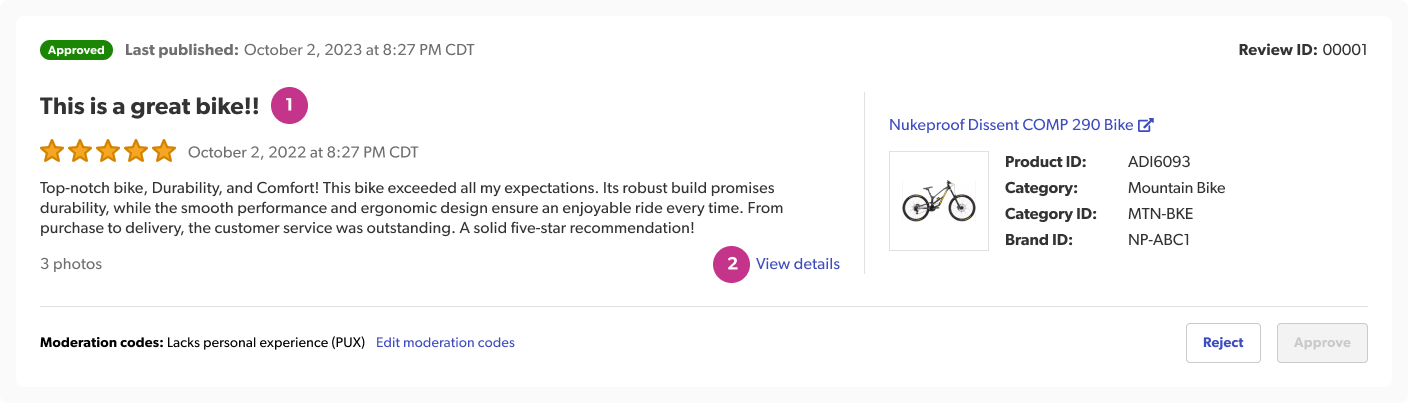
![]() —Review title
—Review title ![]() —View details
—View details
The detail view
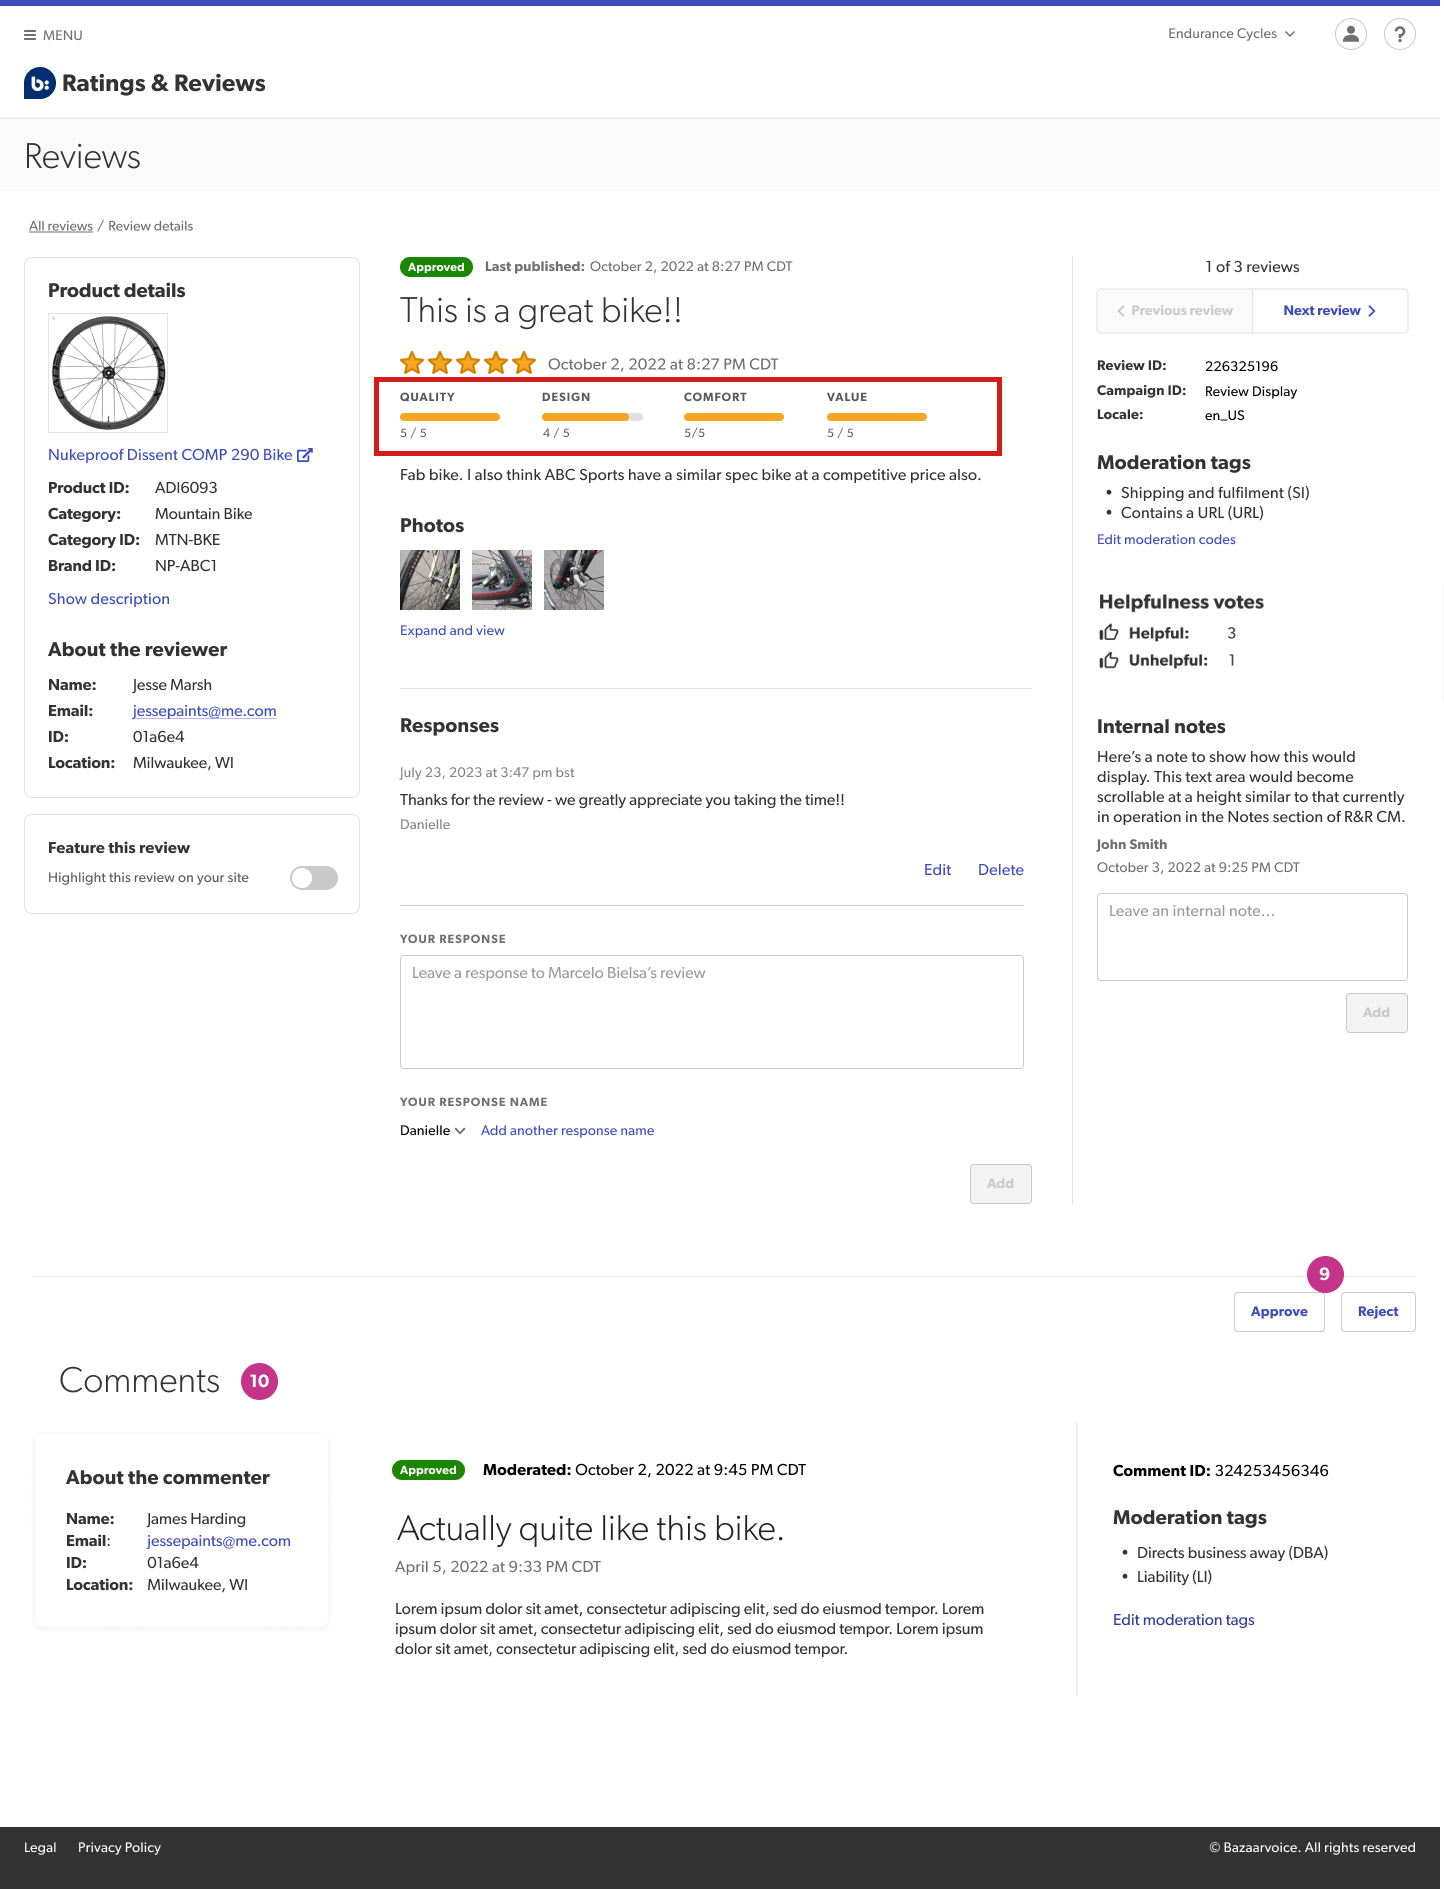
The following illustration highlights the key elements in the detail view:
| Label | UI element | Label | UI element |
|---|---|---|---|
| All reviews (list view) | Previous/Next review | ||
| Product and reviewer information | Moderation codes | ||
| Moderation status label | Helpfulness votes | ||
| Visual content | Approve or Reject | ||
| Responses | Comments |
Navigate between reviews
To navigate quickly through reviews:
- From the list view, select either the review title or View details.
- Within the detail view, select Next to go to the next review or select Previous to go back to the previous review.
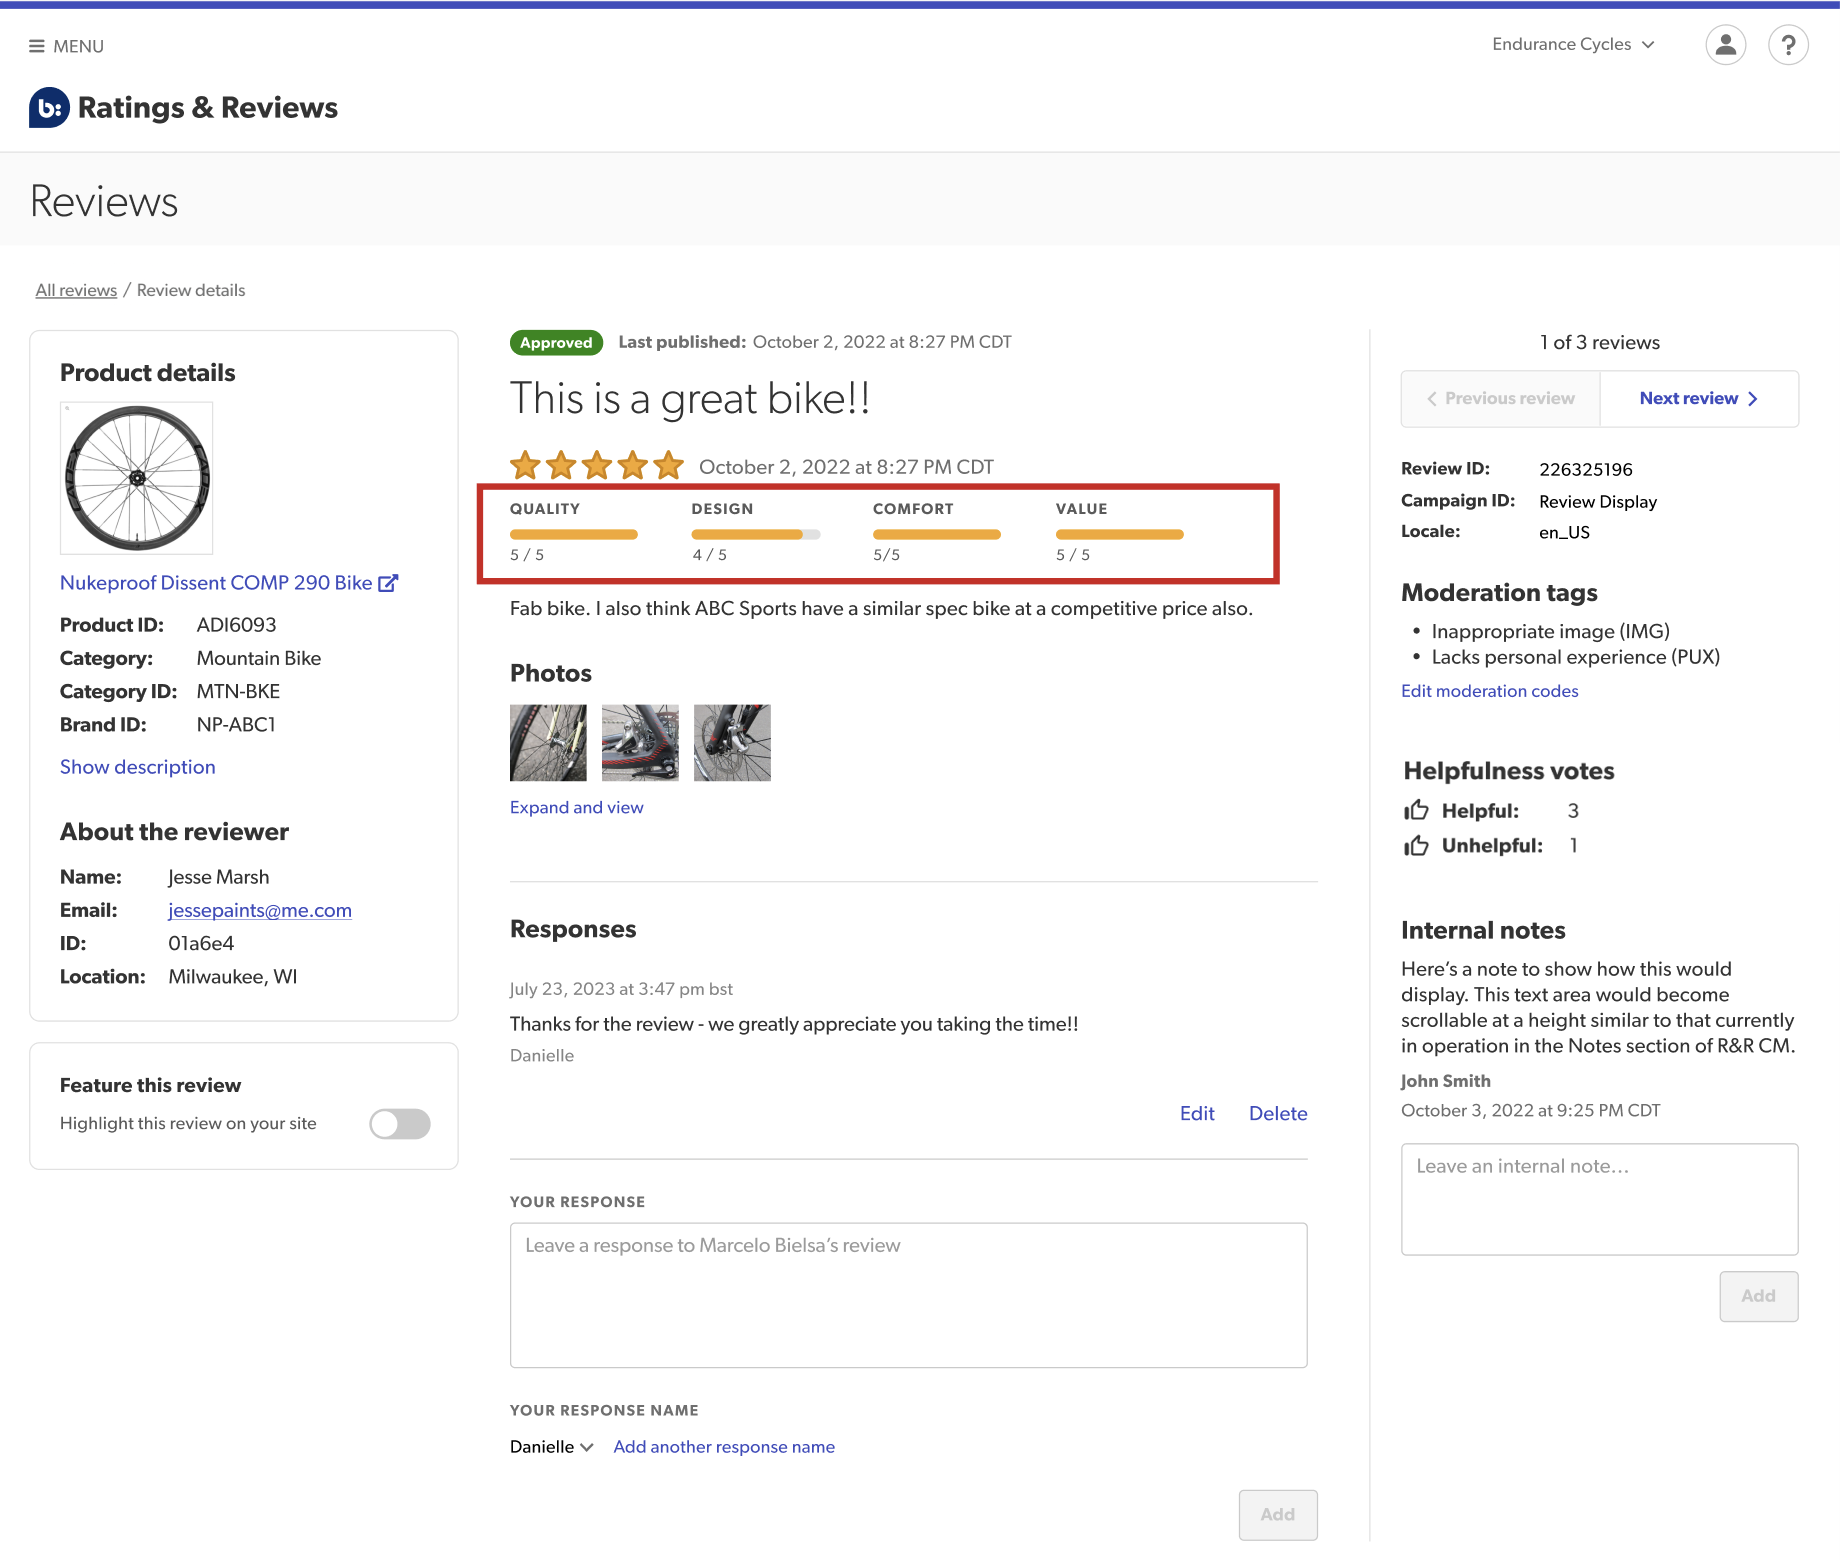
View secondary ratings
Secondary ratings provide a snapshot rating of your product’s attributes or qualities. For instance, rating attributes like quality, design, and value for money for an exercise bike can help consumers decide which bike is most suitable for their needs. Secondary product ratings appear below the review stars in the detail view, which is highlighted in the following image:
Key benefits
Secondary ratings
- Offer greater details about product qualities, which helps consumers make better purchase decisions.
- Pinpoint areas where you fall short as a brand, allowing you to improve your products.
Product-specific questions
To enable consumers to rate specific qualities of your products, add product-specific questions to your review submission form.
For example, in addition to asking a consumer to write a review, you may want them to rate your products on attributes like Comfort, Ease of use, Delivery, or Price on a standard 1-5 rating scale.
You can customize the rating slider with different rating scales, such as 1-3, 1-5, or 1-7. Additionally, you can customize the rating scale values to meet your specific requirements. For example, if you want to create a Customer Service rating slider, you can define unique rating labels like Poor, Average, and Excellent.
View visual content
If a review contains attached photos or videos, they are displayed as a link underneath the review text in the list view.
To view the content:
- Select the link. The video and photo thumbnails will appear.
- Select Expand and view to inspect the visual content.
Alternatively, you can select either the review title or View details, scroll to the photo or video thumbnails and select Expand and view.
View product details
When you select either the review title or View details to open a review, you can view information about the product itself.
The following information is displayed in the Product details panel on the left side of the review:
- Product ID
- Product category
- Category ID
- Brand ID
- Brand
- Product description. Select Show description to view.
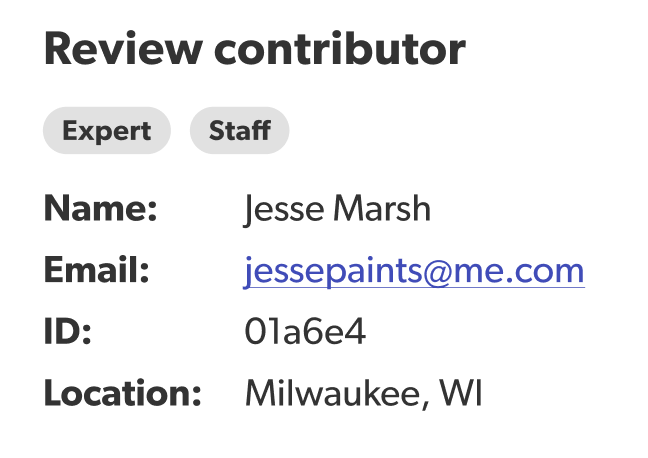
View reviewer details
Under the Review contributor panel to the left side of the review, you can view the following information:
- Contributor badge
- Reviewer name (displays if approved during the moderation process)
- Reviewer email address (redacted)
- Reviewer ID (redacted)
- Reviewer’s location (if provided)
View consumer comments
When you select either the review title or View details to open a review, you can read any comments that have been added by shoppers who have read the review.
- If any comments are attached, the number will be shown in the panel to the right of the review.
- To read the comments, select Jump to comments.
View helpfulness votes
In the panel to the right of the review, you can view the number of helpfulness votes registered by shoppers who have seen the review.
- A thumbs-up
 icon is displayed above the number of votes registered by consumers who found the review helpful.
 - A thumbs-down
 icon is displayed above the number of votes registered by consumers who found the review unhelpful.
View additional information collected through customized questions
If your review submission forms include customized questions, the additional information you collect from contributors will be listed directly below the review text in the detail view.
Respond to reviews
The way you engage with consumer reviews in public can significantly shape the perception of your brand. Offering constructive responses to negative feedback shows your commitment to customer satisfaction.
Respond to a review
When responding to a review, you must provide your department’s name. This adds credibility to your review responses.
- Select either the review title or View details to open the review.
- Read the review and enter your text in the Your response text field.
- Under Your response details, select Add details. The Add details section appears.
- Enter your Department name.
- (Optional) Enter your public display name.
 Tip: You can select any previously saved display name from the drop-down list. Newly added display names will also appear here.
 - Select Save.
- To post your public response, select Add. Your response will now appear with the review on your site.
Delete responder details
- Search for a review, filter reviews, or sort your reviews list.
- Select either the review title or View details to open a review.
- Find the responder details you want to delete from the drop-down list.
- Hover over the responder details you want to delete.
- Select the trashcan icon to delete the highlighted details.
Edit a response
After a response is posted, you can edit it.
- Search for a review, filter reviews, or sort your reviews list.
- Select either the review title or View details to open the review.
- Select Edit under the response you wish to change.
- Make your changes and select Update.
Delete a response
After a response is posted, you can edit or delete it.
- Search for a review, filter reviews, or sort your reviews list.
- Select either the review title or View details to open the review.
- Select Delete under the response you wish to remove and confirm that you want to permanently delete the response.
Add internal notes
In the Detail view, you can add notes that will be visible to your team members. Adding internal notes can be a useful way of recording your comments about the content of the review or any responses that have been posted.
To add internal notes:
- Search for a review, filter reviews, or sort your reviews list.
- Select either the review title or View details to open the review.
- Read any existing entries under Internal notes.
- Enter your note in the text field and select Add.
Contributor badges
Contributor badges are labels that highlight reviewers who have submitted significant or helpful product reviews. Your consumers are more likely to be influenced by reviews written by an Expert contributor. Badges add credibility to your product reviews.
Ratings & Reviews in Portal displays the following badge types:
-
Staff (affiliation badge)
Highlights the reviewer has an affiliation with the product or retail organization, or is employed by your company.

- Top contributor (merit badge)
Awarded to reviewers based on the quantity and helpfulness of submitted reviews. These badges are automatically calculated and applied daily.

- Top contributor—This is the highest ranking contributor badge.
- Top 10 contributor—Indicates the top 10 contributors of useful content.
- Top 25 contributor—Indicates the top 25 contributors of useful content.
- Top 50 contributor—Indicates the top 50 contributors of useful content.
- Top 100 contributor—Indicates the top 100 contributors of useful content.
- Top 250 contributor—Indicates the top 250 contributors of useful content.
- Top 500 contributor—Indicates the top 500 contributors of useful content.
- Top 1000 contributor—Indicates the top 1000 contributors of useful content.
- Expert
Highlights the reviewer has a high level of expertise or experience with your products or services.

Featured reviews
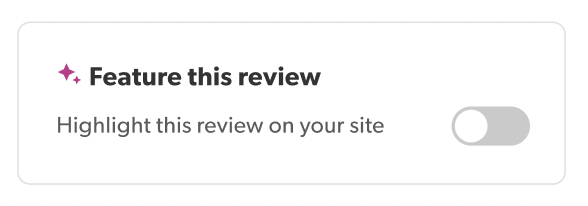
To highlight a product review that is particularly helpful to your consumers, you can mark it as  . Featured reviews will have a Featured label both in the content management solution and on your website. There is no limit to the number of reviews you can feature.
To assign a featured badge to a review:
- Sign in to the Bazaarvoice Portal .
- From the navigation bar, select Ratings & Reviews > Reviews.
- Search or filter reviews to find the review you want to feature.
- Select View details to open the review.
- In the lower-left corner, switch on the Feature this review toggle.
The Featured label appears next to the Review ID.

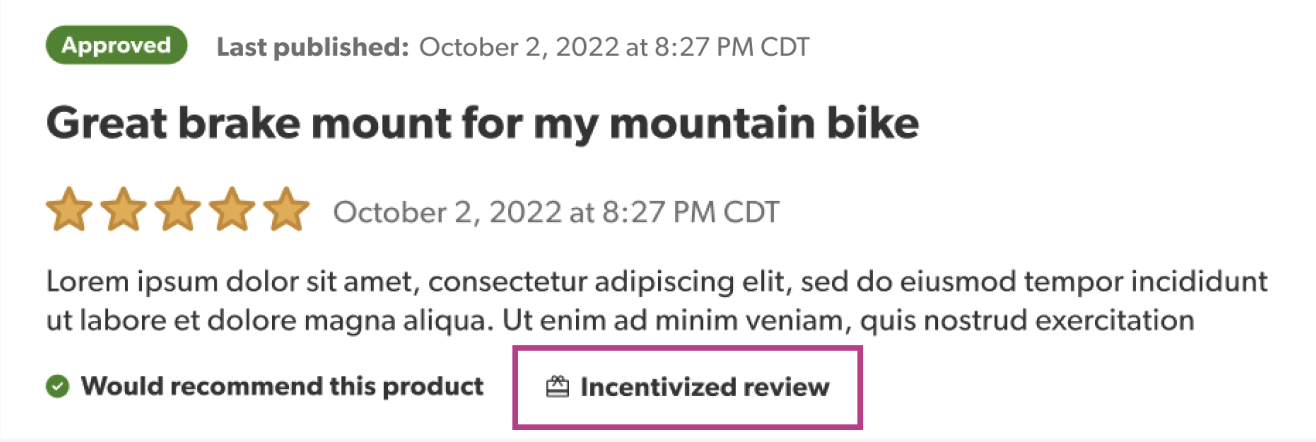
Incentivized reviews
You must inform consumers when reviews are incentivized. To highlight that a reviewer received an incentive in exchange for a review, you can add an Incentivized review icon and label. An incentive might include a free or discounted product or service, an entry into a sweepstakes, or loyalty reward points.
Bazaarvoice is committed to content authenticity. We believe consumers have a right to trust the reviews they read. Refer to the Bazaarvoice Authenticity Policy for information about content authenticity guidelines.
Moderate reviews overview
All user-generated content (UGC) in the Bazaarvoice Network goes through a rigorous moderation process. Ratings & Reviews content management allows you to see the outcome of the Bazaarvoice moderation process for each collected review.
There are some legitimate reasons to remove reviews from your site (and other sites if you have a Network distribution package). For example, you might need to remove reviews that refer to an older product version that’s no longer available.
With the Ratings & Reviews content management solution, you can:
- View which reviews were rejected by Bazaarvoice, and the reasons why
- Approve reviews
- Reject reviews
Check Bazaarvoice moderation process
Bazaarvoice recommends checking that the moderation process is working as you expect and that your content is being approved or rejected correctly.
for details of our authenticity standards.Before deciding whether the UGC was moderated correctly, use your saved filter to:
- Navigate through the reviews
- Read the text
- Inspect any visual content
Roles and permissions
To approve or reject reviews, you must be assigned the:
- Ratings & Reviews solution
- Account Administrator, Content Administrator, or Content Moderator Portal role
Learn more about Portal roles and capabilities.
Moderation status labels
Each review carries one of five moderation status labels: Approved, Rejected, Pending, Expired, or On hold.
- Status labels appear above the title of each review, both in the list view and in the details view.
- The date and time Bazaarvoice moderated the review are also shown alongside the status label.
| Status | Description |
|---|---|
| Either the Bazaarvoice moderation process has approved the review, or it has been approved in Ratings & Reviews by a member of your team. Content with this label is currently displayed on your site. If you have a distribution package, approved content is eligible for syndication to other sites in the Bazaarvoice Network. | |
| Either the Bazaarvoice moderation process has rejected the review, or it has been rejected in Ratings & Reviews by a member of your team. Content with this label is not currently displayed on your site. If you have a distribution package, rejected reviews are not eligible for syndication to other sites in the Bazaarvoice Network. | |
| The review has not yet gone through the Bazaarvoice moderation process. Content with this label is not currently displayed on your site. If you have a distribution package, pending content is not eligible for syndication to other sites in the Bazaarvoice Network. | |
| The review was once approved and displayed, but has been removed at your request. Content can expire for several reasons. One reason is that the product has significantly changed, making older reviews irrelevant. Another reason is that you prefer to display the most current reviews so consumers see the most relevant product feedback.
Note: To request the Expired status be applied to a review, you need to submit a case through
Bazaarvoice Support
.
|
|
| The review has gone through the Bazaarvoice moderation process and been officially approved. A review with this label will not be displayed on your site immediately, but on a pre-determined release date. |
Moderation codes
If you choose to self-moderate reviews, add moderation codes to indicate the specific reasons why you approved or rejected a review.
Guidelines
- Reviews rejected by Bazaarvoice moderation will always be tagged with at least one moderation code.
- You can add moderation codes to your reviews after you’ve read them and inspected any visual content.
- Moderation codes are displayed in both the list view and the details view.
- You cannot moderate an expired review.
- Once rejected, syndicated reviews will no longer appear on other sites within the Bazaarvoice Network.
Learn more about our moderation codes and process.
Approve or reject reviews (List view)
You can approve or reject a review from the list view or the details view.
To approve or reject a review from the list view:
-
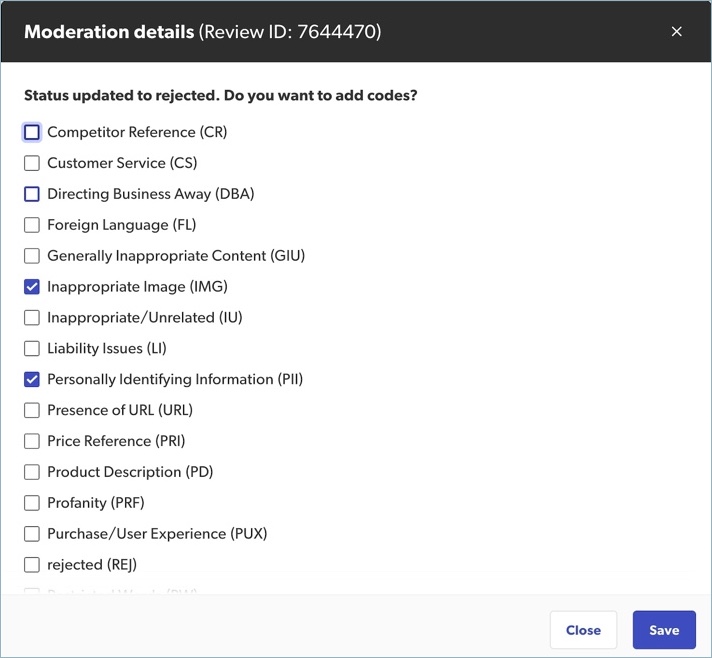
Select Moderation details on any review. The Moderation details modal appears.
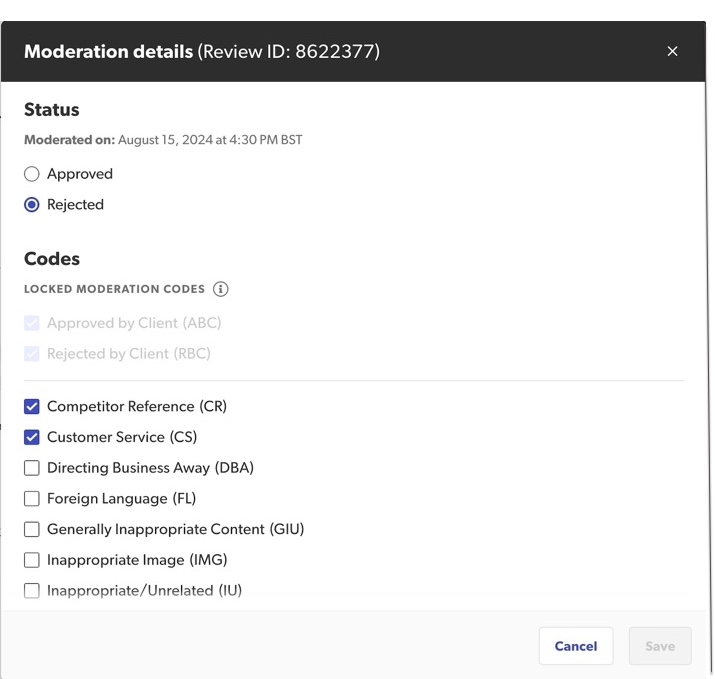
- (Optional) Select either Approved or Rejected.
- (Optional) Select the relevant moderation codes to indicate your reasons for rejecting or approving a review.
Note: You can add or update moderation codes without having to update the moderation status.
- Select Save. The moderation status updates to Approved or Rejected and the moderation timestamp is also updated.
Approve or reject reviews (Details view)
Method 1: To approve or reject a review
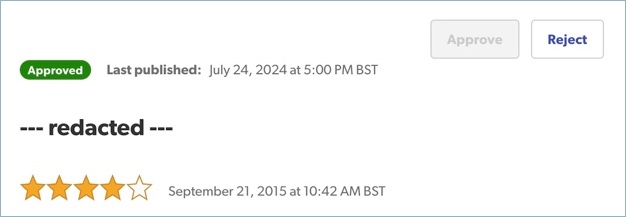
- To approve a review, select Approve in the upper-right corner above the review title.
 Note: The moderation status badge updates to Approved and the moderation timestamp is also updated.
 - To reject a review:
- Select Reject in the upper-right corner above the review title. The Moderation details modal appears.
- (Optional) Select the appropriate moderation codes to indicate your reasons for rejecting a review.
- Select Save.
- The moderation status badge updates to Rejected. The moderation timestamp also updates (whether you add moderation codes or not).
- Select Reject in the upper-right corner above the review title. The Moderation details modal appears.
Method 2: To approve or reject a review
-
Select Edit moderation codes. The Moderation details modal appears.
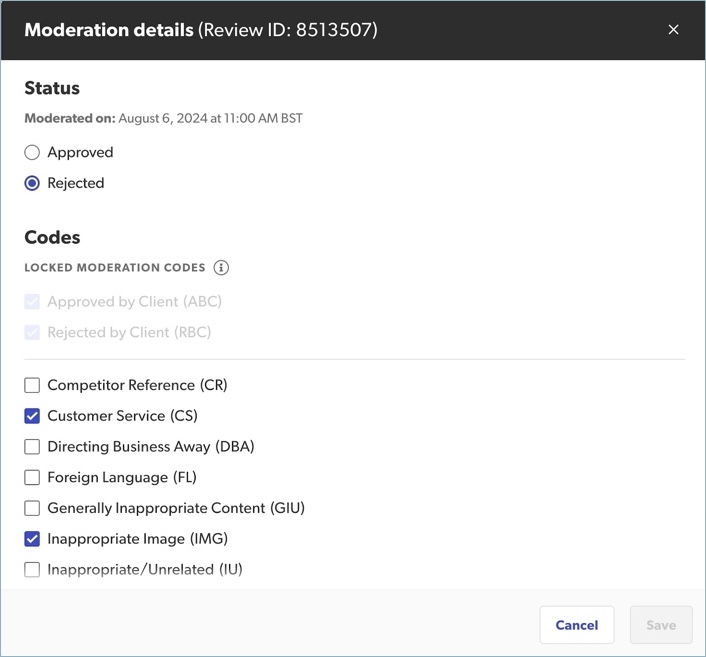
- To approve a review, select the Approved status.
- To reject a review, select the Rejected status.
- (Optional) Select the appropriate moderation codes to indicate your reasons for approving or rejecting a review.
- Select Save.
Export Ratings & Reviews content
Export your Ratings & Reviews content to help you analyze and better understand your consumer reviews. You can examine reviews from specific timeframes, specific product categories, or reviews with notably low ratings.
To export your Ratings & Reviews content, select one of the following three options:
- Export CSV file: Download a CSV file directly from the Ratings & Reviews solution. Each row in an exported CSV file is an individual review. The CSV file has a maximum capacity of 100,000 reviews.
- R&R Key Metrics report: Generate and download a CSV or XLSX file from the Reports solution.
- Data Export list: Generate and download a CSV or XLSX file from the Reports solution. The Data Export list can contain up to 1,000,000 reviews.
Best export option
Use this comparison table to work out which option best fits your needs.
| Key benefits | Export to CSV file Ratings & Reviews |
R&R Key Metrics report Reports |
Data Exports list Reports |
|---|---|---|---|
| Find common trends across your reviews | |||
| Download a quick snapshot of reviews. Capped at 100,000 reviews | |||
| Download important key metrics about your reviews | |||
| In-depth analyses of your rating and reviews | |||
| Export a large data set of reviews. Capacity 1M reviews | |||
| Receive automated daily, weekly, or monthly reports | |||
| Customize report templates to analyze specific data points | |||
| Email shareholders directly | |||
| Download format | CSV only | CSV or XLSX | CSV or XLSX |
Learn more about R&R Key Metrics or Data Exports reports.
Export to CSV
Export a snapshot of your Ratings & Reviews content to a comma-separated value (CSV) file. Open the CSV file in a spreadsheet for analysis and share this information with colleagues. For example, you might want to download a list of reviews that received extremely low ratings.
To export reviews:
- Select Export
 in the upper-right corner of the page.
Tip: Before exporting, use filters to narrow the size and focus of your review list.
in the upper-right corner of the page.
Tip: Before exporting, use filters to narrow the size and focus of your review list. - Select Export to CSV. A progress spinner indicates that the download is in progress.
Caution: Don’t navigate away from Ratings & Reviews during the download. You can continue working in the solution.
- When the export is complete, the CSV file is saved to your default downloads folder.
Watch this video for a quick walkthrough of exports.
CSV file
There are two types of column headers in the CSV file:
- Fixed column headers: These column headers are static and will always appear in a specific order in the exported CSV file. They hold important information about each product review.
- Dynamic column headers: These column headers can vary by review. As the CSV file is downloaded, these columns will be inserted dynamically to include any custom data relevant to product reviews.
Fixed CSV columns
The following fixed data is included in every Ratings & Reviews CSV file:
| CSV column name | Workbench column name | Description |
|---|---|---|
| Review ID | Review ID | Unique identifier for a review |
| Submission date | Submission Date | Date the review was submitted |
| Initial publish date | Initial Publish Date | Date the review was published |
| Moderation status | Moderation Status | Accepted, Rejected, Pending, or Expired |
| Review title | Review Title | Title of a consumer review |
| Review text | Review Text | Contents of a review. For example, "Love my new sports watch! Happy with my purchase." |
| Overall rating | Overall Rating | The overall average rating for a product |
| Ratings-only review | Is a Ratings-Only Review | Reviews with a rating but no review text. Value: Yes or No |
| Product ID | Product id | Unique identifier for a product in your product catalog |
| Product name | Product Name | Name of product in your product catalog |
| Product status | Not available in Workbench | Status of product. Value: Active or Inactive |
| Product description | Not available in Workbench | Description of product |
| Product image URL | Not available in Workbench | URL or link pointing to the webpage hosting the product image |
| Product brand name | Product brand | Product brand. For example, Nike or Heinz |
| Category ID | Category ID | Unique identifier for a product category |
| Category name | Category | Name of product category. For example, Toys |
| Top level category | Top Level Category | Name of first product category in the category hierarchy. For example, in the hierarchy Women > Accessories > Watches, the top level category would be Women |
| Top level category ID | Top Level Category ID | Unique identifier for the top level product category. Hierarchy of product categories. For example, Food & Beverages > Beverages > Drink Mixes |
| Staff badge | Staff Badge | Shows whether the reviewer is employed by or affiliated with your company |
| Expert badge | Expert Badge | Shows the reviewer has a high level of experience with your products or services |
| Top contributor | Merit Rank | Shows the reviewer is a top contributor of useful content |
| Character count | Not available in Workbench | Shows how many characters are in both the review title and text combined |
| # Comments | # of comments | Total number of approved, rejected, and pending comments |
| # Approved comments | # of Approved Comments | Number of comments approved by moderation |
| # Pending comments | # of Pending Comments | Number of comments with the Pending status |
| # Rejected comments | # of Rejected Comments | Number of comments rejected by moderation |
| # Inappropriate votes | # of Inappropriate Votes | Number of inappropriate votes on approved reviews |
| # Helpful votes | # of Helpful Votes | Number of helpful or positive votes on approved reviews |
| # Not helpful votes | # of Not helpful votes | Number of unhelpful or negative votes on approved reviews |
| Would recommend | Not available in Workbench | Reviewers that answered Yes to the question "Would you recommend this product to a friend?". Value: Yes or No |
| Locale | Locale | Locale where the review was submitted |
| Display code | Display Code | Bazaarvoice display code used to show Ratings & Reviews content on product pages |
| Product page URL | Product Page URL | Link to the product page on your website |
| Campaign ID | Campaign ID | Unique number used to identify a product sampling campaign. |
| Featured review | Featured Badge | Indicates review contains helpful content. Review is highlighted with a Featured label |
| Incentivized review | Incentivized Review | Highlights that a reviewer received an incentive in exchange for this review |
| # Photos | Not available in Workbench | Number of attached photos for an approved review |
| # Videos | Not available in Workbench | Number of attached videos for an approved review |
| Video 1 | Video 1 | URL or link pointing to the webpage hosting the first product video If multiple videos are submitted, additional dynamic headers like Video + number will identify each subsequent video Note: If there are no videos associated with a batch of reviews, the Video column will not appear in the export file.
|
| Photo 1 | Photo 1 | URL or link pointing to the webpage hosting the first product photo If multiple photos are submitted, additional dynamic headers like Photo + number will identify each subsequent photo Note: If there are no photos associated with a batch of reviews, the Photo column will not appear in the export file. |
| # Responses | Not available in Workbench | Number of responses to an approved product review |
| Client response 1 | Client Response 1 | Contents of a client’s first response to a review Note: If multiple client responses are submitted, additional dynamic headers like Response + Number will identify each subsequent response.
|
| Response department 1 | Response Department 1 | First department name entered when responding to a review |
| Response name 1 | Response name 1 | Public display name of individual who responded to an approved review |
| Consumer comment 1 | Not available in Workbench | First consumer comment associated with a review |
Dynamic CSV columns
These columns in the CSV file can hold custom information collected from reviewers. For example, you can ask about the Quality, Value, or Ease of Use of a new coffee machine that you just launched.
The following are possible dynamtic headers included in a CSV file:
| CSV column name | Workbench column name | Description |
|---|---|---|
| Custom question answers aka Context Data Values (CDVs) |
Custom questions | Additional information about reviewers who use your products. For example, Gender, Age range, or Body type |
| Secondary product ratings | Secondary ratings | Optional star ratings that relate to different aspects of a product. Default qualities include Quality, Value, or Ease of use |
| Tag properties | Tag properties | Optional review tags such as sound, quality, or price Note: Review tags are used to highligh product strengths (pros), weaknesses (cons), or notable features on your website.
|
| Custom properties answers | Custom properties | Indicates reviewers’ product-specific issues. For example, Clothing fit, Durability, Appearance, and Usability |
| Product attributes | Product attributes | Product catalog attributes, such as Model number or ISBN |
| Video #2 | Video #2 | URL or link pointing to the webpage hosting the second and all other product videos |
| Photo #2 | Photo #2 | URL or link pointing to the webpage hosting the second and all other product photos |
| Client response #2 | Client response #2 | Contents of a client’s second response to a review. |
Workbench export versus Portal export
The following data is not available in Workbench export but is included in the Portal Ratings & Reviews export:
- Product status
- Product description
- Product image URL
- Would recommend
- # Photos
- # Videos
- # Responses
The Portal Ratings & Reviews export currently does not include any of the following:
- Reviewer contributor details. This data can be found in Portal > Reports.
- Review authorization source
- Review published email
- Review commented email
- Client comments (Internal notes in Manage Content)
- # of comments with photo
- # of comments with video
- Originating domain
- Moderation codes
- Session parameters
- Response type 1
Common export questions
Question: Why does my export stop when I leave the Ratings & Reviews page?
Answer: The export download may stop if you close the Ratings & Reviews page as this interrupts the reports generator connection. Make sure you keep the Ratings & Reviews tab open until the download finishes.
Question: Can I work in other tabs or apps while waiting for export download to complete?
Answer: Yes. You can also continue working in Ratings & Reviews. Make sure the Ratings & Reviews tab remains active until the export finishes.
Question: Why is the CSV export capacity limited to 100,000 reviews?
Answer: To make sure that this functionality consistently performs well, we’ve set a cap of 100,000 reviews for CSV exports. Workbench currently allows a maximum of 65,000 reviews.