Workbench overview
Use our new Ratings & Reviews solution in Portal to manage your user-generated content. Refer to the following resources:
- Video: Ratings & Reviews quick tour

- Knowledge Base: Ratings & Reviews content management in Portal
The new Questions & Answers (beta) content management solution is also available in Portal. In the current beta phase, functionality is limited to searching, sorting, viewing, and moderating content.
What is Workbench?
Bazaarvoice Workbench is a secure hub where you can monitor, analyze, and interact with the user-generated content (UGC) created on your site.
- Discover both consumers’ positive and negative impressions about your products or brands.
- Engage with your consumers and address their concerns on time.
.At a glance, you can use legacy Workbench to:
- View and manage content, such as Questions & Answers
- Respond directly to contributors
- Verify the work of Bazaarvoice moderators
- Create and manage reports
- Set up alerts for specific events, such as an increase in the number of product questions
- Manage users and their permissions
Sign in to legacy Workbench
- Sign in to the Bazaarvoice Portal .
- From the navigation bar, select More > Workbench.
- Select your instance from the drop-down menu.
Tip: Depending on your level of access, choose between signing in to your staging or production environment.
- Select Go to Workbench.
Explore Workbench
If you’re new to Workbench, start with the main menu in the upper-left corner. The other resources on the landing page provide quick links to features in the menu or summarize recent UGC activity and Bazaarvoice news.
Workbench has the following layout:
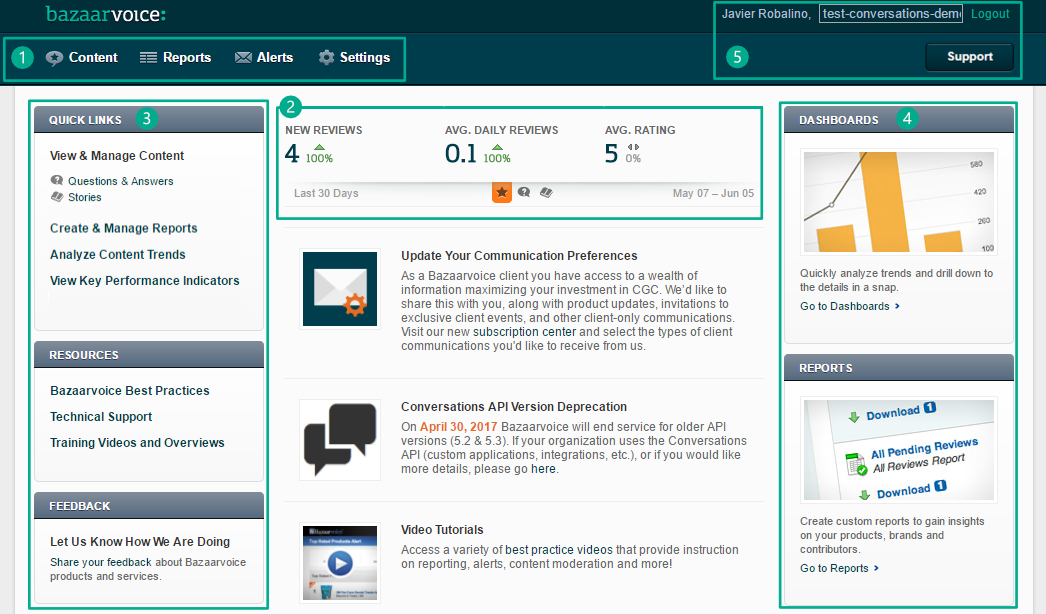
- Provides access to the majority of the Workbench features.
- Provides summaries of UGC activity for each type of content.
- Provides links to commonly used tools and resources.
- Provides links to change your language, switch accounts, or access the support portal.
Manage content
One of the main features of legacy Workbench is the ability to view and interact with your UGC. You can:
- Explore details for individual UGC
- Respond to contributor submissions
- Migrate content from one product to another
- Share content across different products
- Learn what consumers are saying about your products, and use this feedback to inform future business decisions and increase conversion
- Address negative questions or confusion about your products by responding to your contributors in a timely manner
Refer to the following resources for our new Ratings & Reviews content managment solution:
- Video: Ratings & Reviews quick tour
- Knowledge Base: Ratings & Reviews content management in Portal
View your content
Using Workbench you can view or search through all the UGC on your site. Search filters are particularly powerful because they allow you to narrow the content down to just what you’re looking for. For example, you can search for unanswered questions received for products over the past week, and then respond to the relevant contributors.
To view and search your UGC:
- Sign in to Workbench.
- Select Content > Manage Content and then select the product you want to view the content for (such as Questions & Answers).
- Filter your view to relevant content. You can filter by:
- Date
- Keyword
- Product information, such as brand, category, ID, product attributes, or product status
- Contributor information
- Content information
- Moderation information, such as whether the content has been approved or what moderation codes have been applied to it
- (Optional) After you apply your filters, select Save View to add the view to the dropdown menu for repeated use.
- (Optional) Select Word Cloud to display common words and phrases used in your UGC.
When viewing content, you can filter on campaign sources, which are particularly useful because they indicate how the content was collected. For example, when a user selects a “Write a review” link in the rating summary on a product display page (PDP), the campaign source is Rating Summary and the campaign ID is BV_RATING_SUMMARY. Here is a list of all campaign sources (IDs) provided by the system. If an ID maps to a Campaign Source filter, it is also listed here.
| Campaign ID | Campaign Source | Description of submission source |
|---|---|---|
| BV_RATING_SUMMARY | Rating Summary | Rating summary block |
| BV_REVIEW_DISPLAY | Review Display | Review display |
|
BV_MOBILE_RATING_SUMMARY |
Rating summary block in mobile format | |
| BV_MOBILE_REVIEW_DISPLAY | Review display in mobile format | |
| BV_QA_PORTAL_ANSWER_MANAGEMENT | AMT | Answer portal |
| BV_QA_BRAND_ANSWERS | Brand Answers | Brand answers |
| BV_APO | Ask a Product Owner | Ask Product Owners feature |
| BV_PIE | Bazaarvoice Review Requests (formerly post-interaction email or PIE) | Review requests that link to a single product submission form |
| BV_PI_TEXT | Bazaarvoice Review Requests by Text Message | Review requests that link to a multi-product submission form |
| BV_PI_TEXT_FOLLOWUP | Bazaarvoice Review Request Reminders by Text Message | Review requests that link to a multi-product submission form |
| BV_PIE_MPR | Bazaarvoice Review Requests | Review requests that link to a multi-product submission form |
| BV_PIE_FOLLOWUP | Bazaarvoice Review Request Reminders | Review request reminders that link to a single product submission form |
| BV_PIE_FOLLOWUP_MPR | Bazaarvoice Review Request Reminders | Review request reminders that link to a multi-product submission form |
| BV_SOCIAL_ALERT | Bazaarvoice Social Alert Email | Rejected review email messages having 'Submit something new' button |
| BV_EDIT_REJECTED_REVIEW | Bazaarvoice Review Resubmission Email | Edit rejected review (review resubmission) email message |
Interact with your content
Once you identify the content you want to work with, you have a few options. You may want to carry out common tasks such as responding to unanswered questions, addressing contributors’ complaints publicly or privately, or reviewing why Bazaarvoice moderators rejected certain questions.
To interact with your content:
- Select the check box next to any content item, such as a question or answer. This allows you to Approve or Reject the selected content.
- To create a report of the selected content, Select Export. Alternatively, Select Export All to create a report of all content.
- Select the title of any individual piece of content to view the details for that item in a pop-up window.
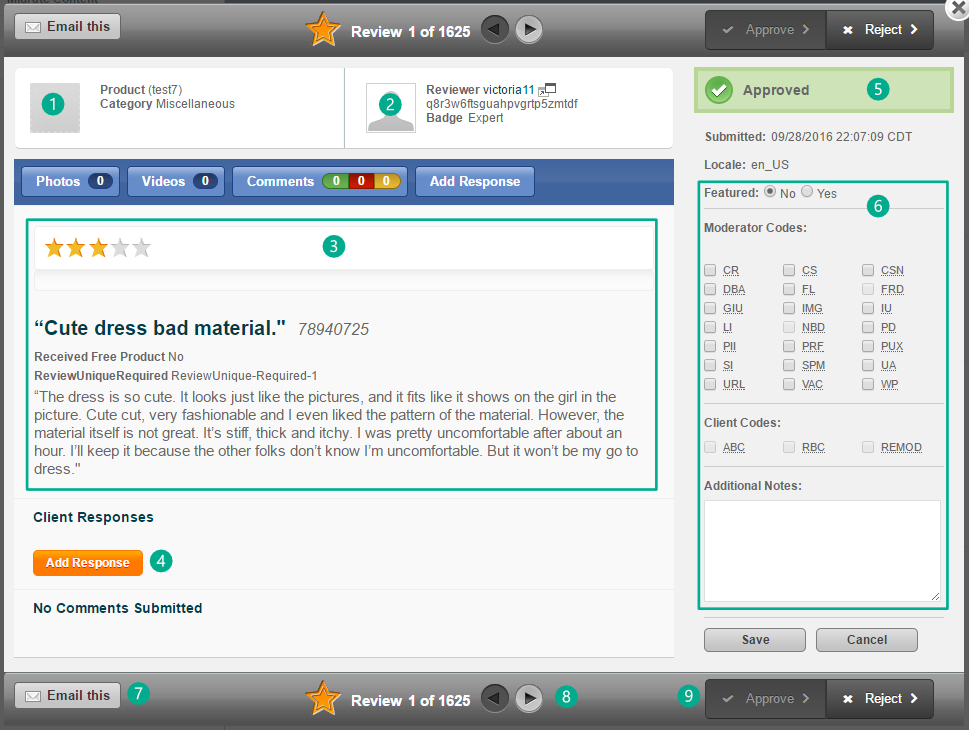
- View the product ID and other product information associated with the content.
Tip: You can select the product link to open the product details page.
- View contributor information, which may include an email address that you can use to correspond directly with the contributor.
- View the content submitted by the contributor, in addition to the content ID.
- Post a public response to the contributor.
- View moderation status and date submitted.
- Review the moderation codes applied to the content during Bazaarvoice moderation and select whether the content should be featured.
Tip: Hover over the moderation codes. If your administrator has assigned you the proper permissions, you can apply or overwrite moderation codes yourself. However, the general best practice is to accept the selections made by the Bazaarvoice moderators. If you find that you often disagree with how content is classified, contact Bazaarvoice in order to revisit your moderation guidelines.
- Email the content to other members of your team.
- Browse backwards and forwards through the content.
- Approve or reject the content. Similar to moderation codes, the general best practice is to accept the selection made by the Bazaarvoice moderators. If you find that you often disagree with how content is classified, contact Bazaarvoice in order to revisit your moderation program.
Migrate content
At times, you may want to migrate existing content from one product to another, such as when the ID of a product changes. You can accomplish this task within Workbench:
- Sign in to Workbench.
- Select Content > Migrate Content.
- Select the type of content you want to migrate (such as Ratings & Reviews).
- Enter the information that identifies either a single piece of content that you want to migrate or the content for an entire product.
Tip: You can obtain this information by going to Content > Manage Content and viewing the details of a specific content item.
- Enter the information that identifies the product you want to move the content to.
- Select Next to view a summary of your changes.
- Select Migrate to apply the migration.
Share content between products
You can group products into families to share content among them. This strategy makes sense when product variants have different product IDs but should otherwise share reviews. For example, a review submitted for a black vacuum cleaner is also relevant to the red version of the vacuum cleaner.
To group products into families:
- Sign in to Workbench.
- Select Content > Manage Families.
- Select Add New Family to open a pop-up editor window.
- Enter a name for your product family.
Caution: Spaces are not allowed in product family names.
- Add products to the family.
Tip: Select the Expand check box next to a product to display reviews from other products in the family on that product's display page. Clear the Expand check box to exclude reviews from product family members. When you clear the Expand check box, the product still shares its reviews with product family members that have the Expand box enabled.
- When you have finished entering products, select the X button to close the editor window.
Respond to questions
The new Questions & Answers (beta) content management solution is also available in Portal. In the current beta phase, functionality is limited to searching, sorting, viewing, and moderating content.
- Sign in to the Bazaarvoice Portal.
- Select Workbench.
- Select an instance.
- Select Go to Workbench.
- Select Content > Manage Content > Questions & Answers.
- Select the question which requires a response, and then select Show Details > Answer Question.
- If this is the first time you’re responding to a question using the answer management tool, you will be prompted to enter your nickname.
-
Select Save.
Note: Your response to the questions will now display the chosen nickname on your site.
Reject a nickname
You will need to reject the profile nickname associated with that contributor role.
To reject the profile nickname:
- Sign in to Workbench.
- Select Content > Profiles.
- Filter your search by contributor ID, contributor nickname, or use a general keyword search.
- Select Get Profiles to view the list of profiles.
-
Select the profile you would like to reject, and select Reject.
Note: When the contributor uses their same email address to submit a review or question, they will now be prompted to enter a new nickname.
View key performance indicators
If you need to report on how your UGC is performing, the executive summary is a useful tool for presenting this data.
Workbench provides an executive summary that lists key performance indicators for each of your products, displayed in a convenient table that you can access at any time. Performance indicators, such as the number of unanswered questions and the average number of questions answered daily, can help you track how your UGC is performing over the past 7, 30, or 60 days in relation to your cumulative totals.
To view the executive summary:
- Sign in to Workbench.
- Select Content > Executive Summary and then select a product (such as Questions & Answers).
Create alerts
Alerts help you monitor potential issues and respond to them quickly. Alerts generate emails with relevant information on a scheduled or as-needed basis. By skimming an email, you can easily stay informed about UGC data important to you, such as the list of your best- and worst-performing products. When a high-priority issue arises, such as a legal or customer service issue, an alert can immediately notify the relevant parties so that they can take appropriate action.
There are two types of alerts:
Recurring—These alerts arrive in your inbox on a regular schedule and summarize information that you want to track on an ongoing basis. Recurring alerts track overall ratings and trends rather than single events. Examples of recurring alerts include:
- A quarterly email that lists products with the most-improved ratings.
- A monthly email that lists brands with the most reviews.
- A weekly email that lists products with the most unanswered questions.
- A daily email that lists products with ratings that have fallen below three stars.
Event Triggered—These alerts arrive in your inbox whenever certain conditions are met. Event-triggered alerts track individual post-moderation events rather than overall ratings and trends. Examples of event-triggered alerts include:
- An email sent to product managers every time a product receives a one- or two-star review (and has passed moderation).
- An email sent to the customer service team when a moderator indicates that a review describes a customer service or shipping issue.
- An email sent to the legal team when a moderator indicates that a review describes a legal liability issue.
- An email sent to product managers whenever a question or answer is posted for a specific category.
View existing alerts
- Sign in to Workbench.
- Select Alerts > View All Alerts.
View your existing alerts in the table (if you do not see a table, then your account does not yet contain alerts). From the alerts table, you can:
- Select the link in the Alert Name column to view the current alert settings, including the conditions for the alert and the configured recipients. You can also edit alert settings or add more items to the alert.
- Select the message icon in the Action column to generate the alert report and send it to the configured recipients.
- Select the delete icon to remove an alert.
Note: This action does not disable an alert—it deletes it. If you want to bring the alert back at a future date, you have to recreate it.
Create a recurring alert
- Sign in to Workbench.
- Select Alerts > Create a New Alert.
- Select Recurring.
- Select Continue.
- Configure the following information:
Field Description Alert Name The alert name that displays in the alerts table. The subject line of the email message delivered by this alert also uses this name unless you enter a custom email subject in the corresponding field. Recipients Enter one email address in each line. Custom email subject (Optional) If you provide a value for this field, the email message uses this value in the subject line. Otherwise, the email message uses the alert name in the subject line. Personal message (Optional) If you provide a value for this field, this text displays at the beginning of the email message. Frequency Select to send the email on a daily, weekly, monthly, or quarterly cadence. In addition to the frequency, select the day of the week to run the alert. Only send interesting results Enable this check box if you only want to send email messages whenever the alert has at least one result that is different from the results of the previous alert. For example, you may not want to receive a daily email summarizing the products with the most unanswered questions if the product list is the same as the day(s) before. Include product images Display product images in the email message (only applies to alerts that contain product results). - Select Add Alert Items.
- Select the content type (Ratings & Reviews or Questions & Answers) for the alert and what the alert item should track (product, brands, categories, or questions).
- Select an alert type. The available alert types vary depending on the content type you select. Some examples include Most Improved Rating for Ratings & Reviews, and Most Unanswered Questions for Questions & Answers.
- Configure filters for the alert. The available filters vary based on the alert type you select. Some examples include filtering by rating, moderator code, categories, brands, and time frame.
- Select Add Alert Item And Return to complete the alert or select Add Alert Item And Continue Adding to add additional alert items to the alert.
Tip: You can add more than one alert item to the same alert. In this way, you can receive summaries of multiple items within the same email. For example, the same weekly email can list your top-rated products, lowest-rated products, and products with the most unanswered questions.
After you configure the alert, it is listed in the alerts table.
Create an event-triggered alert
- Sign in to Workbench.
- Select Alerts > Create a New Alert.
- Select Event Triggered.
- Select Continue.
- Configure the following information:
Field Description Alert Name The alert name that displays in the alerts table. The subject line of the email message delivered by this alert also uses this name unless you enter a custom email subject in the corresponding field. Recipients Enter one email address in each line. Custom email subject (Optional) If you provide a value for this field, the email message uses this value in the subject line. Otherwise, the email message uses the alert name in the subject line. Personal message (Optional) If you provide a value for this field, this text displays at the beginning of the email message. Twitter (Optional) Connect a Twitter account to automatically post compelling content on Twitter whenever this alert runs. Note: Content shows as posted on TweetConnect, with a link describing that application.Choose content Select all the content types that you want to track events for using the alert. Display Potentially Sensitive Information Enable this check box to show decrypted personally identifiable information (PII) in the email message generated by the alert. - Select Save & Continue.
- Configure filters for each content type you enabled on the alert. The available filters vary based on the content type you select. Some examples include filtering by rating, moderator code, categories, brands, and time frame.
Note: This page includes a check box that enables post-moderation alerts for moderation codes added outside the Bazaarvoice moderation process. By default, event-triggered alerts check the conditions of the alert only once (right after Bazaarvoice moderation occurs). However, you can apply your own moderator codes after Bazaarvoice moderation. This means that if your alert includes filters for the codes you intend to apply, the alert will never fire unless you enable this option.
Therefore, if you want the alert to filter for moderation codes that you will apply after the Bazaarvoice moderation process, enable this option. However, note that you may not want to select this option if you are sending or creating tickets in another system because you may end up duplicating issues. - Select Save & Continue.
Recommended alerts
If you do not already have a strategy for which alerts to create, Bazaarvoice recommends that you create the following alerts to get started:
| Name | Description | Frequency | Recipients | Follow-up |
|---|---|---|---|---|
| Customer Service issue | Filters for the "CS" or "SI" moderator codes. | Event-triggered (immediate) | Customer Service | Find the consumer's email address in Workbench and respond to the consumer's question or concern. |
| Liability issue | Filters for the "LI" moderator code. | Event-triggered (immediate) | Manager, Customer Service, or Legal | Work with Legal on next steps. |
| Top 25 Products | Filters for the top 25 highest-rated products. | Recurring (weekly) | E-commerce team, Executive stakeholders, Buyers, Product Managers, and In-store Managers | Identify products whose ratings are quickly rising or falling. |
| Movers and Shakers | Filters top 15, bottom 15, fastest-rising, and fastest-falling products. | Recurring (weekly) | E-commerce team, Executive stakeholders, Buyers, Product Managers, and In-store Managers | Set up marketing initiatives to promote products favored by customers. |
Manage users
If you have administrator privileges, you can create users and manage their permissions to fit your business process. For example, you can make some users administrators with access to modify settings and applications, while limiting other users to reviewing and responding to the content submitted on your site.
With administrator privileges, you can view user details, make changes to user accounts, and deactivate accounts.
- Sign in to Workbench.
- Select Settings > User Settings > Manage Users.
- Your browser redirects you to Portal, where account management takes place.
- Refer to the Users and permissions topic in the Portal knowledge base to learn how to manage users.
Tip: You specify Ratings & Reviews and Questions & Answers roles separately from other Portal roles. Refer to the Ratings & Reviews / Questions & Answers section of the topic for details.
Manage contributors
Designated contributors can respond to reviews, questions, or comments on your website. Contributors provide accurate and helpful information to help consumers make informed decisions.
- Consumers are more likely to trust answers from verified staff members or industry experts.
- Badges add credibility to your product reviews.
- A contributor can have one or more badges.
Contributor badges
Contributor badges are labels that highlight reviewers who have submitted significant or helpful product reviews. These reviews are associated with a user’s Contributor ID. Contributor badges also appear on comments left by that user, including comments on other users’ reviews.
You can assign one or more of the following contributor badges:
| Badge type | Badge (default) | Description |
|---|---|---|
| Staff (affliation) | The contributor is an employee or staff member from your company. | |
| Expert (rank) | The contributor is an industry or product expert. | |
| Merit (top contributor) | The contributor is eligible for a merit (top contributor) badge. When enabled, merit badges are automatically calculated each day and applied to contributors based on the quantity and helpfulness of their content submissions. |
Create new contributors
- Sign in to the Bazaarvoice Portal .
- From the navigation bar, select More > Workbench
- Select your instance from the drop-down menu.
- Select Go to Workbench.
- Select Settings > Contributor Settings > Assign Contributor Roles.
- Enter the User IDs (contributor IDs) for the users you want to assign as contributors. User ID’s are required to authenticate contributors.
Note: You must create the contributor user ID; it's not generated by Bazaarvoice. Here are some guidelines. You can create up to 5,000 IDs at a time.Note: If you use Site Authentication instead of Hosted Authentication to confirm a user’s identity, you should enter an existing ID from your own database as the contributor ID.Tip: To find existing user IDs (contributor IDs), refer to Find existing contributors.
- From the Assign User IDs to the following staff status drop-down list, select a suitable status. The available options are:
- Staff status
- No staff status
- No Changes in staff status
- From the Assign User IDs to the following expert status drop-down list, select a suitable status. The available options are:
- Expert status
- No expert status
- No Changes in expert status
- From the Assign User IDs to the following merit status drop-down list, select a suitable status. The available options are:
- Merit status
- Not eligible for merit status
- No changes in merit eligibility.
- From the Hyperlinks drop-down list, select whether the contributor can Include hyperlinks in their answers. The available options are:
- Cannot include hyperlinks
- No changes
- Select Preview to review your changes.
- Select Assign.
Contributor user ID guidelines
When creating a contributor user ID, follow these guidelines:
- Format:
- The ID should be unique for each contributor.
- The ID can be up to 255 characters in length and can include letters, numbers, and special characters.
- Letters can be both uppercase and lowercase.
- Consistency:
- Maintain a consistent pattern or structure for IDs to make them easier to manage.
- Avoid using spaces or unsupported characters that might cause issues in databases or systems.
- Examples:
- Valid IDs: User1234, Staff#0006
- Invalid IDs: User 123 (contains a space), Staff@#001$%^&*() (might contain unsupported characters in some systems)
Assign an answer contributor ID
The Answer Contributor ID (also known as the contributor user ID), is required to authenticate contributors responding to questions using the Workbench Answer Management tool.
To assign an Answer Contributor ID:
- Sign in to the Bazaarvoice Portal.
- From the upper-right corner, select the settings icon.
- Select Manage Users.
- Select a username. The Edit user page displays.
- Scroll down to Workbench Permissions.
- Select either the Staging or Production environments.
- Under the Role section, select a role that permits response capabilities for each Ratings & Reviews (Workbench) or Questions & Answers (Workbench) instance.
Note: The following Workbench roles have answer management capabilities: User, Responder, or Administrator.
- Select Edit to enter the Answer Contributor ID for each site instance.
Note: You will have created an answer contributor ID (user ID) when you set up a new contributor.Tip: To find an existing answer contributor ID (user ID), search Workbench under Content > Profiles. Refer to Find existing contributors.
- Enter the user’s answer contributor ID for each production site.
Note: You will have created the contributor user ID when adding new contributors in Settings > Contributor Settings > Assign Contributor Roles. This user ID is not generated by Bazaarvoice. Here are some guidelines for creating a contributor user ID.
- Select Save.
Modify contributors
- Sign in to Workbench.
- Select Settings > Contributor Settings > Modify Contributor Roles.
- Filter contributors by user ID, nickname, or badge (staff, expert, merit) status.
- Select Search.
- Select the user ID for the contributor you want to modify.
- Modify the contributor’s staff, expert, merit status or hyperlink eligibility.
- Select Save.
Find existing contributors
To find an existing contributor:
- Sign in to Workbench.
- Select Content > Profiles.
- Filter your search by Contributor ID, Contributor nickname, or use a general keyword search.
- Select Get Profiles to view the list of profiles.
- Select the profile you would like to view.
Manage configuration settings
Navigate to the Bazaarvoice Portal to manage configuration settings for your applications, product catalog, BV Pixel, and other essential elements.
To access Configuration:
- Sign in to the Bazaarvoice Portal .
- From the upper-right corner, select the settings icon
 .
. - Select Configuration.
- Select the instance and Go to Configuration. The Site Manager appears, listing the available deployment zones and implementations.
- From the Implementations section, select Edit next to the implementation you want to configure.
Generally, your implementation team helps you configure these settings before your go-live date, but you can refer to the following topics if you want to revisit these settings or learn more about the process: